DHCP and Remote Access Overview
When a remote computer connects to a remote access server (RRAS), it is automatically provided with an IP address when the Point-to-Point Protocol (PPP) connection is established.
You can configure the RRAS server to allocate IP addresses to remote clients from:
- A static range of IP addresses: This method is usually implemented when there are no internal DHCP servers.
- An existing DHCP Server: This is achieved by relaying clients to the DHCP server for IP address allocation.
If you have an internal DHCP server, you should configure the remote access server to allocate IP addresses via this server. If your DHCP server is not within broadcast range of the RRAS server, you must perform the one of the following configuration as well:
- Configure the DHCP Relay Agent on the remote access server.
- Configure the DHCP Relay Agent on the same subnet as the remote access server.
The DHCP Relay Agent enables DHCP clients to obtain IP addresses from a DHCP server on a remote subnet. The router will drop DHCP broadcast messages if it is not configured to forward them, and no DHCP Relay Agent exists. To enable clients to obtain IP addresses from a DHCP server on a remote subnet, you have to configure the DHCP Relay Agent on the subnet that contains the remote client, so that it can relay DHCP broadcast messages to your DHCP server.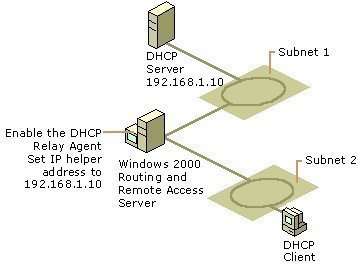
If the remote access server is configured to obtain IP addresses from a DHCP server, to distribute these IP addresses to clients, the following process occurs:
- When the remote access server starts for the first time, it obtains a block of IP addresses from the DHCP server.
- The first IP address is used for the remote access server.
- The remainder of the IP addresses, the remote access server distributes to all TCP/IP based remote access clients during the PPP connection establishment process.
- When the remote access server needs over 10 IP addresses, it obtains additional blocks of 10 addresses.
- If the DHCP server was unavailable when the remote access server started, the remote access server assigns its own IP address through Automatic Private IP Addressing (APIPA).
Configuring the RRAS server to use the DHCP server option
To configure your RRAS server to use the DHCP server to obtain IP addresses to distribute to remote TCP/IP clients, you need to perform the following steps:
- Configure the DHCP Relay Agent on the remote access server, or on the same subnet.
- Configure the RRAS server to allocate IP addresses via the Dynamic Host Configuration Protocol (DHCP) option.
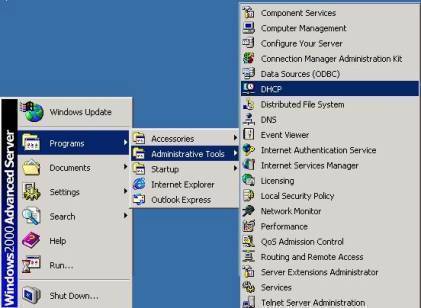
To install and configure the DHCP Relay Agent,
- Click Start, All Programs, Administrative Tools and then click Routing and Remote Access to open the Routing And Remote Access console.
- Expand the IP Routing node in the console tree, right-click the General node, and then select New Routing Protocol from the shortcut menu.
- When the New Routing Protocol dialog box opens, select DHCP Relay Agent.
- Click OK.
- Expand the IP Routing node in the console tree.
- Right-click the DHCP Relay Agent node and then select New Interface from the shortcut menu.
- Select the interface and click OK.
- In the DHCP Relay Properties dialog box, ensure that the Relay DHCP Packets checkbox is selected on the General tab.
- Click OK.
- Right-click the DHCP Relay Agent node, and select Properties from the shortcut menu.
- Enter the DHCP server’s IP address. Click Add.
- Click OK.
To configure the RRAS server to distribute IP addresses via the Dynamic Host Configuration Protocol (DHCP) option,Open the Routing And Remote Access console.
- Right-click the RRAS server node and then select Properties from th shortcut menu.
- Click the IP tab.
- In the IP Address Assignment area of the IP tab, click the Dynamic Host Configuration Protocol (DHCP) option.
- Click OK.
The different DHCP and RRAS Configurations
The method in which a remote client obtains IP addressing information is determined by the different configuration options which can be specified. The actual method which a remote client will use is determined by these IP configuration settings.
The different DHCP and RRAS configurations that can be specified are:
- The IP address is assigned from the static address pool on the RRAS server: This method is enabled when you select the Static Address Pool option on the IP tab of the RRAS server properties dialog box.
To configure this method:
- Open the Routing And Remote Access console.
- Right-click the RRAS server node and then select Properties from the shortcut menu.
- Click the IP tab.
- In the Static Address Pool option.
- Click Add.
- Set the start IP address and end IP address to define the address range for the static address pool.
- Click OK.
Because a remote client can only obtain IP addresses from the RRAS server, it has to access the DHCP server to obtain any other TCP/IP configuration information, such as a DNS server IP address, or WINS server IP address. For this to occur, you have to configure a DHCP Relay Agent for the RRAS server.
- The IP address is assigned from the DHCP server via a DHCP Relay Agent: For this method, the Dynamic Host Configuration Protocol (DHCP) option is configured on the IP tab of the RRAS server properties dialog box. Here, the DHCP Relay Agent is configured on the RRAS server. The DHCP server distributes IP addresses and all other TCP/IP configuration information.
- The IP address is assigned to the security object of the user (Active Directory): For this method, the IP address for the remote client is configured in the properties page of the particular user’s security object. When the client connects to the RRAS server, the IP address configured in the properties page is used. The settings configured in the Remote Access Policy are simply ignored.
How to create a new user object in Active Directory:
- Click Start, Administrative Tools, and click the Active Directory Users And Computers console.
- In the console tree, select the OU wherein you want to create the new user object.
- From the Action menu, click New, and then click User.
- In the New Object – User dialog box, enter information for the fields listed below:
- First name, Initials, Last name, Full name (automatically populated), User logon name, User logon name (pre-Windows 2000).
- Click Next.
- Enter a password in the Password field, and verify the password in the Confirm password field.
- If you leave the User must change password at next logon checkbox enabled, the user has to specify a new password at next logon. Click Next.
- Verify the settings that you entered on the Summary page.
- Click Finish to create the new user object.
How to configure an IP address for a user object in Active Directory:
- Click Start, Administrative Tools, and click the Active Directory Users And Computers console.
- Right-click the domain, and select Find from the shortcut menu. The Find option is used to locate objects in Active Directory. You can specify that the search should be performed on the Active Directory directory, or on a particular OU, and you can specify various other search criteria and options.
- Enter the username that you want to statically assign an IP address for. Click Find Now to locate the particular user object.
- Double-click the username in the search results window to open the properties page of the user object.
- Click the Dial-in tab.
- Enable the Assign A Static IP checkbox.
- Enter an IP address in the available box.
- Click OK.
Follow Us!