Removing password from your Windows 10 machine is an easy procedure, but if you’re thinking about doing it, you should be aware that the computer without a password is like an unlocked house. It’s a security risk and if you share your household with non-reliable people, we rather suggest changing your password and keeping your login password active.
How to Change Password in Windows 10?
To change the existing password on a Windows 10 machine, follow these steps:
- Click on the “Start menu” button
- Click “Settings” icon
- Click on the “Accounts” option
- In the left page click on the “Sign-in options” option
- Scroll down to Password section
- Click on “Change” button
- Windows 10 will ask for your existing (old) password, “enter it” and click “Next”
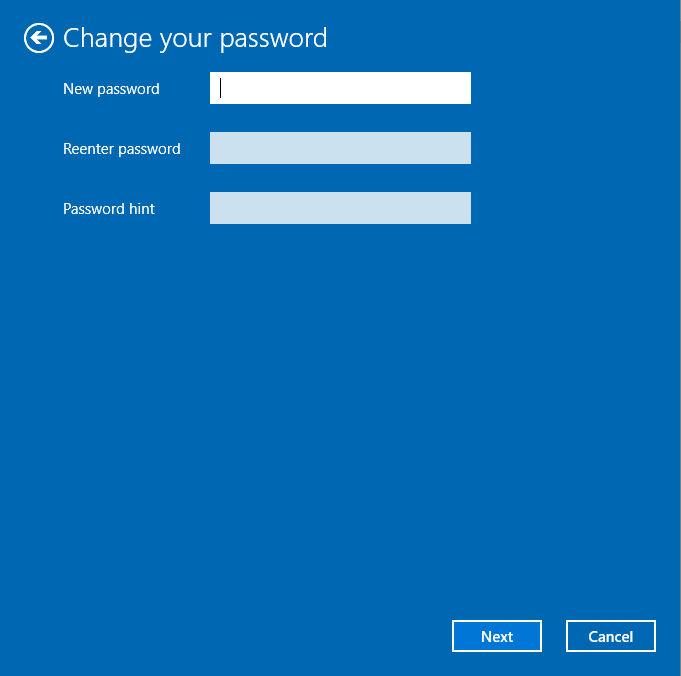
- A new window will pop up asking to enter the new password
- In the same window, you will need to re-enter the new password
- After step 9, you will need to add a hind for your new password
- Click “Next”
- Click “Finish”
How to Remove Password in Windows 10?
To completely remove the password from a user account on a Windows 10 machine, follow these steps:
- Click on the “Start menu” button
- Click “Settings” icon
- Click on the “Accounts” option
- In the left page click on the “Sign-in options” option
- Scroll down to Password section
- Click on “Change” button
- Windows 10 will ask for your existing (old) password, “enter it” and click “Next”
- A new window will pop up asking to enter the new password
- Leave all of the fields blank
- Click “Next”
- Click “Finish”
From now on, when you turn on computer or you logout from a system, there will be a “Sign in” button which will not ask for a password. Just click on it and the desktop will load.
To remove the login welcome screen where you need to click on the login button to enter Windows, follow these additional steps:
- Click on the “Start menu” button
- Type “netplwiz.exe” without quotes
- Click on the “netplwiz.exe” app
- Uncheck the option “Users must enter a user name and password to use this computer”
- Click “Apply” and “Ok” buttons
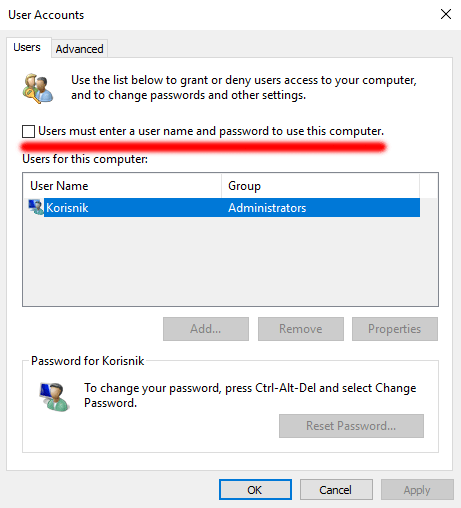
On the next restart and each subsequent boot, Windows will automatically log you in, without asking for a password. However, you can keep your password and do just last five steps to stop Windows from asking for a password when you turn on the computer, but allow it to ask for the password for any system and software changes.
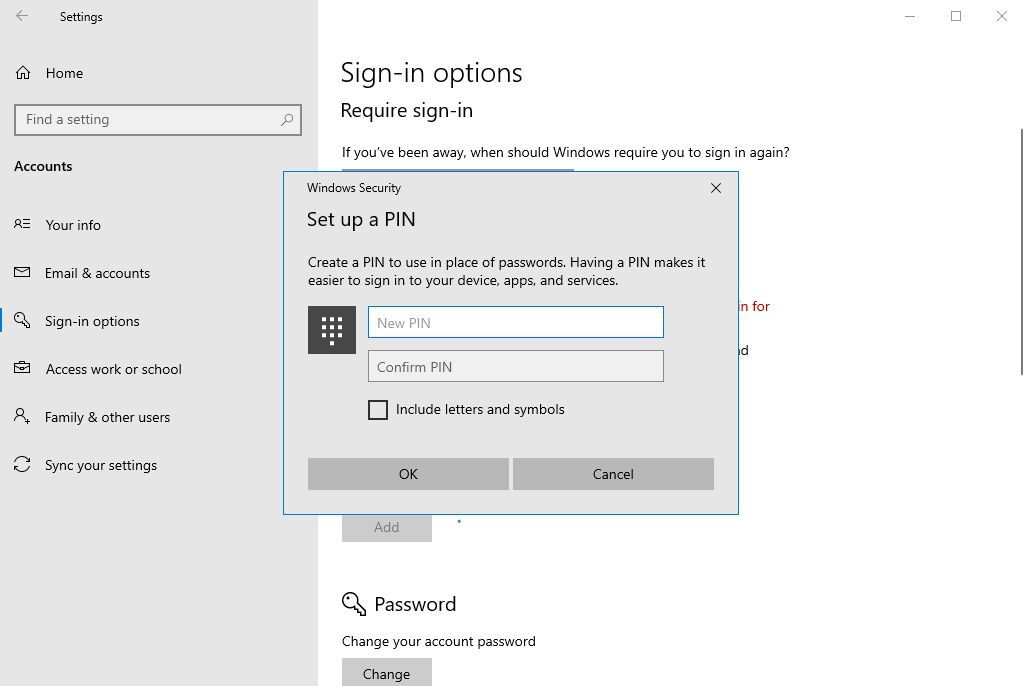
It is worth noting that if you use Microsoft Account for your Windows 10 installation, then you will not be able to remove the password at all, though you will be able to create a PIN and use it for logging into your system as a little faster way.
To add a PIN to your Windows 10 system, follow these steps:
- Click the “Start button”
- Click on the “Settings” option
- Click on the “Accounts”
- In the left page click on the “Sign-in options”
- Scroll down to PIN section
- Click “Add” button
- Enter your current password
- Enter your desired PIN
- Confirm your desired PIN
- Click the “Ok” button

Follow Us!