The zip file format has been around since the late 1980s and provides computer users with the ability to compress one to many files. The format has been supported via third party utility since its creation and has seen built-in support in the Windows and Mac OS X operating systems added over the past several years. Mac users; however, did not enjoy this “built-in” support for the file format until Mac OS X 10.3 when the Archive Utility was added to the operating system. Despite this added functionality, a common question that arises amongst Mac users is how to zip files on a Mac.
What is the Zip File Format?
A zip file is an archive file format that provides support for lossless data compression of one or more files or folders. The format allows several different compression algorithms to be used for creating file archives and was originally created in 1989 by Phil Katz. The file format was first implemented in the PKZIP utility and was designed as a replacement for the ARC compression format. Zip files are designated by the MIME media type application/zip and normally appear visually as a file or document with a zipper icon.
Zip File Specification
The Zip file has a format specification with its own version number that is no longer tied to the versioning of the PKZIP tool. The formal name of the Zip file specification is, “APPNOTE – .ZIP File Format Specification” and continues to be published on the PKWARE.com website. Some of the critical advances in the ZIP file format specification include:
1993 – Version 2.0 allowed file entries to be compressed using DEFLATE as well as make use of PKWARE encryption.
1996 – Deflate64 compression was introduced to the file format.
2001 – The 64 bit ZIP format was documented for the first time.
2002 – Support for Triple DES, DES, RC4, and RC2 incorporated into the file format (not published until later).
2003 – Support for AES encryption and a corrected version of RC2-64 encryption included in the file format.
2004 – Certificate storage and Central Directory Encryption documented for the first time.
2006 – Included support for UTF-8 filename storage. Also expanded hash compression algorithm support.
2007 – Corrected the standard has values for SHA and included compression method 97.
2012 – Included formatting changes to help differentiate the use of other formatting standards.
How to Zip Files in Mac OS X (Archive Utility)
Prior to the release of Mac OS X 10.3, Mac users had to rely on third party utilities in order to ZIP files. Similar to Microsoft Windows users, Mac computer users leverage the ZIP file format to save space on the computer hard drive, for sending smaller email attachments, and to help backup information on the local computer. The Archive Utility now included with OS X is an Apple Core Service and can be used to create or unzip a file archive or ZIP file.
Step 1 – Turn on the Mac OS X computer.
Step 2 – Select the “Finder” and then navigate to the location of the file(s) that will be zipped.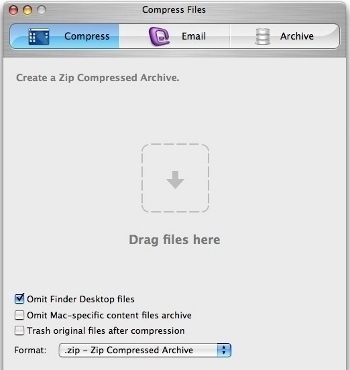
Step 3 – Choose the file to zip. Multiple files can be selected by holding the “Command” key while single clicking each file to add to the archive file.
Step 4 – “Ctrl-Click” or “Right Click” if the computer’s mouse has two buttons the highlighted files.
Step 5 – Choose the “Compress” menu option to open the “Archive Utility” and zip the files. When zipping a single file, the archive file will be the original file name with a zip file extension. If there are multiple files added to the archive file, the filename will be “Archive.zip” which is a slight difference from many of the third party zip utility programs users may be familiar with.
Step 6 – Modify the zip filename if multiple files have been archived if desired. Ensure the ZIP file extension is retained in order to avoid issues with opening the archive file at a later time.
How to Zip/Unzip Files from the Mac OS X Command Line
Although the Mac OS X Archive Utility is fairly straight forward to use, many “power users” of the Mac OS X operating system prefer to create a zip file from the command line.
Step 1 – Open the “Applications” folder located inside the “hard drive.”
Step 2 – Open the “Utilities” folder.
Step 3 – Double click the “Terminal” program icon, and the command prompt will appear.
Step 4 – Determine the current working directory by entering “pwd” followed by pressing the “return” key at the command prompt.
Step 5 – Use the “CD” command to switch to the directory that has the file(s) to zip or unzip.
Step 6 – Enter the following command (change it to reflect the filename to zip) to create a new zip file followed by pressing the “return” key: zip myArchive.zip myFile.txt
Step 7 – Similarly, unzip a file from the command line by typing the following command at the command prompt: unzip myArchive.zip
Step 8 – Archive files can be created or unzipped from other directories by using file paths using the zip and unzip commands.
How to Unzip Files on a Mac How to Open a Zip Archive on a Mac
Another common task for Mac OS X users is figuring out how to open a zip file or archive. The following steps highlight the steps to do so using the Mac OS X Archive Utility program.
Step 1 – If the zip file is not already on the target computer, save it to the desktop of the computer. If already downloaded, it may be located in the “Downloads” folder that is located under the “Documents” and “User” directories on the computer.
Step 2 – Locate the zip file and double click the file. Depending on the settings on the computer, the files contained in the zip file may be saved in a new folder that uses the same name as the zip archive. Mac OS X will leave the original zip file when the files are extracted.
Step 3 – Open the new extract folder to ensure the contents of the zip file are present. Occasionally, multi-file archives will have subdirectories and files that are also zipped. If this is the case, you will need to proceed with unzipping these files using the directions outlined in step 2.
How to Password Protect Zip Files in Mac OS X
Mac OS X does not require any additional add-ons, downloads, or third party utilities to create a password protected zip file. When creating an archive that has password protection, it will work on multiple operating systems to include Windows computers. The common reasons that end users will password protect zip files include:
– Emailing private information to a user on a Windows computer.
– Adding additional security to a hidden folder.
– Password protecting individual backups.
– Sending an encrypted or sensitive file over an unencrypted network.
– Adding basic security to an individual file or directory.
Step 1 – Open the Terminal application on the Mac OS X computer by selecting the “Applications,” “Utilities,” and “Terminal” menu icons.
Step 2 – Enter the following command with the appropriate file paths and filenames at the terminal screen followed by pressing the “return” button:
zip -e myZipFile.zip myFiletoProtect.txt
Step 3 – Enter the password and verify it.
Step 4 – Mac OS X will now create an archive file named myZipFile.zip that is encrypted and includes the password that you entered. The encrypted file (myFileToProtect.txt) will not be accessible without entering the password. The password will not be displayed on the terminal when entering the information.
How to Open a Password Protected Zip File in Mac OS X
Although password protected zip files are created in the Terminal application on Mac OS X, they do not have to be unzipped using the terminal.
Step 1 – Locate the password protected zip file on the computer using the Finder application.
Step 2 – Double click the zip file.
Step 3 – Enter the zip file’s password and the file will be decompressed and unzipped.
Step 4 – Alternatively, the file can be unzipped from the terminal window using the following command. The correct file path will need to be used or the working directory changed to the location of the archive file:
Unzip myFileName.zip
Third Party Zip Applications for the Mac
Despite Mac OS X having the capability to zip and unzip files without use of a third party application, the use of alternative programs for archive file operations remains popular with many Mac users. The following are some popular third party alternatives for Mac users to conduct these operations.
Compress Files for Mac
Compress Files for Mac is an easy to use program that provides capabilities beyond just the basic zipping and unzipping of files. The application supports the following archive formats: .zip, .tar, .tar.gz, .tar.bz2, .xar, .7z, and .dmg. Additionally, the application will maintain Mac file structures as well as preserve Mac system files when opened on a Windows computer. The application is available for free use on a trial basis and costs $24.99 for the commercial version of the product at the time of this writing.
iArchiver
The iArchiver application is designed for Mac users and supports all popular archive formats in addition to zip files to include .rar and .7zip. The program has the look and feel of a native OS X product and is regularly updated to support the latest builds of OS X. iArchiver uses a drag-and-drop interface and allows users to select between a number of advanced features to include the ability to convert an entire archive, encrypt files, and to both split or join files.
MacZip
MacZip is a archive utility designed for Mac users. The application is free and supports file compression operations across a number of operating systems to include Windows, Unix, and the Acorn RISC operating system. The program is fully compatible with PKZip and also supports encryption of archive files. The program has not been updated since 2005 at the time of this writing; however, so some options may not prove fully compatible with modern features incorporated into the ZIP file standard since 2005. Despite this drawback, the program remains the right price for many consumers.
StuffIt Deluxe
StuffIt Deluxe is available to use as a free trial with a single seat license price of $49.99 for commercial users and $29.99 for the educational license at the time of this writing. The application includes a number of programs in a single bundle to include StuffIt Expander, DropStuff, DropZip, and DropTar to provide a suite of tools which support a range of operations ranging from basic archiving to advanced compression and encryption tasks. The program supports the latest versions of Mac OS X and includes the ability for Mac users to use MacFuse and Quick Look plug-ins.
Pack Up & Go
Pack Up & Go was originally created in the UNIX operating system and was not made for use on the Mac OS X operating system. The software is capable of running on just about any OS; however, and makes use of a drag-and-drop system to both compress and extract file archives. Users of the program are able to manage these tasks directly from the program’s main interface and can execute a number of program tasks simultaneously.
ZipIt
ZipIt runs on older builds of Mac OS X and is made specifically for moving files between two different operating platforms. The developers of the application have made the decision to no longer support newer builds of OS X, but the program is now available for free for users of versions of OS X that are older than the Lion build.


Follow Us!