I recently started learning to make Android apps using PhoneGap. I use the Eclipse IDE for development. In this article, I will explain the steps to setup PhoneGap for Android using the Eclipse IDE.
This tutorial is meant for Windows. I used the following components:
- Eclipse Classic 4.2.0
- Android SDK
- ADT Plugin for Eclipse
- PhoneGap 2.3.0
Step 1: Download and install the latest version of the Eclipse IDE. I recommend downloading the Classic version because it envelops most of the needed tools and plugins.
Step 2: Download and install the Android SDK. There are two packages – ADT Bundle and SDK Tools Only. Choose a suitable platform and download the SDK Tools Only.
Step 3: Add and configure the ADT Plugin in the Eclipse IDE.
Step 4: Download the latest version of PhoneGap and save it on your local disk. Extract the downloaded archive for later use.
Step 5: Now we create a new Android project in the Eclipse IDE.
- Start the Eclipse IDE.
- Go to File > New > Project.
- In the New Project wizard, choose Android Application Project under the Android group.
- Click Next.

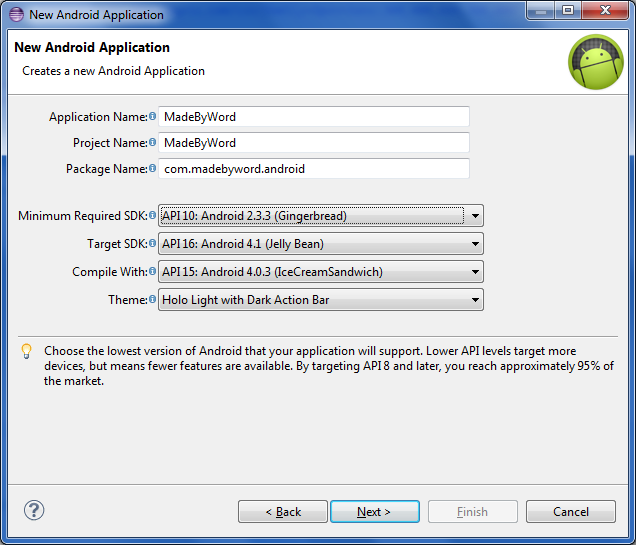
Enter Application Name, Project Name and Package Name.
- Application Name: The application name is shown in the Google Play Store, as well as in the Manage Application list in Settings.
- Project Name: The project name is only used by Eclipse, but must be unique within the workspace. This can typically be the same as the Application Name.
- Package Name: The package name must be a unique identifier for your application. It is typically not shown to users, but it must stay the same for the lifetime of your application; it is how multiple versions of the same application are considered the same app. This is typically the reverse domain name of your organization plus one or more application identifiers, and it must be a valid Java package name.
Ex: com.facebook.katana or com.facebook.orca or com.nimbuzz or com.skype.raider
Choose Minimum Required SDK, Target SDK, Compile With and Theme. Click Next.
- Minimum Required SDK: Select the lowest version of Android that your application will support.
- Target SDK: Select the highest version of Android that your application is known to work with.
- Compile With: Select a target version of Android to compile your code with, from your installed SDKs.
- Theme: Select the base theme to use for your application.
On the Configure Project screen, I recommend to continue with the default options. You can change the workspace if required. You will need an image to be uploaded for the launcher icon in the next screen. Click Next.
On the Configure the attributes of the icon set screen, browse and upload a valid launcher icon. You can modify other given settings if required. Click Next.
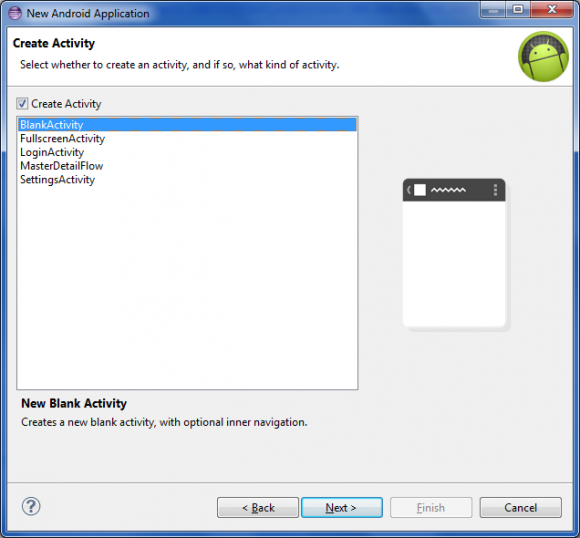
Choose the type of Activity you’d like your application to start with. I recommend choosing BlankActivity. Click Next.
- BlankActivity: Creates a new blank activity, with optional inner navigation.
- FullScreenActivity: Creates a new activity that shows and hides the system UI (status bar, navigation/system bar) and action bar, upon user interaction.
- LoginActivity: Creates a new login activity, allowing users to enter an email address and password to login or register for your service.
- MasterDetailFlow: Creates a new master/detail flow, which is two columns on tablets, and one column on smaller screens. This creates a master fragment, detail fragment, and two activities.
- SettingsActivity: Creates a new application settings activity.
Enter the Activity Name, Layout Name and choose a Navigation Type. Leave them to default if you don’t know what to enter or choose. Click Finish.
- Activity Name: The name of the activity class to create.
- Layout Name: The name of the layout to create for the activity.
- Navigation Type: The type of navigation to use for the activity – None, Tabs, Tabs + Swipe, Swipe Views + Title Strip, and Dropdown.
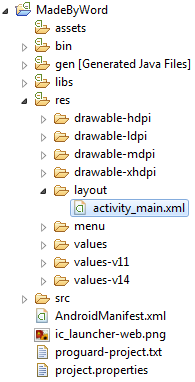
Your empty Android project is ready now. In the Explorer window of Eclipse, you should see the tree-structured file system of your project.
Step 6: Your project however isn’t ready to run PhoneGap. Now we configure your Android project to use PhoneGap.
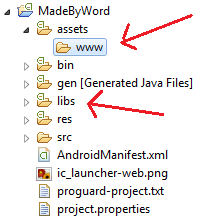
Create a new directory – assets > www. A libs directory should be present directly under the project. If not, create one.
The www directory will hold all the HTML, CSS and JavaScript files required to develop your PhoneGap application.
Now go to the directory where you extracted the PhoneGap files. We need to copy few files from this PhoneGap directory to your Android project.
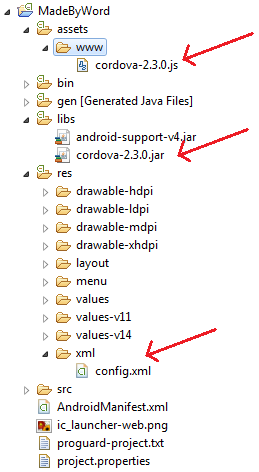
- Copy cordova-2.3.0.js from \phonegap-2.3.0\lib\android to your android project’s \assets\www directory.
- Copy cordova-2.3.0.jar from \phonegap-2.3.0\lib\android to your android project’s \libs directory.
- Copy the xml directory from \phonegap-2.3.0\lib\android to your android project’s \res directory.
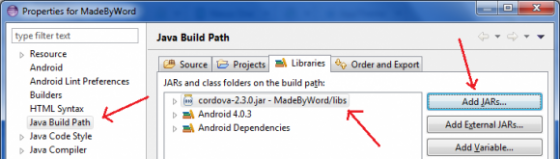
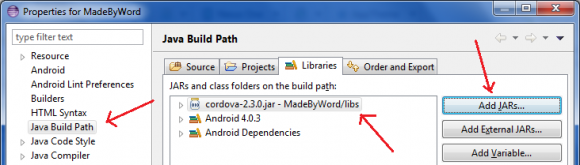
- Now we need to add the cordova-2.3.0.jar file to the project’s build path.
Right-click on the \lib directory in your Android project.
Select Build Path > Configure Build Path.
Choose Java Build Path from the left-side menu.
Click Add JARs.
Browse for cordova-2.3.0.jar in your project’s \libs directory.
Click Ok.
Click Ok again.
The project’s file system should now look like below, after performing the above stated steps.
PhoneGap is now integrated with your Android project. That is you are ready to make a PhoneGap application and execute.
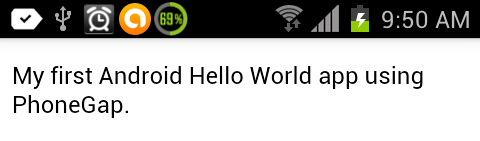
Step 7: We create a simple Hello World app to test whether your PhoneGap is set up correctly.
Create a new file named index.html in the www/assets directory of your Android project. This index.html is the entry point to your Android application. Add the following code to index.html.
<!DOCTYPE HTML>
<html>
<head>
     <title> MadeByWord PhoneGap App </title>
     <script src="cordova-2.3.0.js" type="text/javascript" charset="utf-8"></script>
</head>
<body>
     <p> My first Android Hello World app using PhoneGap. </p>
</body>
</html>
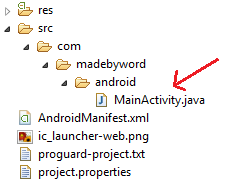
Now, open the Main Activity file from the src directory. The file should be named something like MainActivity.java.
(the activity file name may differ for you, depending on what activity name you provided before)
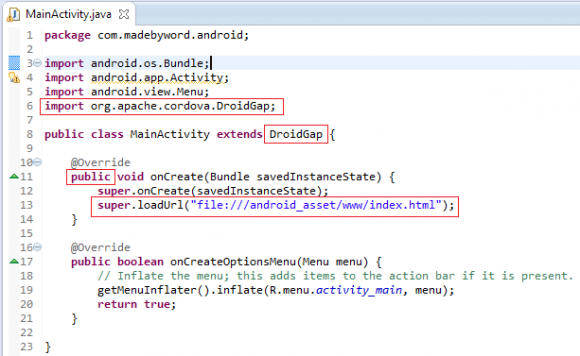
In the activity class, add the following import statement.
import org.apache.cordova.DroidGap;
The current base class is Activity. Modify it to DroidGap.
public class MainActivity extends DroidGap {
Delete the following line.
setContentView(R.layout.activity_main);
Add the following line in place of the above deleted line.
super.loadUrl("file:///android_asset/www/index.html");
Change the access modifier for the onCreate function from protected to public.
public void onCreate(Bundle savedInstanceState) {
The final code in the activity class should look like this.
We have configured our Android project to use PhoneGap. Now, we configure the meta data to help PhoneGap execute properly.
Open AndroidManifest.xml from your Android project. Go to the XML source code by clicking the AndroidManifest.xml tab at the bottom.
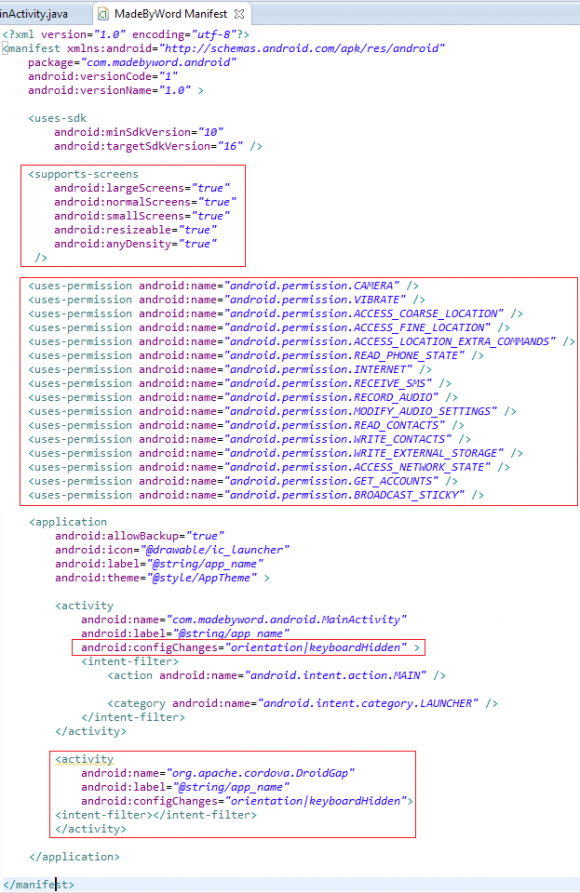
Add the following supports-screens node as a child of the manifest node (root node).
<supports-screens
     android:largeScreens="true"
     android:normalScreens="true"
     android:smallScreens="true"
     android:resizeable="true"
     android:anyDensity="true"
     />
The supports-screens node informs PhoneGap about what kinds and sizes of screens should be supported.
[read more about supports-screens]
Now, we set the phone permissions to be allowed by your PhoneGap application.
Copy the following uses-permission nodes as children of the manifest node (root node).
<uses-permission android:name="android.permission.CAMERA" />
<uses-permission android:name="android.permission.VIBRATE" />
<uses-permission android:name="android.permission.ACCESS_COARSE_LOCATION" />
<uses-permission android:name="android.permission.ACCESS_FINE_LOCATION" />
<uses-permission android:name="android.permission.ACCESS_LOCATION_EXTRA_COMMANDS" />
<uses-permission android:name="android.permission.READ_PHONE_STATE" />
<uses-permission android:name="android.permission.INTERNET" />
<uses-permission android:name="android.permission.RECEIVE_SMS" />
<uses-permission android:name="android.permission.RECORD_AUDIO" />
<uses-permission android:name="android.permission.MODIFY_AUDIO_SETTINGS" />
<uses-permission android:name="android.permission.READ_CONTACTS" />
<uses-permission android:name="android.permission.WRITE_CONTACTS" />
<uses-permission android:name="android.permission.WRITE_EXTERNAL_STORAGE" />
<uses-permission android:name="android.permission.ACCESS_NETWORK_STATE" />
<uses-permission android:name="android.permission.GET_ACCOUNTS" />
<uses-permission android:name="android.permission.BROADCAST_STICKY" />
These permissions tell your PhoneGap application what features of your mobile phone it is allowed to use. You can later add/remove them according to your application requirements.
[read more about uses-permission]
Now, we make some changes to the activity nodes.
Search for the activity which should a child of the application node. Add the following attribute on this activity node.
android:configChanges="orientation|keyboardHidden"
Create a entirely new activity node as a sibling of the existing activity node. This new activity node is needed for the org.apache.cordova.DroidGap class.
<activity
     android:name="org.apache.cordova.DroidGap"
     android:label="@string/app_name"
     android:configChanges="orientation|keyboardHidden">
     <intent-filter></intent-filter>
</activity>
Your final AndroidManifest.xml file should look like this.
Your Android application is now completely ready to run using PhoneGap.
Step 8: You can run your Android application in either of the two ways:
- Create an Android emulator (virtual device) on your computer.
[read about Android virtual devices] - Connect your Android phone to your computer using a data cable (as Media device MTP).
I used my Android mobile phone – Samsung Galaxy S2 – to run the Android application.
- Right-click on your project.
- Go to Run As > Android Application.
- Your Android application should run on your Android phone if the set up has been done correctly.
Note: You can also read the Getting Started with Android guide provided on PhoneGap’s website.
Please leave a comment below if you faced any issue while setting up PhoneGap for Android using Eclipse. Thank you.
Muhammad Talha Jamil
Great Bro, It helped a lot