Shared folder permissions are used to restrict access to a folder or file that is shared over a network. Folder sharing is normally used to grant remote users access to files and folders over a network. Web sharing grants remote users access to files from the Web if Internet Information Services (IIS) is installed.
Members of the Administrators or Power Users group can share folders on a Windows member server. Users have to be members of the Administrators or Server Operators group to share folders on a domain’s domain controller. Users that have the Create Permanent Shared Objects user right are able to share folders as well. To share folders on NTFS volumes, users have to minimally have the Read permission.
When folders are shared, it is important to keep in mind that only folders can be shared, not files. Shared folder permissions are irrelevant to users who are locally logged onto a computer. Shared folders that are moved are no longer shared. When shared folders are copied, the copy is not shared. The original shared folder however remains shared.
A few disadvantages associated with share permissions are listed below:
- Shared folder permissions do not have as many permission options as NTFS permissions. The only shared folder permissions that can be assigned to users/groups are Read, Change, or Full Control.
- Share permissions are not inheritable.
- Users cannot back up or audit shared folder permissions.
- If the user moves or even renames a shared folder, the shared folder permissions for that particular folder no longer exist.
Because of these disadvantages, shared folder permissions are typically utilized on drive volumes that are FAT or FAT32 volumes.
Users can use Windows Explorer to share local folders only. In order to share local folders and remote folders, use Computer Management. Use the File Server Management MMC snap-in to manage shared folders.
The shared folder options that can be set when sharing a folder are listed below:
- Do Not Share This Folder: The folder can only be accessed locally.
- Share This Folder: The folder can be accessed locally and over the network.
- Share Name: The name users would see and utilize to access the folder.
- Description: Additional information on the shared folder.
- User Limit: The maximum number of connections that are concurrently permitted to the shared folder.
- Permissions: The manner in which users are allowed to access the folder.
- Offline Settings: The manner in which folders are cached at times when the folder is offline.
Shared folders basically enable users to access folders over the network. Shared folder permissions specify those users that are allowed to access or connect to a shared folder over the network. Unlike NTFS permissions, shared folder permissions do not utilize access control lists (ACLs) to limit access to resources and cannot be assigned to both folders and files. Shared folder permissions can only be specified for folders, but can be specified for folders stored on volumes formatted with a file system other than NTFS.
The shared folder permissions that can be configured are summarized below:
- Read: The Read permission allows users to view folder and file names, file data, and file attributes. Users are also able to access the shared folder’s subfolders, and run program files and scripts.
- Change: Those who are granted the Change permission can perform all of the functions that the Read permissions grant as well as create and delete files and subfolders. Users are also able to change file attributes, change the data in files, and append data to files.
- Full Control: Users that are granted the Full Control permission can perform all the tasks that the Change permissions enable, take ownership of files, and change file permissions.
How to Share a Folder
Before a user can set shared folder permissions, he/she has to share the particular folder over the network. That is, the user has to create shared folders.
Use the steps below to share a folder using Windows Explorer:
- Right-click the folder to be shared over the network and select Properties from the shortcut menu.
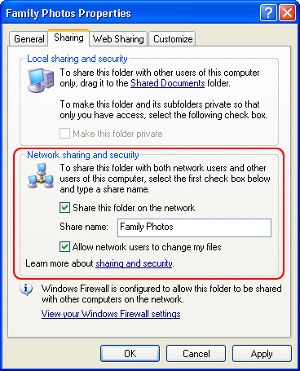
- When the folder’s Properties dialog box opens, click the Sharing tab.
- The Sharing tab is where the user either enables or disables the share for the folder.
- Click the Share this folder option to create a shared folder.
- In the Share name box, enter a name for the share. This is the name that users will see or use to access the shared folder.
- In the Description box, enter a description for the shared folder or any other additional information.
- In the User limit section, the default setting is Maximum allowed. What this means is that the number of client access licenses available determines the user limit.
- Alternately, click the Allow this number of users option then specify the user limit.
- Click OK.
Use the steps below to share a folder using Computer Management:
- In Computer Management, right-click Computer Management in the console tree and click Connect to Another Computer from the shortcut menu.
- Select the computer using the Select Computer dialog box.
- Expand System Tools and Shared Folders, and choose Shares in the console tree.
- All existing shares are displayed.
- Right-click Shares and click New Share from the shortcut menu.
- The Share A Folder Wizard launches now.
- Click Next on the initial screen of the wizard.
- In the Folder Path box, enter the folder path that should be shared.
- Alternately, click Browse to locate the folder that should be shared. Use the Browse For Folder dialog box for this. Click Next.
- In the Share Name box, enter a unique name for the share.
- In the Share Description box, enter a description for the shared folder.
- Click Change to configure Offline Files settings or options. The default setting is that files that users define for offline use is available offline.
- Now set basic share permissions for the shared folder.
- Click Finish.
To publish shares in Active Directory with the File Server Management console to make it simpler for users to easily find shared folders in large networks, consider publishing the shared folder in Active Directory:
- Open the File Server Management console.
- Click Shares, right-click the desired shared folder, and select Properties from the shortcut menu.
- Click the Publish tab.
- Check the Publish This Share In Active Directory checkbox to publish the shared folder in Active Directory.
- Enter a description for the share in the Description box.
- In the Owner box, insert the share owner’s e-mail address.
- Click OK.
How to View Existing Shared Folder Permissions with Computer Management
Use the steps below to view existing shared folder permissions:
- Navigate to Computer Management.
- Connect to the particular computer where the shared folder is.
- Right-click the share and choose Properties from the shortcut menu.
- When the Properties dialog box opens, click the Share Permissions tab.
- Users can now view those who can access the share and the type of access granted to users.
How to Configure Shared Folder Permissions via Windows Explorer
- Open Windows Explorer.
- Right-click the folder that folder permissions should be set for and choose Properties from the shortcut menu.
- When the folder’s Properties dialog box opens, click the Sharing tab.
- In the Sharing tab, click the Permissions button.
- When the Permissions for dialog box opens, click Add.
- The Select Users, Computers, or Groups dialog box opens next.
- Click Object Types and check the Users checkbox. Click OK.
- Enter the name of the user/group in the Enter the object names to select section. Click OK.
- In the Group or user names box of the Permissions for dialog box, select the user/group.
- Next, either Allow or Deny the shared folder permissions.
- Click OK.
How to Set Shared Folder Permissions via Computer Management
- In Computer Management, right-click the shared folder to configure permissions for and select Properties from the shortcut menu.
- Click the Share Permissions tab.
- Click Add.
- When the Select Users, Computers, Or Groups dialog box opens, enter the name of the user/group to set shared folder permissions for. Click Check Names.
- Click OK to add the user(s)/group(s) to the Name list box.
- Set shared folder permissions for the user/group.
- Click OK.
How to Change Existing Shared Folder Permissions via Computer Management
- In Computer Management, right-click the shared folder to change shared folder permissions for and select Properties from the shortcut menu.
- Click the Share Permissions tab.
- Select the user/group whose permissions will be modified in the Name list box.
- Change the permissions granted for the user/group using the Allow and Deny checkboxes.
- Click OK.
How to Remove Shared Folder Permissions for Users or Groups
- In Computer Management, right-click the shared folder to remove shared folder permissions for and select Properties from the shortcut menu.
- Click the Share Permissions tab.
- Select the user/group whose permissions will be removed in the Name list box.
- Click Remove.
- Click OK.
How to Stop a Folder from Being Shared
- In Computer Management, connect to the computer where the share is.
- Navigate to the Shares node.
- Right-click the share to be permanently removed and select Stop Sharing from the shortcut menu.
- Click Yes to verify that the share should no longer exist.
How to Configure Web Shares and Web Shared Folder Permissions
- Open Windows Explorer.
- Right-click the folder to be shared on the Web and select Properties from the shortcut menu.
- Next, click the Web Sharing tab.
- Use the Share On drop-down box to specify the particular website that the folder should be shared on.
- In the Access Permissions area, specify the access permissions for the shared Web folder.
- In the Application Permissions area, select permissions for applications in the folder.
- Click OK.
An administrator must ensure that the users can gain access to folders on the network that contains the files in which they need to work. Sharing a folder enhances security as permission can be set for users who can access these shared folders.
Shared folders can have data, applications, or a home folder that has the user’s personnel data. To share a folder, the user must be a member of one of the groups that have rights to share folders on the computer where the file is. When someone shares a folder he/she can control access to the folder and its contents by granting permissions to selected users and groups. To share a folder, provide a shared folder name and comment on folder description in order to limit the total number of users to access the folder and then grant permissions. To create a shared folder, right-click the folder in Windows Explorer and click Sharing. On the sharing tab configure the options.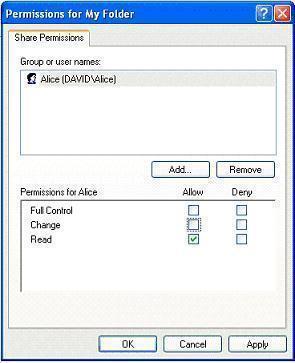
Use shared folder permissions to control users’ access to shared folders. Shared folder permissions apply to shared folders only, not to individual files. Permissions that can be set on shared folders are:
- Read: If the user has Read permission it allows him/her to display the folder name, the name of the file, attributes, and file data. Within the shared folders are application files and change folders.
- Change: If the user has Change permission, it allows him/her to add files to folder and create folders. The user has the right to change file data and file attributes, and append data to files. Users can delete folders and files and have all the permissions of Read.
- Full Control: With Full control permission, the user gets file ownership, can change file permissions, and gets the same permissions of read and change. By default, everyone in the group group has this permission.
Permissions are Cumulative
A user’s effective permissions for a resource are the combination of the shared folder permissions granted to the individual user account and the shared folder permissions granted to the groups to which the user belongs.
For example: If a user has Read permission to access the folder and is a member of a group who has write permission for the same folder, then the user gets both Read and Write permissions for that folder.
Deny Overrides Other Permissions
Users can also deny shared folder permissions. Denied permission overrides any allowed permission set for groups and user accounts.
Granting Shared Folder Permissions
Users can grant shared folder permission when the folder on a drive is formatted to use the NTFS, FAT, or FAT32 file system.
- Open the shared folder Permission. On the sharing tab click Permission to open the permissions dialog box.
- In the Select Users, Groups, or Computers dialog box, click to see a list of domains from which the user account and group names can be selected.
- Select the User or Group tp grant permission to.
- Select the Allow check box of the appropriate permissions for the User Account, Group, or Computer.
Connecting to a Shared Folder
After a folder is shared, users can easily access it across the network. Users can gain access to a shared folder that is placed on another computer by using My Network Places, Map Network Drive, or Run command.
- Using My Network Places: Double click my network places. Enter the network path of the shared folder to be connect to or click browse to find the computer on which the shared folder was created. Double click the shared folder to open it.
- Using Map Network Drive: Use drive letters to gain access to shared folders for which a UNC (Universal Naming Convention) path cannot be used, such as a folder for an older application. Right click My Network Places and then click map network drive. In the map network drive wizard, select the drive letter to be used. Enter the name of the shared folder to be connected to or click Browse to find the shared folder.
- Using Run Command: Click Start then click Run. In the run dialog box, enter a UNC path in the open box then click OK.
Combining NTFS and Shared Folder Permissions
One strategy for controlling access to network resources on an NTFS partition is to share folders that have default shared folder permission and then control access to these folders by granting NTFS permissions.
When shared folder permissions are granted on an NTFS Volume, rules applied are:
- NTFS permissions are required on an NTFS volume. The Everyone group has the full control permission by default.
- Users must have the appropriate NTFS permissions for each file and sub folder in a shared folder with the shared folder permissions in order to gain access to those resources.
- When the user combines NTFS permissions and shared folder permissions the resulting permission is the most restrictive permission on the combined shared folder permissions or the combined NTFS permissions.
Administrative Shared Folders
- Administrators use administrative shared folder to do administrative tasks.
- Administrative shared folders are hidden from normal users.
- Administrators have full control permission.
- The root of each partition is automatically shared by C$, D$, and E$.
- The C:Winnt folder is shared as Admin$.
- The folder containing the printer driver files is shared as Print$ (created when the first printer is created).
Publishing a shared folder in Active Directory
Publishing resources including shared folders in Active Directory enables users to search Active Directory to find resources on the Network even if the resources’ physical location changes.
- Open the Active Directory Users and Computers from the Administrative tools.
- In the console tree of the Active Directory Users and Computers, right click the Domain to publish the shared folder in, point to New and click Shared folder.
- In the Shared folder Name box, type the Folder Name as it should appear in Active Directory.
- In the Network path box, type the path to the Shared Folder (UNC) name and click OK.
manish
I have make one share folder and give one user read rights but how can i stop that user can not copy the files by using Ctrl C option
angelina
can u help us
what are the function benefits of sharing folders?
Prem CHUGH
Angelina,
Sharing of resources is the key to collaborate
1. You can share docs with right people
2. You can share docs with people at remote location
Many more you can think on its own too
Prem C.
Ritesh
Hi all,
Is there a way we could find who is the owner of the folder to request him to gain access to it.
Prem CHUGH
We’ve been given new target to achieve
Shared Folder Access Management
In every orgainization where helpdesk/servicedesk type of teams exists, it is necessary to reduce ticket counts by providing AUTOMATION
In shared folder management,
Current Flow: Pure Manual
End User requests for a Folder access to Helpdesk—>Helpdesk Guy marks a mail to the owner of the Group maintaining access to that Folder for the approval–>When approved, it adds the requestor/member into the group
Proposed: Self Service Based
We are using a group management application where end user can request for a group access on its own
At the end, if an end user wants to access a folder, he is actually requesting for a group
Searching the required group will be a mess for end user. So we put the folder path(\\servername\testsharedfolder\fodler1) at the description of a group to link the group with the folder
End user will search the group by its path and when found it will request for the group memebrship, after this our application will do the necessary automation like approval from owner and adding members
Interested can make comments to improve the process to achive higher level of automation
Prem CHUGH
Prem CHUGH
Hi Ritesh,
You can do it by some programming…I am working over the same project for my organization
Here is the command, by which I am fetching the group which is being used to control accesses. Same wat you can search the owner
get-acl “\\dlhfs01\UPCC” |where { ($_ | get-acl).access} | Select -expandproperty Access | where{$_.IdentityReference -match ‘^ST’} | Select IdentityReference
Prem C.
Arlindo
Hi all,
Do somebody know how to give administrative permission to a folder AND EVERY folders and files inside this folder.
I have a vmware virtual box and 5 snapshots formerly developed in a windows XP. As I installed windows 7 over xp, to get access to these machines I changed permission but I do this one by one folder by folder, file by file – waste of time!! -so I want do at once over a master folder. Is this feasible?
Thanks all in advance ,
Prem CHUGH
Did you try Powershell command
get-childitem “C:” | where { ($_ | set-acl).access……………….}
This is not the exact command but you can make out a perfect command using above keyword
Prem C.
Naam
can we restrict user to take print out of shared folder files? & how
Prem CHUGH
If it is of Windows Family hen use Windows RMS (Rights mgmt service)
Ramil C Montalbo
Can anyone help me.Why when i set the permission in sharing folder i cannot find the computer name of the user that i want to give permission.I cannot see the computer in object type only three list built in user account,group,and users.All of the computer were in workgroup.I hope that someone could help me in this problem.
memenode
You give permissions only to users on that same computer. Other computers then have to connect to it, log in as that user with permissions and then he or she can access the shared folder.
So basically if you want a folder shareable under a specific user name and password first create a new Windows user and then make the folder shareable and give permissions to that user. Then a user on another computer should be able to detect this network share (In My Network Places or just “Network” in Windows 7, under My Computer) and connect to it, and log in with the username and password of the new user.
If you want someone to just be able to connect with your own Windows username and password you don’t need to create a new user. Just make the folder shareable and provide a password to those you wish to share with.