Wireless Network Security Threats
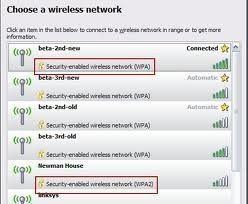
Wireless networks do not have the inbuilt physical security of wired networks, and are unfortunately more prone to attacks from intruders. Once unauthorized access is gained to the wireless network, the intruder would be able to easily access the resources of the corporate, internal network. To complicate matters, there are numerous tools which attackers can use to detect and connect to a wireless network, thus making abusing a wireless network not an intricate task.
The types of attacks that wireless networks are vulnerable to are listed below:
-
Eavesdropping: In this attack, the intruder attempts to capture traffic when it is being transmitted from the wireless computer to the wireless access point (WAP).
-
Masquerading: Here, the intruder masquerades as an authorized wireless user to access network resources or services.
-
Denial of service (DoS): The intruder attempts to prevent authorized wireless users from accessing network resources by using a transmitter to block wireless frequencies.
-
Man-in-the-middle attack: If an intruder successfully launches a man-in-the-middle attack, the attacker could be able to replay, and modify wireless communications.
-
Attacks at wireless clients: The attacker starts a network attack at the actual wireless computer which is connected to an untrusted wireless network.
To secure wireless networks and wireless connections, administrators can require all wireless communications to be authenticated and encrypted. There are a number of wireless security technologies that can be used to protect wireless networks from the different types of attacks that it is vulnerable to. The more common technologies used to protect wireless networks from security threats are:
Wired Equivalent Privacy (WEP) Overview
Wired Equivalent Privacy (WEP) is a wireless security protocol that uses a shared key, to encrypt traffic prior to it being transmitted. The encryption algorithm used by WEP is the RC4 encryption algorithm which is a stream cipher. Shared key authentication enables wireless communication to be encrypted and decrypted. The IEEE 802.11 standard defines WEP for providing protection from casual eavesdropping. What this means is that WEP was designed to provide data privacy.
WEP does not work well where high levels of security are required. Authentication, access control and virtual private networks should be used where high levels of security are required. This is because the shared secret of WEP can be easily discovered by analyzing captured wireless traffic. In fact, numerous readily available tools exist that can be used to decipher WEP encryption and capture and analyze wireless traffic.
However, if WEP is used correctly, it can provide some degree of security. This would involve:
-
Enabling sufficient encryption wherever possible.
-
Not using the default WEP options.
-
Implementing stringent key management processes.
To provide protection from casual eavesdropping, there are a number of options which WEP provides, including the following:
-
64-bit encryption: Here, the length of the encryption key defines the degree of encryption that is provided to secure transmissions.
-
128-bit encryption: 128-bit encryption provides greater security than 64-bit encryption.
-
No encryption: When WEP is configured with the No encryption option, all transmissions are sent in clear-text.
As mentioned earlier, the encryption algorithm used by WEP is the RC4 encryption algorithm which is a stream cipher. The stream cipher is used by the sender and receiver to create pseudorandom strings from the shared key.
The process that occurs when WEP is used for securing transmissions is explained below:
-
The plaintext message is passed through the CRC-32 integrity check algorithm to generate the integrity check value (ICV).
-
The integrity check value (ICV) is then appended to the end of the plaintext message.
-
The random 24-bit initialization vector (IV) is produced next, and is then added to the beginning of the secret key.
-
The random 24-bit initialization vector (IV) is used in the Algorithm (KSA) to create a value for the WEP pseudorandom number generator (PRNG).
-
The WEP PRNG produces the encrypting cipher stream.
-
The encrypting cipher stream is XOR'ed with the message to create the WEP ciphertext.
-
The WEP ciphertext is next added with the IV, and is then encapsulated and sent.
-
Each frame uses a new IV, which means that the RC4 key has a different value.
A few advantages of using WEP to prevent intruders from examining traffic being transmitted between the AP and clients are summarized below:
-
WEP is easy to implement. You only have to configure the encryption key on the APs and your clients.
-
WEP can provide basic security for WLAN applications.
-
Transmission privacy is ensured through RC4 encryption. This means that the shared secret key has to be used for decryption.
-
Transmission integrity is ensured by the CRC-32 checksum.
The main disadvantages associated with using WEP are:
-
WEP has weak cryptography. It has been proven that the shared secret used by WEP can easily be discovered by analyzing captured traffic.
-
For providing WLAN security, WEP is inadequate. You have to use it together with another technology.
-
You have to ensure that WEP is implemented on all APs and on all clients for it to operate.
-
WEP is difficult to manage because it provides no mechanism to change the shared secret. If you want to change the secret key, all APs and all clients must be simultaneously changed.
The WEP standards provide the following types of two authentication methods:
-
Open authentication: Open authentication offers no user authentication. Any client can connect without providing a password, and all requests are allowed.
-
Shared key authentication: Wireless clients are required to authenticate by means of a shared secret. Shared key authentication makes use of cryptographic mechanisms used by WEP for authentication. The process that occurs when shared key authentication is used is outlined below:
-
The client or requestor transmits a request for a connection.
-
The AP or authenticator receives the request and then generates a random challenge text.
-
The authenticator sends the random challenge text to the client.
-
When the client receives the random challenge text, the client uses a secret key to encrypt the challenge text.
-
The client returns the encrypted challenge text to the authenticator.
-
When the authenticator receives the encrypted challenge text, it decrypts the challenge text and then compares the decryption to the original.
-
The client is authenticated if a match occurs.
-
How to enable WEP
-
Click Start, Control Panel, and then click Network Connections.
-
Locate and double-click the Wireless Connection.
-
Click the Advanced button.
-
Click the Wireless Networks tab.
-
Select the Use Windows to configure my wireless network settings option.
-
Chose a SSID from the list of available networks.
-
Click Configure.
-
Verify that the SSID is correct on the Association tab.
-
Enable the Data Encryption (WEP enabled) checkbox.
-
To close the dialog boxes that you have opened, click OK, and click OK again.
-
Double-click the Wireless Connection.
-
In the Network Key textbox, specify the key which the APs are going to be using.
-
Re-enter the key in the Confirm Network Key textbox.
-
Click OK.
Understanding IEEE 802.1X Authentication
You can address the weaknesses of the WEP protocol by using IEEE 802.1X authentication. With IEEE 02.1X authentication, WEP can on regular basis change its encryption keys. This in turn makes it more intricate for an intruder to break WEP encryption.
802.1X authentication uses the Extensible Authentication Protocol (EAP) to provide authenticated communication between the client, the wireless access point (WAP), and a Remote Access Dial-In User Server (RADIUS) service. The Extensible Authentication Protocol (EAP) is a internet Engineering Task Force (IETF) standard protocol. To provide a secure authentication process, the EAP protocol regularly produces a new encryption key. This in turn reduces the vulnerabilities of the WEP protocol.
The authentication components used in the 802.1X authentication process are:
-
EAP-TLS authentication: With EAP-TLS authentication, public key certificates are used to authenticate the RADIUS service, and the client. EAP-TLS authentication is therefore a stronger authentication method than PEAP authentication. To implement EAP-TLS authentication, you need to use a Public Key Infrastructure (PKI).
-
Protected EAP (PEAP) authentication: While EAP-TLS utilizes public key certificates to authenticate clients; PEAP authentication utilizes a user name and password to authenticate clients. EAP-TLS is therefore the stronger authentication method to authenticate wireless clients. One advantage of using PEAP authentication is that it is easy to implement. When PEAP authentication and the RADIUS service are used together, the encryption keys have to be changed on a regular basis. This in turn ensures that WEP encryption cannot be easily broken. The PEAP authentication process has the following two stages:
-
The RADIUS server is authenticated through the examination of its public key certificate. A Transport Layer Security (TLS) session is established between the client and the RADIUS server.
-
An additional EAP method within the PEAP session authenticates the client to the RADIUS service.
-
-
RADIUS service: The RADIUS service is used mainly to authenticate dial-up users, and can be used to authenticate wireless users when they attempt to connect to the network. One of the main benefits of using the RADIUS service is that user authentication for wireless networks are centralized. When a client transmits a request to establish a connection, the RADIUS service verifies the identity of the client by looking for a match in its authentication database. You can also configure a maximum session time limit which forces clients to regularly re-authenticate to the RADIUS service. During re-authentication, a new shared secret is generated, which makes it more difficult for attackers to decipher the shared secret keys.
The terminology typically used when discussing 802.1X authentication is listed below.
-
Port; a single point of connection to the network.
-
Extensible Authentication Protocol Over LAN (EAPOL); the 802.1X defined standard for encapsulating EAP traffic to enable it to be dealt with by the LAN MAC service.
-
Extensible Authentication Protocol over Wireless (EAPOW); EAPOL messages which are encapsulated over 802.11 wireless frames.
-
Authentication server; the server that verifies whether the supplicant (see below) is authorized to access the authenticator
-
Port access entity (PAE); controls the protocols and algorithms of the authentication technologies of the port.
-
Authenticator PAE; implements authentication before granting access to resources that exist beyond the port.
-
Supplicant PAE; accesses the resources which are permitted by the authenticator.
The process that occurs when a client attempts to connect to a wireless network that uses the 802.1X authentication is explained next:
-
The client attempts to connect to the SSID of the wireless access point (WAP).
-
The client has to authenticate to the WAP if shared network authentication is enabled. The network key is used to authenticate the client.
-
The WAP sends an authentication challenge to the client.
-
The WAP next creates a channel to enable the client to communicate directly with the RADIUS service.
-
When the client initially interacts with the RADIUS server, it first needs to verify that the RADIUS server is in fact who it is. To verify the identity the RADIUS server, the client checks the public key certificate of the RADIUS server.
-
Once the client has verified the identity the RADIUS server, the client has to use 802.1X authentication to authenticate to the RADIUS service.
-
If the RADIUS service and the client are set up to use EAP-TLS authentication, public key certificates are used to authenticate the client to the RADIUS service.
-
If the RADIUS service and the client are set up to use Protected EAP (PEAP) authentication, then a Transport Layer Security (TLS) session is established between the client and the RADIUS service. Once the Transport Layer Security (TLS) session is established, the client starts sending its security credentials to the RADIUS service.
-
When the RADIUS service receives the credentials of the client, it verifies the received credentials to its directory.
-
Access is granted to the client when the following occurs:
-
-
The RADIUS service is able to authenticate the credentials of the client through its authentication database.
-
The access policy allows the client to establish a connection.
-
-
At this stage, the RADIUS service sends the dynamic shared secret to the WAP, and informs the WAP that access was granted for the client.
-
The shared secret is used to encrypt and decrypt communication transmitted between the client and WAP.
Wi-Fi Protected Access (WPA) Overview
Wi-Fi Protected Access (WPA) was developed by the Wi-Fi Alliance to address a few of the weaknesses of the WEP protocol. WPA can use the identical authentication mechanisms and encryption algorithms as the WEP protocol. This allows some degree of support for WPA to be added with only a simple firmware upgrade.
The two encryption methods which can be used with WPA are:
-
Temporal Key Integrity Protocol (TKIP): While WEP also uses the TKIP encryption algorithm, the use of TKIP is improved on by WPA. When WPA and TKIP are used, TKIP generates a unique encryption key for each frame. With WPA, initialization vectors (IVs) are less regularly used which makes it harder for an intruder to break encryption.
-
Advanced Encryption System (AES): The Advanced Encryption System encryption algorithm is more secure than the TKIP encryption algorithm. The downfall of the AES encryption algorithm is that you have to upgrade your hardware to support the algorith.
The primary benefits of using WPA encryption are summarized below:
-
WPA provides better security than what WEP does.
-
WPA uses a unique encryption key for every packet that is transmitted.
The main disadvantages of WPA encryption are summarized below:
-
Some wireless network hardware does not support WPA. WEP on the other hand is generally supported.
-
Windows 2000 and all prior versions do not include integrated support for WPA.
-
You have to manually configure WPA on Windows XP clients.
Planning for Wireless Security
A few issues that need to be clarified when you plan for wireless security are:
-
Determine whether the Wi-Fi Protected Access (WPA) protocol or the Wired Equivalent Privacy (WEP) protocol will be used.
-
If you select to use the WAP protocol, determine whether your hardware needs to be upgraded to support WPA.
-
If you select to use the WEP protocol, determine whether 64-bit or 128-bit encryption will be used.
-
Determine whether 802.1X authentication will be used.
-
Determine whether wireless clients will use IPSec.
-
Determine whether MAC address filtering will be used to limit wireless access based on MAC addresses.
-
Determine whether Group Policy will be used to configure wireless client security settings; or whether it will be manually configured.
-
Determine whether your wireless network security strategy involves monitoring of wireless network activity, and if yes, how and when will you monitor wireless network traffic.
Best Practices for Securing Wireless Networks
The recommended best practices for securing wireless networks are summarized below. Before implementing wireless network security technologies to reduce the security threats of wireless networks, consider these best practices:
-
Study the various available security features of wireless devices to determine whether any of these meet the security requirements which you have defined.
-
Determine on a regular basis whether any wireless vendors have released firmware updates. Apply all firmware updates to your wireless devices.
-
If possible, place the wireless network in a wireless demilitarized zone (WDMZ). A router or firewall should isolate the private corporate network from the WDMZ.
-
DHCP should not be used in the WDMZ.
-
Use extended subnet mask to limit the number of hosts.
-
-
If possible, purchase an AP that enables you to minimize the wireless zone's size through modification of the power output. APs should be placed in the center of a building, and should not be placed near windows.
-
If your security requirements dictate a high level of wireless security, ensure that your wireless devices support the following:
-
802.1X authentication using Extensible Authentication Protocol (EAP) authentication.
-
Temporal Key Integrity Protocol (TKIP)
-
If feasible, you should utilize IPSec to secure communication between the AP and the RADIUS server.
-
-
It is recommended that WAPs and adapters support the following:
-
Firmware updates
-
WEP using 128-bit encryption
-
Disabling of SSID broadcasts
-
MAC filtering to restrict wireless access based on MAC addresses.
-
-
Purchase devices that support dynamic WEP keys if possible. You should also ensure that any static WEP keys are rotated.
-
For WAPs, the best practices are:
-
Change the default administrative password which is sed to manage the AP to a complex, strong password.
-
Change the default SSID of the AP as well.
-
-
The SSID should not contain the following elements:
-
The name of the company.
-
The address of the company.
-
Any other identification-type information
-
-
To protect the network from site survey mechanisms, disable SSID broadcasts.
-
It is recommended that you do not use DHCP for wireless clients. You should definitely not use DHCP if SSID broadcasts are allowed.
-
It is recommended to not use shared key encryption because it leads to the compromise of the WEP keys.
-
Consider enabling MAC filtering.
-
It is recommended to at least use WEP over implementing no wireless network security measures at all.
Implementing and Configuring Wireless Security
Implementing and configuring wireless security can be broken down into the following steps:
-
Plan your wireless security strategy.
-
Plan your wireless access policies.
-
Create the configuration that would force users and computers to be authorized before they can access the wireless network.
-
Plan the certificate infrastructure.
-
Implement a PKI if necessary.
-
Configure your ISA servers:
-
Assign a certificate
-
Create remote access policies (RAPs).
-
-
Configure security settings for WAPs
-
Configure the IP addresses of the IAS servers for the WAPs.
-
Configure wireless clients with the SSID.
-
Configure security settings for wireless clients.
When you plan your wireless access policies, you should ensure that the requirements for your wireless access points (WAPs) are included:
-
Authentication: You should configure that all wireless users need to be authenticated either through EAP-TLS or PEAP.
-
Encryption: You should always select the highest level of encryption.
-
Your WAPs should be located in a secure, protected environment.
-
You should define the naming conventions for SSIDs.
The main configuration settings that you have to specify when you configure your wireless access points (WAPs) are listed below:
-
Set the encryption method as WEP encryption or WPA encryption.
-
Specify the level of encryption.
-
Set 802.1X authentication.
-
Set the authentication method.
-
Configure the IAS RADIUS servers' IP address.
-
Set the shared key that matches to the shared secret that was defined when IAS was configured.
How to configure wireless network security using Group Policy
With Windows Server 2003, the configuration of the wireless network is integrated with Group Policy. You can define Wireless Network (IEEE 802.11) Policy for:
-
Domain controllers
-
Domain
-
Organizational units
-
Specific computer accounts
To configure wireless network security,
-
Open an empty MMC console.
-
Add the Group Policy Object Editor snap-in to the console.
-
Open the GPO.
-
In the console tree, expand Computer Configuration, Windows Settings, and expand Security Settings.
-
Select Wireless Network (IEEE 802.11) Policies.
-
Right-click Wireless Network (IEEE 802.11) Policies and then select Create Wireless Network Policy from the shortcut menu.
-
The Wireless Network Policy Wizard launches.
-
Click Next on the initial screen of the Wireless Network Policy Wizard.
-
Enter a name and description for the new wireless network policy on the Wireless Network Policy Name page. Click Next.
-
Click the Edit Properties checkbox.
-
Click Finish.
-
The Properties dialog box opens automatically.
-
On the General tab, you can set the following security configuration settings:
-
In the Networks To Access list, specify the network types that the client is allowed to connect to.
-
To prevent clients from connecting to untrusted wireless networks, ensure that the Automatically Connect To Non-Preferred Networks checkbox is cleared.
-
-
Switch to the Preferred Networks tab.
-
Click the Add button.
-
The New Preferred Setting Properties dialog box opens. This is the where the following element are configured:
-
The default SSID for the organization.
-
Enable/disable WEP.
-
Enable/disable Shared mode authentication.
-
Specify whether the WEP key is provided automatically.
-
Disable Infrastructure mode.
-
-
The settings typically configured on the Network Properties tab of the New Preferred Setting Properties dialog box are:
-
The Data Encryption (WEP enabled) checkbox is selected.
-
The Key Is Provided Automatically checkbox is selected.
-
The Network Authentication checkbox is left at its default setting of not selected.
-
-
Click the IEEE 802.1X tab on the New Preferred Setting Properties dialog box.
-
Click the Enable Network Access Control Using IEEE 802.1X checkbox to select this configuration setting.
-
In the EAP Type list, select the setting that matches to the setting configured on the IAS server:
-
Smart Card Or Other Certificate
-
Protected EAP
-
-
Select the Authenticate As Computer When Computer Information Is Available checkbox if you want to administer the computer when users are not logged on.
-
If you want to configure the EAP type, click Settings.
-
Use the dialog box to further define the EAP type that you have selected. Click OK.
-
Click OK to close the New Preferred Setting Properties dialog box.
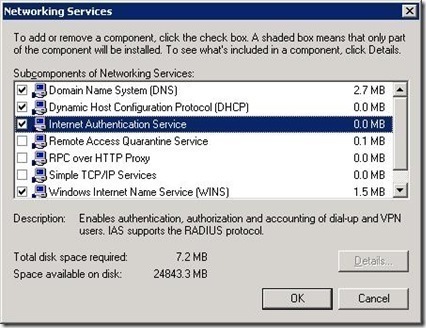
How to configure IAS
-
Click Start, Administrative Tools, and then click Internet Authentication Service to open the Internet Authentication Service console.
-
In the console, right-click RADIUS Clients and then select New RADIUS Client from the shortcut menu.
-
The New RADIUS Client Wizard starts.
-
Add client information for the wireless access point and add the wireless clients as RADIUS Clients. Click Next.
-
On the New RADIUS Client screen, select the RADIUS Standard option from the Client-Vendor drop-down list box.
-
Specify the shared secret password.
-
Click Finish.
How to configure a remote access policy for IAS clients
-
Click Start, Administrative Tools, and then click Internet Authentication Service to open the Internet Authentication Service console.
-
In the console tree, expand Internet Authentication Service.
-
Select Remote Access Policies.
-
In the right pane, select and double-click the policy which you need to configure.
-
Click the Edit Profile button.
-
Click EAP Methods on the Authentication tab.
-
Click Add in Select EAP providers, select Protected EAP (PEAP), and then click OK.
-
Now, click Protected EAP (PEAP) in Select EAP providers, and then click the Edit button.
-
The Protected EAP Properties dialog box opens.
-
Using the Certificate Issued drop-down list box, select the certificate which the server will utilize for clients to identify it.
-
Check the Enable Fast Reconnect checkbox.
-
In the EAP Type box, select Secure password (EAP-MSCHAPv2)
-
Click OK.
Using Resultant Set of Policy (RSoP) to View and Troubleshoot Wireless Network Policy Assignments
Resultant Set of Policy (RSoP) refers to the sum of all group policies which are applied to a user and computer. This includes all filters and exceptions. Determining the Resultant Set of Policy of a particular user or computer can be an overwhelming experience. To simplify group policy management, and to simplify the process of determining the RSoP of a user or computer, Windows Server 2003 includes the Resultant Set of Policy feature for this purpose. What this means is that you can create and run RSoP queries in Windows Server 2003 to find out what the RSoP of a user or computer is. Based on the information specified in the RSoP query, RSoP collects information on all existing group policies to determine the policies which are associated with a user or computer, and its effects. You can run RSoP queries on a number of different containers and objects, including User accounts, Computer accounts, Sites, Domains, Organizational Units, and Local Computers.
You can use RSoP queries to plan wireless network policy assignment, and to troubleshoot wireless network policy assignments and precedence issues. To examine network policy assignments in RSoP, you have to run a RSoP query.
A RSoP query has the following two modes:
-
Planning Mode: This mode enables you to create a RSoP query to test Group Policy settings with the purpose of simulating its effects on users and computers. RSoP planning mode is typically used for the purposes listed below:
-
To simulate GPO processing over a slow network connection, such as a dial-up, DSL or ISDN connection.
-
To simulate loopback.
-
To test the precedence of GPO application.
-
-
Logging Mode: This mode enables you to determine what policy settings have been applied to a particular user or computer. RSoP logging mode is typically used for the purposes listed below:
-
Identify any failed policy settings. This includes policy settings which have been overwritten.
-
Determine the manner in which local policy affect Group Policy settings, and the manner in which certain security groups affect the application of Group Policy settings.
-
The ways in which you can create a RSoP query using planning mode or logging mode are listed below:
-
Create a RSoP query console, and use the Resultant Set Of Policy Wizard to specify the settings or options which the query should utilize.
-
Open the Active Directory Users and Computers console, right-click the object which you want to query, and click All Tasks and then Resultant Set of Policy (Planning) or Resultant Set of Policy (Logging) from the shortcut menu.
-
Open the Active Directory Sites and Services console, right-click the site which you want to query, and click All Tasks and then Resultant Set of Policy (Planning) or Resultant Set of Policy (Logging) from the shortcut menu
How to use RSoP queries to assess wireless network policy assignments
-
Click Start, Run, and enter mmc in the Run dialog box. Click OK.
-
From the File menu, select Add/Remove Snap-In.
-
When the Add/Remove Snap-In dialog box opens, click Add.
-
When the Add Standalone Snap-In dialog box opens, select Resultant Set of Policy from the available list, and click Add.
-
Click Close to close the Add Standalone Snap-In dialog box opens.
-
Click OK in the Add/Remove Snap-In dialog box.
-
Proceed to right-click Resultant Set of Policy in the MMC, and select Generate RSoP Data on the shortcut menu.
-
The Resultant Set of Policy Wizard launches.
-
Click Next on the Welcome To The Resultant Set Of Policy Wizard page.
-
When the Mode Selection page appears, select Logging Mode. Click Next.
-
On the Computer Selection page, you can choose the This Computer option, or you can choose the Another Computer option. If you select the Another Computer option, click Browse to select the other computer.
-
Enable the Do Not Display Policy Settings For The Selected Computer In the Results | Display User Policy Settings Only checkbox if you only want to view user policy settings. Click Next.
-
On the User Selection page, you can choose the Current User option, or you can choose the Select A Specific User option. If you select the Select A Specific User option, choose the user from the list.
-
Enable the Do Not Display User Policy Settings In the Results | Display Computer Policy Settings Only! checkbox if you only want to view computer policy settings. Click Next.
-
When the Summary Of Selections page opens, verify that the options which you chose are correct.
-
Click Finish.
-
To view the query results, click the folders in the RSoP console tree.
Monitoring Wireless Connections
Windows Server 2003 includes the Wireless Monitor snap-in that can be used to monitor wireless activity. You can use the Wireless Monitor snap-in to monitor wireless connections to APs on the corporate network. The Wireless Monitor snap-in works by:
-
Gathering information on those APs that are within range of the wireless network adapter of the server.
-
Extracts data that was collected at the APs.
How to add the Wireless Monitor snap-in to a MMC
-
Click Start, Run, and enter mmc in the Run dialog box. Click OK.
-
From the File menu, select Add/Remove Snap-In.
-
When the Add/Remove Snap-In dialog box opens, click Add.
-
When the Add Standalone Snap-In dialog box opens, select Wireless Monitor from the available list, and click Add.
-
Click Close to close the Add Standalone Snap-In dialog box opens.
-
Click OK in the Add/Remove Snap-In dialog box.
How to monitor AP traffic
-
Open the Wireless Monitor console.
-
In the console tree, select Wireless Monitor.
-
Locate the server on which the wireless network adapter is installed.
-
If you want to monitor all those APs that are within range of the wireless network adapter of the server, click Access Point Information.
-
All AP data will be displayed in the details pane of the Wireless Monitor console. The various columns that contain AP information are:
-
Network Name; lists the SSIDs of the networks that are within range of the wireless network adapter.
-
Network Type; lists the network mode as either Access Point or as Peer to Peer.
-
MAC Address; lists the MAC address of the networks that are within range of the wireless network adapter.
-
Privacy; indicates whether WEP is enabled or disabled.
-
Signal Strength; indicates the signal strength being broadcast from those networks which are within range of the server's wireless network adapter.
-
Radio Channel; indicates the radio channels being used by the networks.
-
Access Point Rate; indicates the data rate that the wireless network supports.
-
Network Adapter GUID; shows the GUID for every existing wireless adapter.
-
How to monitor wireless client traffic
-
Open the Wireless Monitor console.
-
In the console tree, select Wireless Monitor.
-
Locate the server on which the wireless network adapter is installed.
-
Click Wireless Client Information.
-
The data that is displayed in the details pane includes information on all traffic moving through the APs that are within range of the wireless network adapter of the server; and all traffic that the wireless network adapter detects, irrespective of whether it is moving through an AP.
-
The various columns that contain wireless client information are:
-
-
Source; displays the software which produced the event.
-
Type; indicates the event type as Error, Warning, Information or Packet
-
Time; displays when the event was logged.
-
Local MAC Address; indicates the MAC address of the local network adapte.
-
Remote MAC Address; indicates the MAC address of the remote network interface.
-
Network Name; lists the SSID of the network associated with the logging of the event.
-
Description; contains a brief description of the event that was logged.
-

Follow Us!