
Installing and Configuring RRAS as a VPN Server
How to install the Routing and Remote Access Services (RRAS)
- Click Start, and then click Manage Your Server.
- Select the Add or remove a role option.
- The Configure Your Server Wizard starts.
- On the Preliminary Steps page, click Next.
- A message appears, informing you that the Configure Your Server Wizard is detecting network settings and server information.
- When the Server Role page appears, select the Remote Access/VPN Server option and then click Next.
- On the Summary of Selections page, click Next.
- The Welcome to the Routing and Remote Access Server Setup Wizard page is displayed
How to configure RRAS as a VPN Server
- Click Start, Administrative Tools, and then click Routing And Remote Access to open the Routing And Remote Access management console.
- In the console tree, select the server that you want to configure.
- Right-click the server, and then click Configure And Enable Routing And Remote Access from the shortcut menu.
- The Routing and Remote Access Server Setup Wizard starts.
- Click Next on the Routing and Remote Access Server Setup Wizard Welcome page.
- On the Common Configuration page, select the Remote Access (Dial-Up Or VPN) option. Click Next.
- On the Remote Access page, select the VPN server checkbox and the Dial-up server checkbox (optional) and then click Next.
- On the Macintosh Guest Authentication page, select the Allow Unauthenticated Access For All Remote Clients option if you have Macintosh File and Print services installed and you want the remote access server to allow anonymous remote access.
- On the IP Address Assignment page, select the Automatically option if you want use a DHCP server for IP address assignment for remote clients; or select the From A Specified Range Of Addresses option if you want to specify your own address range.
- If you chose the From A Specified Range Of Addresses option, proceed to specify the address range for remote clients. Click Next.
- On the Managing Multiple Remote Access Servers page, select the No, Use Routing And Remote Access To Authenticate Connection Requests option. Click Next.
- Click Finish when the Completing the Routing and Remote Access Server Setup Wizard page appears.
- You will be notified that the DHCP Relay Agent has to be configured with the IP address of the DHCP server so that DHCP messages can be allowed from your remote clients.
- Click OK to acknowledge this notification.
How to configure VPN ports for the remote access server
You can increase the number of clients that are allowed to concurrently connect to the VPN server, and you can enable and disable the use of PPTP or L2TP. You add more L2TP ports or PPTP ports in the Routing And Remote Access management console, through the Ports Properties dialog box for the remote access server.
To configure additional PPTP ports or L2TP ports,
- Click Start, Administrative Tools, and then click Routing And Remote Access to open the Routing And Remote Access management console.
- In the console tree, expand the node for the server that you want to configure.
- Right-click Ports and then select Properties from the shortcut menu to open the Ports Properties dialog box.
- Select WAN Miniport (PPTP) or select WAN Miniport (L2TP).
- Click the Configure button.
- The Configure Device dialog box opens.
- In the Maximum Ports box, specify the number of connections that the port type which you have selected can support. The default configuration setting when the RRAS is installed is 5 PPTP ports and 5 L2TP ports.
- If you want to specify the IP address of the public interface to which VPN clients connect, use the Phone Number For This Device box on the Configure Device dialog box.
- If you want to disable connections for the port type, select the Use the Remote Access Connections (Inbound Only) checkbox on the Configure Device dialog box.
- If you do not want to allow the specific VPN type to be used for demand-dial connections, deselect the Demand-Dial Routing Connections (Inbound And Outbound) checkbox.
- Click OK to close the Configure Device dialog box.
- Click OK to close the Ports Properties dialog box.
How to configure the VPN client computer
- On the client computer open Control Panel.
- Right-click Network Connections and then select open from the shortcut menu.
- Click New Connection Wizard to start the New Connection Wizard.
- Click Next on the Welcome to the New Connection Wizard page.
- On the Network Connection Type page, select Connect to the network at my workplace, and then click Next.
- Click Virtual Private Network Connection, and click Next.
- Enter a name for the connection and click Next.
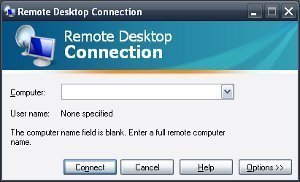
- Specify the external IP address of the VPN server, or the FQDN of the VPN server, and then click Next.
- Select the Anyone’s use – If you want the connection to be available to everyone who uses the computer and then click Next.
- When the Completing the New Connection Wizard page appears, click Finish.
- The logon dialog box is displayed after you click the Finish button to complete the New Connection Wizard.
How to grant dial-in permission for user accounts
- Click Start, Administrative Tools, and then click Computer Management to open the Computer Management console.
- Double-click Local Users and Groups.
- Double-click Users.
- Double-click the specific user account that you want to grant access for to open the Properties dialog box of the user.
- Click the Dial-in tab.
- Click Allow access, and then click OK.
- On the client computer, access the Network Connections folder, and then double-click the VPN connection that you want to configure.
- Specify the user account credentials, and then click Connect.
How to manually install the DHCP Relay Agent
The DHCP Relay Agent is automatically installed when you install the Windows Server 2003 Routing And Remote Access Service (RRAS).
You can though manually install the DHCP Relay Agent,
- Click Start, Administrative Tools, and then select Routing And Remote Access to open the Routing And Remote Access console.
- In the console tree, expand the Server node of the server that you want to install the DHCP Relay Agent for.
- Expand the IP Routing node.
- Right-click the General node, and then select New Routing Protocol from the shortcut menu.
- The New Routing Protocol dialog box opens.
- Select DHCP Relay Agent.
- Click OK.
- The DHCP Relay Agent node appears beneath the IP Routing node in the console tree of the Routing And Remote Access management console.
How to add the DHCP server that DHCP requests should be forwarded to
- Click Start, All Programs, Administrative Tools and then click Routing and Remote Access to open the Routing And Remote Access management console.
- Expand the IP Routing node and in the console tree.
- Right-click the DHCP Relay Agent node, and then select Properties from the shortcut menu to access the DHCP Relay Agent Properties dialog box.
- On the General tab, enter the IP address of the DHCP server that DHCP requests should be forwarded to in the Server Address text box, and click Add.
- Repeat the above process for each DHCP server that you want DHCP requests forwarded to.
- Click OK.
How to configure the DHCP Relay Agent on a network interface
- Click Start, All Programs, Administrative Tools and then click Routing and Remote Access to open the Routing And Remote Access console.
- Expand the IP Routing node in the console tree.
- Right-click the DHCP Relay Agent node and then select NewInterface from the shortcut menu.
- The New Interface For DHCP Relay Agent dialog box opens, showing the interfaces that the DHCP Relay Agent can be attached to.
- Select the interface that is on the same subnet as the DHCP clients.
- Click OK.
- In the DHCP Relay Properties dialog box, ensure that the Relay DHCP Packets checkbox is selected on the General tab.
- You can change the Hop-Count Threshold and Boot Threshold values.
- Click OK.
How to configure a VPN Gateway/Router
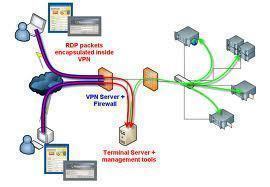
A VPN gateway or VPN router is simply a router that connects to another VPN gateway, or to multiple VPN gateways. VPN routers are usually created to provide an extension to the LAN.
To configure a VPN router to enable connectivity between LANs,
- Click Start, Administrative Tools, and then click Routing And Remote Access to open the Routing And Remote Access management console.
- In the console tree, select the server that you want to configure.
- Right-click the server, and then click Configure And Enable Routing And Remote Access from the shortcut menu.
- The Routing and Remote Access Server Setup Wizard starts.
- Click Next on the Routing and Remote Access Server Setup Wizard Welcome page.
- On the Common Configuration page, select the Remote Access (Dial-Up Or VPN) option. Click Next.
- On the Remote Access page, select the VPN server checkbox and then click Next.
- On the VPN Connection page select the network interface for connecting the server to the Internet.
- Leave the default setting that enables security on the selected interface unchanged, and then click Next.
- On the Address Assignment page, select the From A Specified Range Of Addresses option and click Next.
- On the Address Range Assignment page click New and then proceed to specify an address range for the remote VPN gateway. Click Next.
- On the Managing Multiple Remote Access Servers page, select the No, Use Routing And Remote Access To Authenticate Connection Requests option. Click Next.
- Click Finish when the Completing the Routing and Remote Access Server Setup Wizard page appears.
- You will be notified that the DHCP Relay Agent has to be configured with the IP address of the DHCP server so that DHCP relay messages can be allowed from your remote clients.
- Click OK to acknowledge this notification.
- To configure the demand-dial interface, in the console tree of the Routing and Remote Access console, select Network Interfaces.
- From the Action menu, click New Demand-dial Interface.
- The Demand-dial Interface Wizard starts.
- Click Next on the Demand-dial Interface Wizard Welcome page.
- Enter a name for the demand-dial VPN interface and then click Next.
- On the Connection Type page, choose the Connect using virtual private networking (VPN) option and click Next.
- On the VPN Type page, select the VPN protocol which you want to use and then click Next. You can leave the Automatic selection default option unchanged.
- On the Destination Address page, provide the IP address that corresponds to the public interface of the remote gateway and then click Next.
- On the Protocols And Security Page, select the Route IP packets on this interface checkbox, and click Next.
- On the Static Routes For Remote Networks page, click the Add button and then enter the LAN subnet address for the remote LAN on the Static Route dialog box.
- Click OK and then click Next.
- Specify the username, password and domain for authentication purposes and click Next.
- Click Finish on the Completing the Demand-dial Interface Wizard page.
- You now have to configure the interface for a persistent connection.
- In the console tree of the Routing and Remote Access console, select the demand-dial interface that you want to configure, and then select the Action menu. Click the Options command on the Action menu.
- lick Persistent Connection and click OK.
- In the console tree of the Routing and Remote Access console, expand the IP Routing node.
- Select Static Routes to verify that the static route to the remote LAN subnet is configured. The static route should be displayed in the Details pane.
- To configure packet filtering properties, select the demand-dial interface and select Properties from the shortcut menu.
- On the General tab, select Inbound Filters and then select New.
- Specify the appropriate LAN subnet information. Click OK.
- Select the Drop all packets except those that meet the criteria below option and then click OK.
- Select the demand-dial interface and select Properties from the shortcut menu.
- On the General tab, select Outbound Filters and then select New.
- Specify the appropriate LAN subnet information. Click OK.
- Select the Drop all packets except those that meet the criteria below option and then click OK.
- Click OK again.
- In the console tree of the Routing and Remote Access console, select the demand-dial circuit from Network Interfaces, and then select the Connect command from the Action menu.
- Examine the information in the Status column and Connection State column to verify the status and state of the tunnel.
How to specify server log file properties for the remote access server
- Click Start, Administrative Tools, and then select Routing And Remote Access to open the Routing And Remote Access console.
- In the console tree right-click the server that you want to configure and then select Properties from the shortcut menu.
- Click the Logging tab.
- The logging options logging options which you can set are:
- Log errors only
- Log errors and warnings
- Log all events
- Do not log any events
- Click OK.
Configuring RRAS LAN Routing and Packet Filters
How to configure RRAS LAN Routing
- Click Start, Administrative Tools, and then click Routing And Remote Access to open the Routing And Remote Access management console.
- In the console tree, select the server that you want to configure.
- From the Action menu, select Configure And Enable Routing And Remote Access.
- The Routing And Remote Access Server Setup Wizard starts.
- Click Next on the initial page of the Routing And Remote Access Server Setup Wizard.
- On the Configuration page, select the Custom Configuration option and then click Next.
- On the Custom Configuration page, select the LAN Routing checkbox and then click Next.
- On the Completing The Routing And Remote Access Server Setup Wizard page, click Finish.
- Click Yes in the message box that appears, asking whether the Routing and Remote Access service should be started.
- To configure the routing protocol, in the console tree of the Routing And Remote Access console, expand the IP Routing node.
- Select the General subnode.
- From the Action menu, click the New Routing Protocol command.
- The New Routing Protocol dialog box opens.
- Select RIP Version 2 For Internet Protocol from the Routing Protocols list. Click OK.
- A RIP node is added beneath the IP Routing node in the console tree of the Routing And Remote Access console
- Select the RIP node in the console tree of the Routing And Remote Access server.
- From the Action menu, click the New Interface command.
- The New Interface For RIP Version 2 For Internet Protocol dialog box opens.
- Using the Interfaces list, select the interface which connects the computer to the LAN and then click OK.
- The RIP Properties dialog box for the interface which you have selected is displayed next.
- On the General tab, specify whether the RIP version 1 or RIP version 2 packet format must be used for outgoing messages.
- Specify whether broadcasts or multicasts should be used.
Specify whether incoming messages using the RIP version 1 format; or RIP version 2 format; or whether both of these formats should be processed. - Click the Advanced tab.
- Set the value in the Periodic Announcement Interval (Seconds) setting to 300 seconds. This is the frequency at which the router transmits RIP messages.
- Set the value in the Time Before Routes Expire (Seconds) setting to 1800 seconds.
- Set the value in the Time Before Route Is Removed (Seconds) setting to 1200 seconds.
- Click OK.
How to configure RRAS packet filters
- Click Start, Administrative Tools, and then click Routing And Remote Access to open the Routing And Remote Access management console.
- Right-click the server in the console tree, and then select Configure And Enable Routing And Remote Access from the shortcut menu.
- The Routing and Remote Access Server Setup Wizard starts.
- Click Next on the initial page of the Routing and Remote Access Server Setup Wizard.
- Select the Custom Configuration option. Click Next
- Click LAN routing and then click Next.
- Click Finish.
- Click Yes to enable LAN routing.
- Proceed to enable the RIP Version 2 for Internet Protocol.
- Once RIP Version 2 is enabled, right-click RIP in the console tree, and then select New Interface from the shortcut menu.
- Select the interface.
- The default setting for RIP if you are running Windows Server 2003 is:
- Outgoing packet protocol: dropdown list = RIP version 2 broadcast
- Incoming packet protocol: dropdown list = RIP version 1 and 2
- The following configuration is recommended if you are using RIP version 2; and Ethernet as the transport medium:
- Outgoing packet protocol: dropdown list = RIP version 2 multicast
- Incoming packet protocol: dropdown list = RIP version 2 only
- Click OK
Configuring a Remote Access Dial-Up Server
How to configure a RRAS Dial-Up server
- Click Start, Administrative Tools, and then click Routing And Remote Access to open the Routing And Remote Access management console.
- In the console tree, select the server that you want to configure.
- From the Action menu, select Configure And Enable Routing And Remote Access.
- The Routing And Remote Access Server Setup Wizard starts.
- Click Next on the initial page of the Routing And Remote Access Server Setup Wizard.
- On the Configuration page, select the Custom Configuration option and then click Next.
- On the Custom Configuration page, select the Dial-Up Access checkbox and then click Next.
- On the Completing The Routing And Remote Access Server Setup Wizard page, click Finish
- Click Yes in the message box that appears, asking whether the Routing and Remote Access service should be started.
- To configure modem ports, in the console tree of the Routing And Remote Access console, expand the node for the server that you want to configure.
- Right-click Ports and then select Properties from the shortcut menu to open the Ports Properties dialog box.
- Select the specific device and then click the Configure button.
- To enable remote access, select the Use the Remote Access Connections (Inbound Only) checkbox and click OK.
How to configure properties for the RRAS Dial-Up server
- Click Start, Administrative Tools, and then select Routing And Remote Access to open the Routing And Remote Access console.
- In the console tree, select the server that you want to configure, and then select Properties from the Action menu.
- Verify that the Remote access server checkbox is enabled on the General tab.
- Click the Security tab.
- In the Authentication Provider list, select the Windows Authentication option.
- Choose the authentication protocol for you clients./li>
- In the Accounting Provider list, select the Windows Accounting option.
- Click the IP tab.
- Select the Enable IP Routing checkbox.
- Select the Allow IP-Based Remote Access And Demand Dial Connections checkbox.
- The IP Address Assignment section of the IP tab is used to configure the manner in which the IP addresses are assigned to remote access clients.
- If you are using a DHCP server, then you can select the Dynamic Host Configuration Protocol (DHCP) option.
- In the Adapter list, choose the adapter for providing DNS, DHCP and WINS services for dial-in clients.
- Click OK.
How to configure a Dial-Up Gateway
You configure a Dial-Up Gateway by completing the following process:
- Configure the user account, with the correct dial-in permissions, that the remote access server would use to connect to the remote LAN.
- Configure a demand dial interface to the remote network.
- Configure a static route to point non-LAN traffic to the dial-up connection.
- Click Start, Administrative Tools, and then select Active Directory Users and Computers to open the Active Directory Users and Computers management console.
- In the console tree, right-click the Users container and then select New and then User from the shortcut menu.
- In the New Object – User dialog box, enter the correct account name information and then click Next.
- Enter the password information for the new user account in the Password and Confirm Password textboxes.
- Ensure that the User must change password at next logon checkbox is not selected and then click Next to complete the creation of new user account.
- In the console tree, select the Users container, right-click the user account which you created and then select Properties from the shortcut menu.
- When the Properties dialog box for the user account appears, click the Dial-in tab.
- Click the Allow access option.
- Click OK.
- To configure the demand dial interface, click Start, Administrative Tools, and then select Routing And Remote Access to open the Routing And Remote Access console.
- In the console tree, right-click the server that you want to configure, and then select Configure And Enable Routing And Remote Access.
- The Routing And Remote Access Server Setup Wizard starts.
- Click Next on the initial page of the Routing And Remote Access Server Setup Wizard.
- On the Configuration page, select the Custom Configuration option and then click Next.
- On the Custom Configuration page, select the Demand-dial connections (used for branch office routing) checkbox and then click Next.
- On the Completing The Routing And Remote Access Server Setup Wizard page, click Finish
- Click Yes in the message box that appears, asking whether the Routing and Remote Access service should be started.
- In the console tree of the Routing And Remote Access management console, right-click Network Interfaces and then select New Demand-dial Interface from the shortcut menu.
- The Demand-dial Interface Wizard starts.
- Click Next on the Demand-dial Interface Wizard Welcome page.
- Enter a name for the new demand-dial interface and then click Next.
- On the Connection Type page, choose the Connect using a modem, ISDN adapter, or other physical device option and click Next.
- On the Protocols And Security Page, select the Route IP packets on this interface checkbox, and click Next.
- On the Static Routes For Remote Networks page, click the Add button to configure the static route.
- Click OK in the Static Route dialog box. Click Next.
- Specify the username, password and domain for authentication purposes on the Dial Out Credentials page. Click Next
- Click Finish on the Completing the Demand-dial Interface Wizard page.
- This process has to be completed for the remote LAN as well.
Configuring the Remote Access Server to use Multilink with Bandwidth Allocation Protocol (BAP)
How to enable BAP
- Click Start, Administrative Tools, and then select Routing And Remote Access to open the Routing And Remote Access console.
- In the console tree, right-click the server that you want to configure and then click Properties from the shortcut menu.
- Click the PPP tab on the Server Properties dialog box.
- Click the Dynamic bandwidth control using BAP and BACP to activate it.
How to enable Multilink
- Click Start, Administrative Tools, and then select Routing And Remote Access to open the Routing And Remote Access console.
- In the console tree, expand the server node to display the Remote Access Policies node.
- Select Remote Access Policies.
- In the details pane, double-click the remote access policy that should be configured.
- Click Edit Profile.
- Use the Multilink tab to configure properties for the Multilink policy.
- Click OK.
How to enable multiple device dialing on the client system
- Open Control Panel.
- Click Network and Dial-up Connections.
- Right-click the connection for multilink and then select Properties from the shortcut menu.
- Select Options and then Multiple devices.
- If you want to dynamically dial and hang up devices click Dial devices only as needed and then click Configure.
- If you want to use all devices, click Dial all devices.
- If you want to use only the first available device, click Dial only first available device.
- Click OK.
Configuring Remote Access Policies for Remote Access Servers
You can configure remote access policies to control the access rights of remote users. Remote access policies allow you to authenticate remote connections and enforce any specific connection restrictions.
The following connection settings can be administered by configuring standard remote access policy settings.
- Authentication methods: The different authentication methods that can be configured are listed below:
- EAP
- CHAP
- MS-CHAP
- MS-CHAP version 2
- PAP
- PEAP
- Unauthenticated access
- Remote access permissions
- Group membership
- Time of day
- Type of connection
The following connection settings can be administered by configuring advanced remote access policy settings.
- Access server identity
- Access client phone number or MAC address
- Specify to use user account dial-in properties
- Specify that unauthenticated access be allowed
After a remote access policy authorizes a connection, you can also configure that certain constraints be enforced. Constraints are based on the following:
- Encryption strength
- IP packet filters
- Idle timeout
- Maximum session time
How to configure a remote access policy for a remote access server
- Click Start, Administrative Tools, and then select Active Directory Users and Computers to open the Active Directory Users and Computers management console.
- In the console tree, select the Users container, right-click the user account which you want to configure and then select Properties from the shortcut menu.
- The Properties dialog box for the user account appears.
- Click the Dial-in tab.
- Ensure that the Remote Access Permission (Dial-in or VPN) option is specified as Control Access Through Remote Access Policy.
- To configure the remote access policy for the remote access server, click Start, Administrative Tools, and then select Routing And Remote Access to open the Routing And Remote Access console.
- In the console tree, expand the server’s node and then right-click Remote Access Policies and select New Remote Access Policy from the shortcut menu.
- Select the desired policy configuration settings through the various pages of the New Remote Access Policy Wizard.
- The different policy conditions that you can specify are listed below:
- Authentication Type; the authentication type, for instance PAP or CHAP.
- Called Station ID; the network access server’s (NAS) phone number.
- Calling Station ID; the phone number used by the caller.
- Client-Friendly Name; the name of the RADIUS client requiring authentication.
- Client IP Address; the IP address of the RADIUS client.
- Client Vendor; the network access server’s (NAS) vendor.
- Day and Time Restrictions; when a connection can be established.
- Framed Protocol; IAS uses this to determine the frame type of the incoming packets.
- MS RAS Vendor; the RADIUS client machine’s vendor.
- NAS Identifier; the network access server’s (NAS) name.
- NAS IP Address; IP address of the NAS.
- NAS Port Type; the media used by the client.
- Service Type; the type of service requested.
- Tunnel Type; the type of tunnel (PPTP, L2TP).
- Windows Groups; the groups to which the user establishing a connection belongs.
How to configure a remote access policy to authorize access by user
- Click Start, Administrative Tools, and then select Routing And Remote Access to open the Routing And Remote Access console.
- In the console tree, expand the server’s node and then right-click Remote Access Policies and select New Remote Access Policy from the shortcut menu.
- The New Remote Access Policy Wizard starts.
- Click Next on the New Remote Access Policy Wizard Welcome page.
- On the Policy Configuration Method page, click the Use the wizard to set up a typical policy option.
- Enter a name in the Policy name box, and then click Next.
- On the Access Method page, select between the following options and then click Next:
- Dial-up
- VPN
- Wireless
- Ethernet
- On the User or Group Access page, click the User option and then click Next.
- On the Authentication Methods page, specify the authentication methods which the policy will accept and then click Next.
- On the Policy Encryption Level page, specify the encryption types and then click Next.
- Click Finish to create the new remote access policy.
How to configure a remote access policy to authorize access by group
- Click Start, Administrative Tools, and then select Routing And Remote Access to open the Routing And Remote Access console.
- In the console tree, right-click Remote Access Policies and then select New Remote Access Policy from the shortcut menu.
- The New Remote Access Policy Wizard starts.
- Click Next on the New Remote Access Policy Wizard Welcome page.
- When the Policy Configuration Method page appears, select the Use the wizard to set up a typical policy option.
- Enter a name in the Policy name box, and then click Next.
- On the Access Method page, select between the following options and then click Next:
- Dial-up
- VPN
- Wireless
- Ethernet
- On the User or Group Access page, select the Group option and then click Add to specify the group name.
- Using the Enter the object names to select box, specify the group and then click OK.
- Click Next on the User or Group Access page.
- On the Authentication Methods page, specify the authentication methods which the policy will accept and then click Next.
- On the Policy Encryption Level page, specify the encryption types and then click Next.
- Click Finish to create the new remote access policy.
How to restrict remote access by connection type
- Click Start, Administrative Tools, and then select Routing And Remote Access to open the Routing And Rmote Access console.
- In the console tree, expand the server’s node and then right-click Remote Access Policies and select New Remote Access Policy from the shortcut menu.
- The New Remote Access Policy Wizard starts.
- Click Next on the New Remote Access Policy Wizard Welcome page.
- On the Policy Configuration Method page, click the Set up a custom policy option.
- Enter a name in the Policy name box, and then click Next.
- On the Policy Conditions page, click the add button to add a condition.
- When the Select Attribute dialog box opens, specify the desired attribute and then click the Add button.
- Click Next on the Policy Conditions page.
- On the Permissions page, click the Deny remote access permission option and then click Next.
- When the Profile page appears, use the Edit button if you want to change the profile. Click Next.
- Click Finish to create the new remote access policy.
Follow Us!