Primary Site Server Installation Overview
A SMS site server is the Windows server on which SMS 2.0 is installed and running. The SMS site server is the main access point between the SMS database and administrators. The SMS server manages the SMS site and component attributes.
The SMS site server must be installed on a domain controller or on a member server. It cannot be installed on a stand-alone server. Before installing the primary site server, you should consider the factors listed here on server resource requirements:
-
Installing Windows, SMS and SQL Server on the same disk would typically depreciate performance, unless the logical disk is a RAID implementation. The site server running SMS must have a minimum of 1 GB disk space. For packages, you would need roughly four times the amount of disk space.
-
For large SMS sites that have multiple site systems and subsites, you need to ensure that the CPU does not become a processing bottleneck. You need to ensure that you have sufficient processing power when the site server runs SQL Server.
-
It is recommended that you monitor the Committed Bytes and Memory Page Reads/sec counters in Performance Monitor to ensure that you have sufficient RAM. If you constantly have a high Committed Bytes counter, you should consider increasing the RAM.
SMS is reliant on the SQL Server and its database. All SMS services in a primary site utilize SQL Server to update and manage the site database. The performance of SMS is therefore directly impacted by the performance of SQL Server. Here, SMS performance would be determined by the following factors:
-
SQL Server performance.
-
SQL Server hardware capacity
-
SQL Server configuration settings
-
Network access between the site database server and the site server
-
SMS Provider location.
The best possible performance is assured for SMS if SQL Server is installed solely for SMS. In addition to this, SMS performance is also maximized when the SMS site database and the computer for the SMS site server role exists on the same computer. The performance of SMS is also enhanced if the data and log devices reside on separate physical drives or on RAID arrays.
It is recommended that you install SQL Server on a separate computer to the site server when the following conditions apply:
-
A dedicated computer cannot be used for the site server and SQL Server.
-
There is a fast reliable network connection between the site server computer and the site database computer.
-
SQL Server manages other databases.
-
The site runs mainly as a software distribution service.
The hardware installation requirements listed below are a guideline for a typical site server deployment which has to support the main SMS functions, and roughly one hundred computers:
-
The production site server should be a computer specified on the Windows NT/Windows 2000 Server/Windows Server 2003 Hardware Compatibility List (HCL).
-
SMS, Windows NT/Windows 2000/Windows Server 2003, and SQL Server run on computers which include CISC based x86 or RISC based Alpha CPUs. The hardware requirements for the two systems differ to some extent.
-
One Pentium 133 processor is required to run a site server
-
64 MB of RAM is the minimum RAM requirement for a site server which contains a dedicated SQL Server. 128 MB of RAM should be assigned for a site server that supports about 100 client computers.
-
Approximately 500 MB of disk space is typically required for a Windows NT Server version 4.0 (SP4), SQL Server version 7.0 and a SMS site server installation. The size of the site database and software metering database are excluded from figure though. Packages require additional hard disk space.
The software requirements are relevant to each site server installation.
-
Site servers have to be installed on Windows NT Server version 4.0 (SP4), Windows NT Server version 4.0 Enterprise Edition, or Windows 2000 Server or Windows Server 2003.
-
The disk partition used for the SMS source files must be NTFS formatted partitions.
-
Internet Explorer 4.01 or above has to be installed to use the SMS Administrator console and the help features.
When you install SMS, the default configuration is that all SMS roles are installed on an SMS site server:
-
Logon points: This is a SMS site system that is the initial connection point between a SMS site and client computer. Functions performed by logon points include the collection of discovery information on the client, determines the site assignment of the client and passes the client a list of client access points (CAPs).
-
Client access points (CAPs): This is a SMS site system that operates as the exchange point between SMS clients and the SMS site server. At the CAP; inventory, and status information and discovery information is gathered. Advertisement information can be retrieved from the CAP.
-
Distribution points: This is a SMS site system that installs the following components which deal with running a package at a SMS client computer: Package files, Programs, and Scripts.
-
Software metering servers: This is a SMS site system which enables administrators to perform a number of management activities: Grant/deny licenses for applications running on an SMS client; Monitor and track application usage on SMS clients; and Restrict application usage on SMS clients.
How the SMS databases are created
Microsoft SQL Server stores the SMS data. SQL Server can be installed before you install SMS or it can be installed when you install SMS. If you choose to install SQL Server with the installation of SMS, the SMS Setup program creates the databases that it needs. When you create the SQL Server databases during the SMS installation process; SMS logs on to SQL Server to create the databases. It uses SQL Server accounts to create and modify the databases. The method that SMS utilizes to access SQL Server is determined by the SQL Server logon method that is configured.
The SMS Setup program creates the SQL Server database device files, which contains the following components:
-
Tables; store the data.
-
Statements; compiled sets of SQL statements
-
Views; for displaying data.
-
Indexes; for finding data.
The following SMS databases are created with the installation of SMS components:
-
When you install a primary site server, the SMS site database is created.
-
When you enable SMS software metering, the SMS software metering database is created.
These two databases use the following types of data files:
-
Primary data file; contains the SMS data.
-
Transaction log file; contains database modification information.
Because SMS uses the time settings of SQL Server for task scheduling, you should ensure that the time settings of the SMS site server and SQL Server are synchronized.
After SMS is installed, the necessary management data is written to the databases. You can utilize either of the following methods to access the databases:
-
WBEM application access: The SMS Administrator console provides database access through the WBEM layer and SMS Provider layer. The rights of the user as specified by Windows 2000/Windows Server 2003 domain user account and Windows 2000/Windows Server 2003 group membership determines what access is allowed to the WBEM objects.
-
SMS service account access: The SMS services use the SMS service account to collect data from the site systems. SQL Server manipulates the site database.
-
Software metering service account access: The SQL Server account manipulates the software metering database for the software metering service account.
How to configure SQL Server for SMS
The SQL Server configuration settings listed below can be tuned for SMS operations. You should as far as possible set maximum values for the SQL Server configuration parameters so that the assigned resources can be increased/decreased as necessary:
-
Memory; you can configure SQL Server to dynamically assign RAM for SQL Server functions so that it dynamically shrinks or grows its memory utilization.
-
User Connections; user connections provide access to SQL Server. One user typically needs 40 KB of RAM on a SQL Server computer. When you install SMS, the user connections listed here are used:
-
SMS Administrator console access nodes
-
SMS service operations
-
-
Open objects; these objects affect how much tables, stored procedures, triggers, etc; can be open. Because open object assignment is handled dynamically, you do not need to manually configure it.
-
Locks; this SQL Server parameter is also self configuring and does not need to be manually specified.
-
Primary data file;
-
For the SMS site database, the primary data file must be over 50 MB. The primary data file must also have 100 KB storage space for each SMS client computer.
-
For the software metering database, the primary data file must be over 10 MB. The primary must have 200 KB storage space for each client computer that has the Software Metering Client Agent installed.
-
-
Transaction log device file;
-
For the SMS site database, the transaction log device file must be over 20 percent of the associated primary database file.
-
For the software metering database, the transaction log device file must be over 15 percent of the associated primary database file.
-
-
Temporary database; contains the temporary tables and stored procedures and is included in the master database. For the primary data file, the temporary database size should roughly be 20 percent of your total device files.
How to install a primary site server
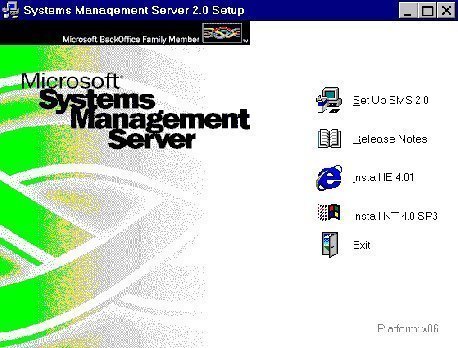
The SMS Setup program starts automatically when the SMS CD-ROM is placed in the CD-ROM drive and autorun is configured on the Windows computer.
After SMS Setup starts, the Systems Management Server 2.0 Setup screen is displayed, listing the following SMS installation options:
-
Set up SMS 2.0
-
Install SP4a for Windows NT Server version 4.0
-
Install Internet Explorer 4.01
-
View SMS release notes
You can use either of the SMS installation methods to install the primary site server:
-
Express Setup; for simple SMS installations the Express Setup is the best option. With Express Setup, most of the SMS features are automatically installed.
-
CustomSetup; this method provides the majority of the SMS features and is the recommended method for installing SMS.
The SMS components which are installed during the Express Setup method and the Custom Setup method are listed below, together with the default value, if applicable:
-
SMS site server;
-
Express Setup: installed
-
Custom Setup: installed
-
-
SMS Administrator console;
-
Express Setup: installed
-
Custom Setup: installed
-
-
Crystal Info;
-
Express Setup: installed
-
Custom Setup: optional
-
-
NetWare Bindery support;
-
Express Setup: not installed
-
Custom Setup: optional
-
-
NetWare NDS support;
-
Express Setup: not installed
-
Custom Setup: optional
-
-
Network Monitor
-
Express Setup: installed
-
Custom Setup: optional
· Package automation scripts;
-
Express Setup: installed
-
Custom Setup: optional
· Product compliance database;
-
Express Setup: installed
-
Custom Setup: optional
· Remote Tools;
-
Express Setup: installed
-
Custom Setup: optional
· SMS Installer;
-
Express Setup: installation point is created
-
Custom Setup: optional
· Software metering;
-
Express Setup: installed and enabled
-
Custom Setup: optional
· Heartbeat Discovery method;
-
Express Setup: enabled, once a day
-
Custom Setup: enabled, once a week
· Windows Networking Logon Discovery method;
-
Express Setup: enabled for each logon. The Modify
Logon Script option is disabled. -
Custom Setup: disabled
· Windows NT User Discovery method;
-
Express Setup: enabled, once daily at midnight.
-
Custom Setup: disabled
· Windows NT User Group Discovery method;
-
Express Setup: enabled, once daily at midnight.
-
Custom Setup: disabled
· Network Discovery method;
-
Express Setup: disabled
-
Custom Setup: disabled
· NetWare NDS Logon Discovery method;
-
Express Setup: disabled
-
Custom Setup: disabled
· NetWare Bindery Logon Discovery method;
-
Express Setup: disabled.
-
Custom Setup: disabled
· Windows Networking Logon Client Installation method;
-
Express Setup: enabled
-
Custom Setup: disabled
· NetWare Bindery Logon Client Installation method;
-
Express Setup: disabled
-
Custom Setup: disabled
· NetWare NDS Logon Client Installation method;
-
Express Setup: disabled
-
Custom Setup: disabled
· Windows NT Remote Client Installation method;
-
Express Setup: enabled for domain controllers, servers and workstations running Windows NT.
-
Custom Setup: disabled
· Advertised Programs Client Agent;
-
Express Setup: enabled, polls at 60 minute intervals for advertised programs.
-
Custom Setup: disabled
· Event To Trap Translator Client Agent;
-
Express Setup: enabled
-
Custom Setup: disabled
· Hardware Inventory Client Agent;
-
Express Setup: enabled, once weekly.
-
Custom Setup: disabled
· Software Inventory Client Agent;
-
Express Setup: enabled, once weekly.
-
Custom Setup: disabled
· Remote Tools Client Agent;
-
Express Setup: enabled, and all remote options are enabled as well.
-
Custom Setup: disabled
· Software Metering Client Agent;
-
Express Setup: enabled, polls at 4 hour intervals for changes. Licensing is not enforced.
-
Custom Setup: disabled
When you install the primary site server, you have to provide the following information when the SMS Setup program is run:
-
Site code; a unique three character code which will identify the primary site server within the SMS hierarchy.
-
Site name; the name assigned to the site, which will be associated with the value specified for the Site Code. The name specified here is displayed in the SMS Administrator console.
-
Domain name; the domain containing the server for SMS installation.
-
SMS service account; must be a user account in the domain specified.
-
Number of client computers to be supported; used for sizing the SMS database.
To install the primary site server;
-
Insert the SMS 2.0 CD and select Set Up SMS 2.0 from the autorun menu to start the SMS Setup program.
-
Click Next on the Welcome to Systems Management Server Setup Wizard screen.
-
On the System Configuration screen you can click Next as well. Here, SMS Setup checks whether the computer has a previous version of SMS installed.
-
When the Setup Options screen is displayed, select the Install an SMS primary site option and then click Next.
-
The Installation Options screen is displayed if you have not installed SQL Server on the same server as the site server. Here, you can select either the Express Setup option or the Custom Setup option, and then click Next.
-
The Systems Management Server License Agreement screen is displayed. Read and then accept the licensing information by clicking the I Agree button.
-
On the Product Registration screen:
-
Provide a name in the Name box
-
Enter the organization name in the Organization box.
-
Enter the CD product key in the Product ID field
-
Click Next.
-
On the SMS Site Information screen:
-
In the Site code field, provide a three character site code. The code that you specify has to be unique in the SMS hierarchy.
-
In the Site name field, enter a descriptive name for the site that details the purpose or location of the site
-
In the Site domain field, enter the domain in which the site is being installed.
-
Click Next.
-
On the SMS Service Account Information screen:
-
In the Account Name field, provide the name of the SMS Service account which you will be utilizing.
-
In the Password field and Confirm Password field, enter the password for the SMS Service account.
-
Click Next.
-
On the SMS Primary Site Client Load screen, specify how much SMS client computers this site will manage in the Number of SMS clients field. The number which you indicate affects the SQL database size which SMS will create. Click Next.
-
The remainder of this Setup illustration is specific to a custom installation of SMS.
-
On the SMS Server Platform screen, the Intel X86 or compatible checkbox is selected by default. Leave this option selected and then click Next.
-
The Setup Installation Options screen is displayed. This is where you select which SMS components should be installed. Setup automatically selects the NTFS partition that has the most free disk space for the location for installing the files. Click Next.
-
The Dedicated Copy Of SQL Server screen is displayed next. Here, you should indicate whether Setup should install a dedicated copy of SQL Server on the site server, or specify that SQL Server has been installed. Click Next.
-
On the SQL Server Information for SMS Site Database screen, check that the correct information is displayed in the Computer running SQL Server field. Click Next.
-
On the SQL Server Account for SMS Site Database screen, enter the appropriate information, and click Next.
-
On the SQL Server Devices for the SMS Site Database screen, ensure that the Yes option is selected. This would result in Setup creating the site database and devices. Click Next.
-
On the SMS Site Database Name page, verify that the proper database name is provided and then click Next.
-
On the SQL Server Device Directory Path for SMS Site Database page, verify that the correct location is specified. Click Next.
-
The SQL Server Information for Software Metering Database screen is displayed if you have selected to install the software metering database as well. Verify that the computer running SQL Server field contains the proper information. Click Next.
-
On the SQL Server Devices for the Software Metering Database screen, click the Yes option so that SMS Setup automatically creates the software metering database as well. Click Next.
-
On the Software Metering Database Name screen, ensure that the correct database name is specified and click Next.
-
On the SQL Server Device Directory Path for Software Metering Database, specify where the primary data device and log device for the software metering database will be located. Click Next.
-
On the Concurrent SMS Administrator Consoles screen, enter the appropriate value for the number of SMS Administrator consoles and for the minimum number of SQL Server connections, and then click Next.
-
On the Completing the Systems Management Server Setup Wizard screen, verify the setup summary information displayed and then click Finish.
-
Click Yes when a message is displayed, requesting verification that the SMS Service account should be created.
-
After SMS is installed, the Systems Management Server program group and its icons are displayed.
Server Modifications after the SMS Site Server Installation
After running the SMS 2.0 Setup program to install a SMS primary site server, a number of modifications are made to the Windows Server operating system.
The modifications made by the SMS Setup are listed here:
-
Installs the SMS client software components in the SMS folder. This is the folder that Setup creates in the operating system root.
-
Installs and starts the SMS Client Service.
-
Installs and starts default client agents.
-
Creates a SMS Program Group.
-
Creates and enables SMS services.
-
Creates directory shares.
-
Creates registry entries.
SMS Program Group Modifications
The SMS Setup program adds the SMS program group to the Start menu when you install the SMS primary site server. The SMS components which were specified for installation determines which icons or shortcuts are displayed within the SMS program group.
The SMS program group’s shortcuts are listed here:
-
Network Monitor – NETMON.EXE: Used to start Network Monitor which is used to collect, view, track and analyze network traffic.
-
Network Monitor Control Tool – MCSUI.EXE: Used to start the Network Monitor Control Tool which is used to configure network tracking tools; so that you can be alerted when certain events occur on the network.
-
SMS Administrator console – SMS.MSC: Used to start the SMS Administrator console, SMS management tool. The SMS Administrator console is used to configure and manage SMS.
-
SMS Administrator Guide – SMSADMIN.CHM: Used to start the online version of the SMS Administrator's Guide.
-
SMS Courier Sender – COURSEND.EXE: Used to start the SMS Courier Sender Manager. The SMS Courier Sender Manager is used to create, receive, and view the status of parcels.
-
SMS Release Notes – README.CHM: Used to start the SMS Version 2.0 Release Notes.
-
SMS Setup – SETUP.EXE: Used to start the SMS 2.0 Setup Wizard. You can run the SMS 2.0 Setup Wizard if you need to change the options for the existing SMS installation. This includes changing, removing, or resetting site settings.
SMS Services
When you install the SMS primary site server, a number of SMS services or processes are installed and enabled. To view which SMS services are installed, open the SMS Administrator console and select the SMS Service Manager node. Then, click the Start the SMS Service Manager item on the Action menu.
By default, the following SMS services are started on the primary site server:
-
SMS Executive service; this service controls over 40 thread components.
-
SMS Site Component Manager service; manages the installation, removal and state of processes and threads.
-
SMS SQL Monitor service; maintains the site database and communicates all changes to the appropriate SMS service and thread components.
-
Windows Management Service; used by the SMS Administrator console and WBEM compliant applications.
-
The SMS Site Backup service.
-
Info Agent service, Info APS service and Info Sentinel service support Crystal Info. These services are started if you have installed Crystal Info.
The main SMS service is the SMS Executive service. The SMS Executive service updates the database. The different process threads managed by the SMS Executive service are listed here:
-
Client Configuration Manager
-
Client Install Data Manager
-
Collection Evaluator
-
Courier Sender Confirmation
-
Despooler
-
Discovery agents:
-
NetWare Bindery Logon Discovery
-
NetWare NDS Logon Discovery
-
Network Discovery
-
Windows NT Logon Discovery
-
Windows NT Server Discovery
-
Windows NT User Account Discovery
-
Windows NT User Group Discovery
-
-
Discovery managers:
-
NetWare Bindery Logon Manager
-
NetWare NDS Logon Manager
-
Windows NT Logon Manager
-
-
Discovery Data Manager
-
Distribution Manager
-
Hierarchy Manager
-
Inbox Manager
-
Inbox Manager Assistant
-
Inventory Data Loader
-
Inventory Processor
-
Installation managers:
-
NetWare Bindery Installation Manager
-
NetWare NDS Installation Manager
-
Windows NT Logon Installation Manager
-
-
License Metering
-
License Server Manager
-
Offer Manager
-
Replication Manager
-
Scheduler
-
Senders:
-
Asynchronous RAS Sender
-
Courier Sender
-
ISDN RAS Sender
-
SNA RAS Sender
-
Standard Sender
-
X.25 RAS Sender
-
-
Site Control Manager
-
Status summarizers:
-
Advertisement Status Summarizer
-
Component Status Summarizer
-
Site System Status Summarizer
-
-
Software Inventory Processor
-
Status Manager
Directory shares
The SMS services and SMS client agents utilize directory shares for the following purposes:
-
Site communication
-
Communicate with the site systems.
The SMS directories created by the SMS Setup program are:
-
SMS directory
-
CAP_site code directory
The SMS directory is the main SMS installation directory because it contains all the necessary site components for servicing and managing the SMS site.
The shares that SMS Setup creates when using the Custom Setup option to install the SMS primary site server are listed here:
-
CAP_site code share; created on each CAP site system.
-
Cinfo installation share; used for Seagate Crystal Info services, and is created in the SMS installation directory.
-
SMS_site code share; points to the root of the SMS installation.
-
SMS_SITE share; used when SMS site servers need to connect to another site to copy data or package information.
-
SMS_PKGx$ share; a hidden share created on the site server. Used when site systems perform the distribution point role.
Registry Entries
A number of registry keys are added when you install SS. These registry keys are used to store the SMS configuration information:
-
SOFTWAREMicrosoftNAL; stores CAP access location and fixed disk information.
-
SOFTWAREMicrosoftSMS; stores SMS setup and site information. Service configuration and database locations are also kept here.
-
SOFTWAREMicrosoftWBEM; used by WBEM enabled applications.
-
SYSTEMCurrentControlSetServices; SMS services and startup information is stored here.
Users and Group
When you install a SMS primary site server, the following user and group accounts are created:
-
SMS service account
-
SMSClient_site code user account
-
SMSServer_site code user account
-
SMS Admins group
-
SMSInternalCliGrp
Upgrading SMS 1.2 to SMS 2.0
A few recommendations with regard to upgrading a SMS 1.2 primary site server to a SMS 2.0 site server are noted below:
-
Upgrade the operating system and the database to the latest versions which are supported by SMS 1.2.
-
Consolidate the SMS 1.2 site server functions back to the SMS primary site server.
-
For SQL Server, back up the SMS site database and master database before you perform a SQL Server upgrade.
-
Back up the SMS 1.2 registry keys.
-
Perform the actual upgrade.
There are a number of SMS 1.2 settings which are dropped when the upgrade from SMS 1.2 to SMS 2.0 is performed.
-
All security settings which were configured with the SMS Security Manager.
-
Client disk inventory
-
All jobs, other than system jobs
-
Named queries
-
SMS logon scripts
-
Collected files
-
Package Definition Files (PDF)
-
All custom management information format (MIF) files.
How to modify the primary site server installation
You may find that you need to make modifications to the primary site server after SMS is installed. The SMS setup program is added to the SMS program group after you install the SMS primary site server. You can run SMS Setup from the SMS CD-ROM to modify SMS, reset SMS, or remove SMS.
The following Setup Options are available for modifying an existing primary site server installation:
-
Upgrade an existing SMS installation option: Used to upgrade an existing SMS installation in terms of both SMS version updates and service pack updates. When the Upgrade an existing SMS installation option is selected, the SMS services are stopped and the registrations for component object model (COM) controls are removed. Next, the SMS databases are updated and the upgrade process starts to reinstall the SMS files to the site server, register the component object model (COM) controls, and restart the SMS services. Finally, the update process creates the SMS program group again.
-
Remove SMS option: Used to remove a primary site and all site systems that are managed by the specific primary site. When the Remove SMS option is selected, all associated SMS registry settings, and SMS services and files are removed. There are though some components which are not uninstalled, namely; Internet Explorer, SQL Server, the WBEM Windows Management service and all packages which are installed on distribution points and SMS client computers.
-
Modify or reset the current installation option:Used to change the following aspects of SMS:
-
SMS service account name
-
SMS service account password
-
SQL Server hosting the SMS databases
-
Authentication method used to access the SMS databases.
-
To modify the primary site server installation,
-
Insert the SMS 2.0 CD.
-
The SMS Setup Wizard starts.
-
Click Next on the SMS Setup Wizard Welcome screen.
-
Click Next on the System Configuration screen.
-
On the Setup options screen, select the Modify or reset the current installation option and then click Next.
-
On the SMS Server Platform screen, specify any additional platform support required and then click Next.
-
On the Setup Installation Options screen, choose all the additional SMS 2.0 features that you require and then click Next.
-
On the SMS Service Account Information screen, change the SMS Service account name or its associated password and then click Next.
-
On the Database Modification screen, perform the necessary software metering database changes and then click Next.
-
On the Integrated Security For SMS Site Database screen, you can specify either integrated security or standard security to access the SMS site database. Click Next.
-
On the Integrated Security For Software Metering Database, you can specify either integrated security or standard security to access the software metering database. Click Next.
-
On the Completing The Systems Management Server Setup Wizard screen, click Finish after checking the configuration changes that you have made.
How to remove a primary site server
Removing a primary site server is a two-fold process:
-
You first have to remove the site server client software
-
Remove the actual primary site server
To remove the site server client software,
-
Open the Registry Editor.
-
Locate and select the HKEY_LOCAL_MACHINESoftwareMicrosoftSMSClientConfigurationClient Properties registry key.
-
Click the Registry Editor menu and then click Edit.
-
Click Add Value.
-
The Add Value dialog box opens.
-
For the value name, enter SMS Client Deinstall.
-
For the data type, enter REG_SZ.
-
Click OK.
-
The String Editor dialog box opens.
-
Enter True and click OK.
-
Close the Registry Editor.
-
Open the Control Panel utility.
-
Initiate the Services program.
-
Select the SMS Client Service option.
-
To stop the SMS Client Service, click Stop.
-
Restart the SMS Client Service by clicking Start. This causes the SMS Client Service to access the registry and start the deinstall process.
To remove the primary site,
-
Insert the SMS 2.0 CD.
-
The SMS Setup Wizard starts.
-
Click Next on the SMS Setup Wizard Welcome screen.
-
Click Next on the System Configuration screen.
-
On the Setup Options screen, select the Remove SMS option and then click Next.
-
The SMS Database Deinstallation Options screen is displayed.
-
Select the Delete SMS site database checkbox to delete the SMS site database.
-
Select the Delete software metering database checkbox to delete the SMS software metering database.
-
Click Next and then click Finish.
Follow Us!