The computer BIOS (Basic Input/Output System) is found on Windows computers. The BIOS is the first application launched during the computer’s boot process. The program is used to check for and initialize computer hardware during the start-up process prior to passing control of the computer to the operating system. Unlike the OS that is normally saved on the local hard drive, a computer’s BIOS is stored as updateable firmware on a ROM (Read Only Memory), EEPROM (Electrically Erasable Programmable Memory), or flash memory chip on the motherboard.
When was BIOS Invented?
Gary Kildall is credited with invented the term BIOS which first appeared in the CP/M operating system in 1975. At the time, it was used to describe the part of the OS loaded during the boot time which directly interfaced with the computer hardware. Microsoft DOS adopted these ideas in the first versions of DOS that included similar .COM and .SYS files very similar to those used in CP/M. Other legacy terms used for the bootstrap functionality of BIOS were boot loader, boot monitor, and boot ROM. Through the early 1990s, the PC’s BIOS was stored on either PROM (Programmable Read Only Memory) or ROM chips located on the computer’s motherboard. As the demand for increased complexity and to update the BIOS increased, the computer’s BIOS were shifted to being stored on flash memory drives or EEPROM chips in the mid-1990s. Today, the size of some computer BIOS’s can exceed 16 megabytes in size.
What is the Computer BIOS?
The Basic Input/Output System (BIOS) is tasked with conducting a power-on self-test when a computer is initially turned on or booted. After completing this test, the BIOS is responsible for initializing the computer host and attached hardware such as the hard drive, CPU, mousse, keyboard, video card(s), RAM, and other major hardware. Once this step is complete, the boot loader software will be located (typically on the computer’s hard drive or CD/DVD drive). Once located, control of the system will be passed to the OS to continue the system boot or start process.
The computer BIOS on a computer running the Windows OS is firmware stored on a flash memory or EEPROM chip located on the computer’s motherboard. The computer’s BIOS can be updated by the end-user through the BIOS UI (user interface) and provides functionality to: change or set the system clock, turning off system hardware, selecting the drive or device to use as a computer boot device, configure system hardware, and setting system or BIOS passwords. With each new generation of computer hardware, both the functionality included in the BIOS and size of the programming code saved in the firmware has increased. The extensible firmware interface (EFI) was released in the mid-2000’s as an alternative to BIOS on 64 bit 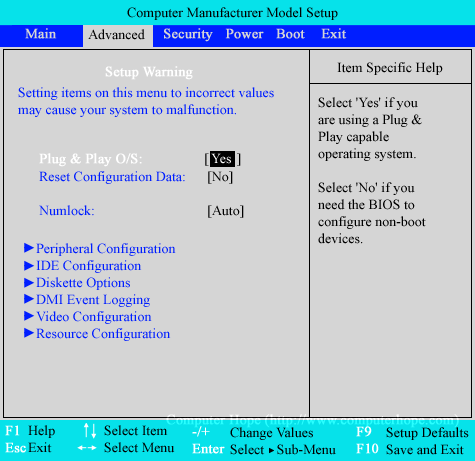 computers, Linux Kernel 2.6.1 or newer, and x86 or Intel chipped Mac computers.
What is the BIOS Sequence?
The BIOS sequence has commonalities across Windows PCs, but is specific to the computer manufacturer. Across manufacturers, the BIOS will normally begin with a check of the CMOS (Configuration Memory Operating System) for any specialized settings for the computer. Next, it will load the computer’s device drivers and computer hardware interrupts. Power management and the computer handlers will be initialized, and BIOS will also conduct a self-test for power. The system settings will be displayed, and it will determine the bootable devices in or connected to the computer and start the host’s boot sequence based on the preferred device to load the computer’s operating system. The order that these checks are accomplished can be modified by the computer manufacturer based on specific needs of the platform.
How to Change the BIOS through CMOS
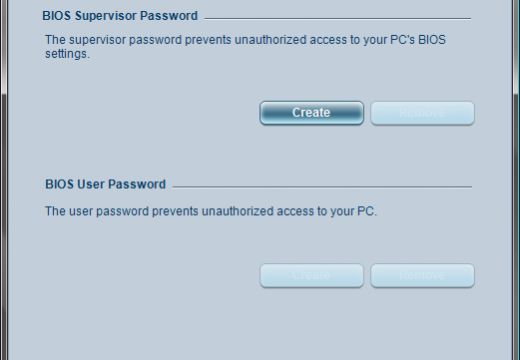
In order to change the BIOS settings through the CMOS setup and interface, the end-user must access the setup during the boot process of the computer. This access relies upon a combination of one or more key strokes during the computer’s start-up to interrupt the start-up process. For most Windows computers, these keys or sequence of required keys will be displayed on the computer’s screen during reboot. Once the user gains access to the CMOS setup, there will be several options available to him or her to make changes. Unlike the traditional Windows interface, the BIOS configuration user interface (UI) does not support the use of the Windows mouse. Keyboard keys such as the arrow keys and “+” or “-“symbols must be used to navigate through the setup menus and make changes. Available settings for modification include changing the system date and time, Plug-and-Play setting modifications, driver configuration, password settings, changing the system boot sequence, memory settings, and changing how the computer’s power is managed. Once the BIOS is changed through the computer’s CMOS interface, it will save the changes and force a restart of the computer for them to take place.
What are the Common BIOS Access Codes?
When looking for the common BIOS access codes, the key strokes will vary a bit depending on the BIOS supplier and computer vendor. Each of these entities has their own codes built-in to the computer to allow access to the BIOS setup. The following list includes some of the more commonly encountered codes:
BIOS Supplier Codes
Bios supplier codes are normally included on OEM built or supplied computers intended for resale to consumers.
Advanced Logic Research (ALR) – There are two access codes: “F2″ or “CTRL” + ”ALT” + “ESC”.
Advanced Micro Devices (AMD) – Access code is: “F1″.
American Megatrends (AMI) – Access code is “Del”.
Award BIOS – There are two access codes: “DEL” or “CTRL” + ”ALT” + ”ESC”.
Datatech Enterprises (DTK) – Access code is: “CTRL” + “ALT” + “ESC”.
Pheonix BIOS – There are two access codes: “CTRL” + “ALT” + “INS” or “CTRL” + “ALT” + “INS”.
Computer Vendor BIOS Codes
Every computer manufacturer typically customizes the BIOS to work more efficiently with the computer hardware and software included in the specific computer system. Some of the BIOS setups will require a password to access. This is normally due to the password “feature” being turned on by an administrator. The following are the most common BIOS access codes used by the major computer manufacturers:
Acer – There are three access codes: “F1″, “F2″ or “CTRL” + “ALT” + “ESC”.
ARI – There are two codes: “CTRL” + “ALT” + “ESC” or “CTRL” + “ALT” + “DEL”
AST – There are two codes: “CTRL” + “ALT” + “ESC” or “CTRL” + “ALT” + “DEL”
Compaq – The access code is: “F10″.
CompUSA – The access code is: “DEL”.
Cybermax – The access code is: “ESC”.
Dell Computers– The access codes are: “F1″, “F2″, “F3″, “F10″, “F12″, “Del” or “FN
+ “F1″ on Dell laptops.
eMachines – The two access codes are: “DEL” or “F2″.
Gateway – The two access codes are: “F1″ or “F2″.
Hewlett-Packard (HP) – The three access codes are: “F1″, “F2″ or “Esc”.
IBM – The three access codes are: “F1″, “CTRL” + “ALT” + “INS”, or “CTRL” + “ALT” + “DEL”.
Intel – The access code is: “DEL”
Lenovo – The four access codes are: “F1″, “F2″, “CTRL” + “ALT” + “F3”, or “CTRL” + “ALT” + “INS”.
Micron – The three access codes are: “F1″, “F2″ or “DEL”.
Packard Bell – The three access codes are: “F1″, “F2″ or “DEL”.
Seanix – The access code is: “Del”.
Sony – The three access codes are: “F2″, “F3″ or “DEL”.
Toshiba – The three codes are: “F1″, “F2″ or “ESC”.
How to Update BIOS
The computer’s BIOS may require updating periodically to allow computer hardware that has been manufactured since the computer was produced to be recognized. Updating or changing the BIOS on a computer requires specialized software from the BIOS manufacturer. Once obtained, the update to the BIOS must be the appropriate one for the version of BIOS installed on the computer. To ensure the right update is applied, the version of the current BIOS can be found by checking the date and revision number listed on the computer screen during the computer’s startup. This information can then be used on the BIOS manufacturer’s website to find and download the appropriate update. The BIOS update utility and update itself is then copied to a CD or DVD to use the next time the computer boots. Note that you may have to change the boot order of the computer to look at the CD/DVD drive first during the boot sequence. After the utility program is run, the old BIOS software will be erased and replaced with the current version provided by the manufacturer.
What is Extensible Firmware Interface
The Extensible Firmware Interface (EFI) was created as a replacement for the Basic Input/Output System (BIOS). EFI was invented primarily to help the expansion of Intel chipped CPUs (x86) to non-Windows operating systems such as found on Mac OS X. To date, the support by other computer manufacturers to switch to EFI has been slow, but Intel continues to push for support of the technology. For the version implemented on Mac OS X, Apple has included a number of the Open Firmware commands to include startup disk selection (pressing the “option” key during startup) and the Target Disk Mode (pressing the “T” key during startup. EFI is supported on the following operating systems: Windows Server 2003, 64 bit Windows (to include Windows Vista 64 bit), Mac OS X 10.4.4+, and some of the Linux distributions. EFI is not supported on 32 bit Windows distros and some of the Linux variants.
Do Macs Have BIOS?
A common misperception by Mac users is that the operating system (OS) has a BIOS. Macs that do not use EFI have traditionally used OpenFirmware for PowerBooks, iBooks, eMacs, iMacs, Dual G5s, and G4 Mac Minis, etc. In order to access OpenFirmware on a Mac, the following key sequence is used: “CMD” + “OPT” + “O” + “F” simultaneously during the computer boot process. If the sound is turned on, there will be audible chimes. If you have never restarted your Mac (many Mac users have not), simply press the power button for 10 seconds or so while pressing the keys to enter the OpenFirmware interface. Once you have successfully accessed the interface you will see the following on the computer’s screen:
Ok
0>
Common commands for Mac users to leverage while accessing the OpenFirmware interface include:
Mac-boot – To boot the Mac using the default boot device
Boot cd:,installyaboot – To boot the Mac using the CD using the yaboot directory on Linux CDs.
Eject cd – Ejects a CD/DVD from the Mac.
For those who are familiar with the Sun Microsystems/Oracle SPARC systems, the Open Firmware interface functions similarly by storing environmental variables using the setenv command. These variables can be viewed using printenv. Another commonality is that both systems are stored on NVRAM.
Common Open Firmware System/User Defined Variables
Auto-boot? – Assigned a Boolean value to assess whether the computer shop be automatically booted or drop to using open firmware.
Boot-device – A string value used to assign the boot device, partition, and file type to load on boot for the computer.
Boot-command – A string value used for assigning an alias to be used during the OS boot process.
Boot-file – A string value that contains the location of the bootinfo.txt style script. It is considered a legacy open firmware variable that can be used for assigning a chrp style script.
ahmad kakar
hi the issue i have is I had virus and reloaded new window but my speakers dont play the sound which were played before and i got new speakers today but still same problem so when u try to go to contl panl the messg says no audio device found thanks for your help
memenode
You might need to install the drivers of your sound card.