An Introduction to Power Management and its Features
Power management is a component of system performance that affects how Windows makes use of power when the computer is running under normal conditions. You can use the Power management settings to preserve energy. This in turn extends the life of hardware components of the system because they are powered down during periods when there is no user activity. The power management feature is extremely beneficial for laptop users.
Microsoft Windows XP and OnNow capable computers can manage the power of a computer in a manner where the consumption of power is minimized when not needed. Windows XP is able to immediately move the computer and any needed peripherals to an available state when they are needed. What this means is that the computer operates in a low power usage when it is not required. Windows XP can shift to different modes that actually simulate system shutdown. When it moves into one of these states; no data, applications, or programs currently loaded is lost. Windows XP Professional offers a few attractive power management capabilities for desktop users and mobile users. The OS supports the Advanced Configuration and Power Interface (ACPI) specification. It is ACPI that offers reliable power management and system configurations.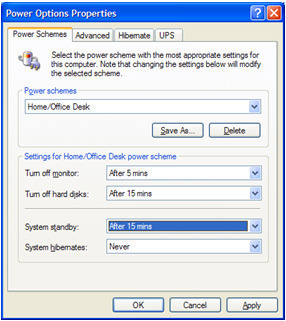
A system is typically shifted from the low power usage state when it receives wake events from a modem or other device, application, or network connection. Because of Windows XP Professional's advanced power management features, it provides for the following situations:
-
You can configure a computer as a telephone answering device. The computer will shift from a low power usage state when there is a pending call
-
You can also configure a computer as a host for a shared printer. The computer moves from a low power usage state when a network connection is received that needs printing.
-
You can configure scheduled tasks to wake the computer to perform scheduled tasks
-
You can configure security mechanisms to shift a computer to an available state to transmit e-mails when certain predefined conditions arise.
As mentioned earlier, Windows XP supports the ACPI specification. For the above mentioned features to work, the computer has to be ACPI compliant. When the computer is ACPI compliant, Windows XP can manage power efficiently. It can ensure that the computer is using minimal power when the computer is not functioning fully. Windows XP also ensures that the computer and all its peripherals are immediately available when users or a network connection requires it. This is possible because applications and devices that are ACPI compliant function together with the OS to respond to switches in power mode.
The features provided by power management are summarized below:
-
The computer preserves power in the low power state when it is not being used. The computer can however wake instantly when certain events occur.
-
Startup time and shutdown times are reduced. This enables a user to access the computer faster when it shifts for the low power usage state.
-
When applications support power management features, they communicate those components that should not be moved into the sleep state, to the OS.
-
Power efficiency is especially enhanced for laptop/mobile users.
-
The life of hardware components are extended when components are powered down when the computer is inactive. Noise is also decreased.
How Power Policy works
The power policy manager operates together with devices and applications to enforce those settings that specify the manner in which power should be preserved. The components which power polices are based on are listed below:
-
User preference settings
-
Application requirements
-
The features, or capabilities of hardware devices
A device connected to the computer has a power policy owner. The power policy owner is responsible for controlling power for that particular piece of hardware. The policy owner and the policy of the OS operate together to shift the computer to the low power usage state. The policy owner of a device sends a message to the power policy manager to move the device to a low power usage state when it determines that the computer's state can change. When power usage changes for a particular device, this change is communicated to the drivers as well. Device drivers save their device settings if changing to the low power state. They restore the device driver settings if a changeover occurs from the low power state to the available/active state.
Understanding the Differences between ACPI and APM Power Management
You can configure power management options irrespective of whether the computer is enabled for ACPI, or APM. The following section takes a look at ACPI power management.The computer must have an ACPI compliant BIOS which is Windows XP Professional compatible, for it to use the features of power management in Windows XP Professional. Windows XP Professional decides on the hardware abstraction layer (HAL) that should be installed at Setup. The ACPI hardware abstraction layer (HAL) is installed if Windows XP determines that the computer has an ACPI compliant BIOS. If not, a non ACPI HAL is installed. When this occurs, the ACPI power management features cannot be used.
Windows XP Professional Setup uses the procedure explained in the following section to decide on the HAL that should be installed. At startup, Windows XP Professional examines the ACPI BIOS tables. The ACPI BIOS tables contain information on the devices and its associated power management features that are installed on the computer. A non ACPI HAL is installed if the ACPI BIOS tables cannot be located. If the ACPI BIOS tables are incorrect, a non ACPI HAL is also installed. When Windows XP Professional concludes that the ACPI BIOS tables are correct, Setup proceeds to check whether the BIOS of the computer appear on the Incompatible list. It installs a non ACPI HAL when the computer's BIOS appear on this list. Setup proceeds to check the BIOS date when the computer's BIOS is not noted on the Incompatible list. An ACPI HAL is installed when the BIOS date is older than 01/01/1999. When the date of the BIOS is prior to 01/01/1999, Setup checks whether the BIOS is verified to be compatible with Windows XP Professional. If it is, an ACPI HAL is installed. If not, a non ACPI HAL is installed.
How to verify whether a computer is running in ACPI mode
-
Open Control Panel
-
Click Performance and Maintenance, and click System
-
When the System Properties dialog box is displayed, select the Hardware tab
-
Next, click Device Manager
-
When Device Manager opens, click Computer in the details pane
-
Check whether Advanced Configuration and Power Interface (ACPI) PC is shown beneath Computer
-
If it is, the computer is running in ACPI mode
The following section takes a look at APM power management. Windows XP Professional includes support for APM power management as well. APM power management cannot be used for desktop computers because of its limited capabilities. Windows XP Professional's support for APM power management is for providing compatibility with legacy notebook computers.
A system has to meet the following requirements to use APM power management
-
Hardware should be in compliance with standard Windows XP Professional requirements
-
The APM compliant BIOS should not exist in the Disable APM List for its version and date. Windows XP Professional supports APM version 1.2 for portable computers.
-
APM BIOS should be enabled
-
CMOS power control features should be disabled
-
Timeouts should be set as Off
At setup, Windows XP Professional checks whether the BIOS is APM compliant. It checks whether the BIOS of the computer is included in the Auto-enable APM list. If it is, Ntapm.sys and Apmbatt.ys is installed, and APM is enabled. When the BIOS is on the Disable APM list, setup does not install any AMP components, nor does it enable APM.
How to determine whether APM support in included on the portable computer
-
Open Control Panel
-
Click Performance and Maintenance, and click System
-
When the System Properties dialog box is displayed, select the Hardware tab
-
Next, click Device Manager
-
When Device Manager opens, click the View menu, and choose Show hidden devices.
-
The computer includes APM support when NT Apm/Legacy Support is shown in the details pane.
How to enable APM
-
Open Control Panel
-
Click Performance and Maintenance, and click Power Options
-
Click the APM tab.
-
Check the Enable Advanced Power Management support checkbox in the Advanced Power Management area. .
Power Schemes
Power schemes are used to set the following:
-
The manner in which the computer turns off connected devices.
-
The time when the computer turns off these devices.
Power schemes operate by using the Standby and Hibernation features in the following manners:
-
Standby: Occurs when currently used data and programs are stored in memory, and the computer is then put into the low power state. When the computer moves from the low power state, the programs and data previously used are restored. The computer shifts into the active state when the user presses a key on the keyboard, or moves the mouse/pointing device.
-
Hibernation: With Hibernation, the programs and data are stored on the hard disk before the computer is powered off. The user has to power on the computer again to return to the active state. Hibernation is very much like standby, with the difference being that programs and data are stored on the hard disk.
Windows XP Professional includes the preconfigured power schemes listed below:
-
Always On: The monitor is turned off after 20 minutes, the hard disk is never turned off. This option does not initiate Standby or Hibernation
-
Home/Office Desk: The monitor is turned off after 20 minutes, the hard disk is never turned off. This option does not initiate Standby or Hibernation.
-
Max Battery: The monitor is turned off after 15 minutes, and the computer is placed into Standby after 20 minutes. This change to Hibernation after 45 minutes.
-
Minimal Power Management: The monitor is turned off after 15 minutes, the hard disk is never turned off. This option does not initiate Standby or Hibernation.
-
Portable/Laptop: The monitor is turned off after 15 minutes. The computer is placed into Standby after 20 minutes. This is shifted to Hibernation after 3 hours.
-
Presentation: Both the monitor and hard disk are never turned off. This option does not initiate Standby or Hibernation.
How to set/enable a power scheme
-
Open Control Panel
-
Click Performance and Maintenance, and click Power Options
-
Click on the Power Schemes tab on the Power Options dialog box.
-
Choose a power scheme from the Power schemes drop down list box
-
The settings associated with the scheme are displayed in the Turn off monitor and Turn off hard disk drop down list boxes.
-
Click OK to accept the settings.
-
The power scheme is now enabled.
How to modify an existing power scheme or create a new power scheme
-
Open Control Panel
-
Click Performance and Maintenance, and click Power Options
-
When the Power Options Properties dialog box is displayed, choose the power scheme that you want to use.
-
In the Settings area of the Power Options Properties dialog box, change the idle time settings
-
Click OK if you want to modify the current power scheme.
-
Click Save As if you want to create a new scheme.
How to disable Hibernation
The Hibernation feature is enabled by default. You must have the same amount of available disk space as memory for hibernation, because the data and programs currently in the computer's memory are written to the hard disk.
To disable this feature,
-
Open Control Panel
-
Click Performance and Maintenance, and click Power Options
-
Click the Hibernate tab on the Power Options dialog box.
-
Uncheck the Enable hibernate support checkbox.
How to disable password protection for computers for the Standby feature
When a computer shifts from Standby or Hibernation, the user has to by default provide a user name and password to log on to the computer. This is the default configuration setting.
If you want to disable password protection, use the following steps:
-
Open Control Panel
-
Click Performance and Maintenance, and click Power Options
-
Click the Advanced tab on the Power Options dialog box.
-
Uncheck the Prompt for password when computer goes off standby checkbox.
How to configure a mobile computer's battery for monitoring and management
You can use the Power Meter feature to monitor and manage the battery of a mobile computer. The battery status icon is displayed on the taskbar when the computer is running on batteries. This is the default setting. The battery status icon is used to access Power Meter.
Use the steps below to add the battery status icon to the taskbar.
-
Open Control Panel
-
Click Performance and Maintenance, and click Power Options
-
Click the Advanced tab on the Power Options dialog box.
-
Check the Always show icon on the taskbar checkbox.
With mobile computers, you can configure alarms to alert when low-battery and critical-battery levels are reached, and you can specify the manner in which the alarm notification (visual/audible) should be raised.
Use the steps below to set alarms.
-
Open Control Panel
-
Click Performance and Maintenance, and click Power Options
-
Click the Alarm tab on the Power Options dialog box.
-
Proceed to specify the battery levels which you want to use
-
Click Alarm action to set how the notification should raised
When computers use more than one battery, you can also specify that the status of each battery be shown. Use the steps below to enable this view.
-
Open Control Panel
-
Click Performance and Maintenance, and click Power Options
-
Click the Power Meter tab on the Power Options dialog box, and choose the Show details for each battery option.
How to enable a device to wake the computer
The following events are supported to wake a computer from a low power state:
-
Wake on ring event
-
Wake on LAN event
-
Wake on critical battery event
These capabilities are only supported on ACPI based computers.
Use the steps below to configure the computer to be activated by a device:
-
Open Control Panel
-
Click Performance and Maintenance, and click System
-
Click on the Hardware tab, and click Device Manager
-
Proceed to locate and double-click the device that should wake the computer.
-
When the Properties dialog box of the particular device opens, click the Power Management tab.
-
Select the Allow this device to bring the computer out of standby checkbox.
-
Click OK
How to set up button and lid switch functionality to control system power
If you have an ACPI based computer, you can configure the following functionality to administer the power of the system:
-
Power button,
-
Sleep button,
-
Lid Switch action
A button can be associated with one of the following actions:
-
Ask me what to do, Do nothing, Hibernate, Sleep, Shutdown.
Use the steps below to set up a power button:
-
Open Control Panel
-
Click Performance and Maintenance, and click Power Options
-
Click the Advanced tab on the Power Options dialog box.
-
Choose a lid switch action in the When I close the lid of my portable computer section of the tab.
-
Choose a power button action in the When I press the power button on my computer section of tab.
-
Choose a sleep button action in the When I press the sleep button on my computer section of tab.
Using Group Policy settings to configure the Refresh Interval, and to hide Power Options
The refresh interval administers the frequency at which polices are applied to the computer. The default refresh interval setting is 90 minutes. You can use Group Policy refresh settings to configure the refresh interval setting to a value between 0 and 64,800 minutes. An interval offset can also be configured for a refresh interval. The interval offset stops clients that have the identical refresh interval value from simultaneously requesting policy updates. This ensures that an excessive load is not placed on the server. The default interval offset setting is 30 minutes. This value can be changed to a value between 0 and 30 minutes.
Group Policy refresh settings can stop a computer from moving into Hibernation or Standby. This occurs because a policy update actually resets the hibernation or standby timer in the same manner as pressing a key does. You can prevent this from happening by setting the value of the Group Policy refresh interval to a value that is greater than the setting of Hibernation or Standby configured under Power Options of Control Panel.
You can use the Group Policy Control Panel settings to hide Power Options from users, thereby preventing them from specifying any power options. You can use the Group Policy Control Panel settings to show only particular Control Panel tools and options, and to even hide Control Panel.
How to change the Group Policy refresh interval and the interval offset settings for User Configuration settings
-
Click Start, click Run, and enter gpedit.msc in the Run dialog box.
-
In the details pane, click User Configuration, click Administrative Templates, click System, and then click Group Policy.
-
Double-click Group Policy refresh interval for users.
-
Click Enabled
-
Proceed to set a value for the refresh interval and the interval offset
How to change the Group Policy refresh interval and the interval offset settings for Computer Configuration settings
-
Click Start, click Run, and enter gpedit.msc in the Run dialog box.
-
In the details pane, click Computer Configuration, click Administrative Templates, click System, and then click Group Policy.
-
Double-click Group Policy refresh interval for computers.
-
Click Enabled
-
Proceed to set a value for the refresh interval and the interval offset
How to disable policy updates when the computer is running
-
Click Start, click Run, and enter gpedit.msc in the Run dialog box.
-
In the details pane, click Computer Configuration, click Administrative Templates, click System, and then click Group Policy
-
Double-click Disable background refresh of Group Policy
-
Click Enabled
How to hide Power Options
-
Click Start, click Run, and enter gpedit.msc in the Run dialog box.
-
In the Group Policy console tree, click User Configuration, click Administrative Templates, click Control Panel
-
Double-click Hide specified control panel applets
-
Click Enabled
-
Click Show, and then Add
-
Enter power options
How to completely hide Control Panel
-
Click Start, click Run, and enter gpedit.msc in the Run dialog box.
-
In the Group Policy console tree, click User Configuration, click Administrative Templates, click Control Panel
-
Double-click Disable Control Panel
-
Click enabled
shane
Hi, I have somewhat of a unusual question, I want to put a custom built computer in my car and run it to a touch screen display so I can have a vpn set up to my home computer, the problem I am having with this is the power requirement, I don’t want to shut it down every time I get in and out of the car but it can’t stay on at all times either. I was trying to find a way to have it enter sleep mode when power drops below a cretin level, (car is shut off) then wake up when power is restored (car is on). Is this something the operating system can do or will I have to find some kind of program to make it work? Thank you for any answer you can give me.