The Basic Input Output system (BIOS) is a type of software that provides an interface between the hardware components of a computer and its operating system. It is usually stored in a Read Only Memory (ROM) chip. As it is stored in a ROM chip, its contents can never be erased and can be accessed by the computer at all times. Nowadays computers have the BIOS stored on flash memory chips, which allows the BIOS to be updated at any time.
The computer would not be able to function without the assistance of the BIOS. When a computer is first turned on, it sends out instructions to the microprocessor as to what it has to do to load the operating system stored on the hard drive. The BIOS provides for communication between the operating system and the various peripherals connected to it such as the keyboard, monitor, printer and so on. It also handles the settings for various internal components such as the hard drive and system clock.
Another important task the BIOS performs is the Power-On-Self-Test (POST). This test is initiated by the BIOS when a computer is switched on. It is also known as the pre-boot sequence. POST is executed to ensure that all the hardware components, both internal and external, are functioning properly.
How to Change BIOS settings
- The BIOS has a number of settings that can be changed as required. The Standard CMOS features is perhaps the most commonly used area in a BIOS. It permits users to set simple system settings such as time, date, disk drive settings, and boot sequence and so on. It also permits users to make changes to the BIOS itself.
- To access the BIOS setup, perform the following steps:
- Press the BIOS setup key on your keyboard repeatedly to enter the BIOS setup utility. The BIOS setup key is determined by the PC manufacturer and differs with each PC brand. The Esc, Delete, F1, or F2 keys are usually designated as the BIOS setup key.
- The BIOS setup utility screen appears.
- You can use the up and down arrow keys to navigate between the various sections present in the setup utility and also to highlight them. Press the Enter key to access the selected section and use the plus or minus keys, Page Up or Page Down keys to make a selection. To exit from one menu to the other press the ESC key.
- Once you have made changes to the BIOS settings, press the F10 key to save your changes and exit the BIOS. Your computer will now reboot normally.

shared
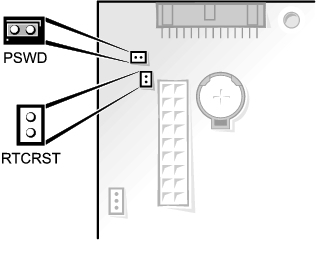
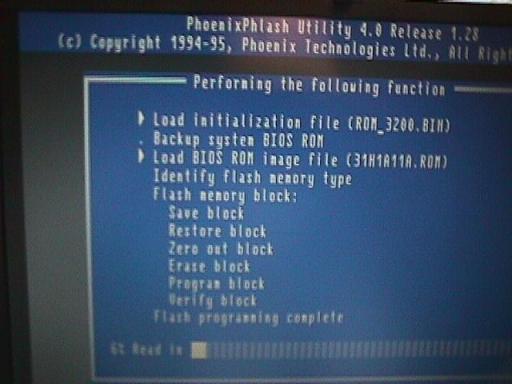
eu tenho um notbook dell latitude d531 e um dia quando formatando sem querer eu mandei atualizar a bios e interrompi desligando o computador. quando religuei ele nao respondeu, apenas as luzes do leitor de cd e leds ligaram mas a ventuinha e tela não ligaram, me disseram para resetar a bios tirando os jampers mas não encontro eles. me ajuda