Macintosh Services Overview
While in the earlier days, it was somewhat difficult to integrate Macintosh networks and Windows networks because each operating system basically used different protocols, and files structures and systems. To deal with these integration issues, Microsoft has since introduced the File Server for Macintosh (FSM) and Print Server for Macintosh (PSM) services with Windows NT Server. These FSM and PSM Macintosh services are also included with Windows 2000 and Windows Server 2003. When the FSM and PSM Macintosh services are installed, it enables Macintosh clients to access printers and shared files and on a Windows server.
With the launch of the new Unix based operating system, Mac OS X., file structure integration became easier because Mac OS X deals with files in a similar method, thereby removing the need to translate files. Mac OS X is also capable of connecting to LPD/LPR printer shares.
The Mac models that can currently be integrated with Windows Server 2003 are listed here:
-
Power Macintoshes which have processors of over 180MHz
-
Power Macintosh G3
-
Power Macintosh G4 -P4
-
iMa
-
eMa
-
Powerbook G3 and G4
-
iBook – G3
The latest Macintosh operating systems are listed here:
-
OS 9.1
-
OS 9.2.2
-
OS X 10.1.5
-
OS X 10.2.x
When integrating Macintosh and Windows networks, the main integration objectives are usually:
-
File sharing
-
Printing
-
Internet access using DNS/DHCP
To provide interoperability between Windows operating systems and Apple Macintosh computers, Microsoft provides the following products and services to:
-
Windows Server 2003 Services for Macintosh: Windows Server 2003 Services for Macintosh includes three components that provide server end interoperability services to enable Windows based clients and Macintosh clients to share files and printer resources. The three components of Windows Server 2003 Services for Macintosh are:
-
AppleTalk Phase 2 Protocol Suite; a grouping of network protocols that the AppleTalk network architecture is based on.
-
File Server for Macintosh (FSM) service; enables Macintosh computers to store and share files on servers running Services for Macintosh. The FSM service includes support for AppleTalk Filing Protocol (AFP) over TCP/IP protocol support, thereby allowing Macintosh clients to access shared resources through the faster TCP/IP.
-
Print Server for Macintosh (PSM) service; makes it possible for Macintosh clients to send documents to printers connected to a computer running Windows NT Server; Windows 2000 Server, or the Windows Server 2003 operating system. The PSM service also enables Windows clients to access Macintosh printers.
-
-
Microsoft Office for Apple Macintosh Operating Systems: The latest Microsoft Office for Apple Macintosh Operating Systems is Microsoft Office v. X for Mac. Microsoft Office v. X for Mac enables users to access data and share files over multiple versions of Windows based computers and Macintosh computers.
This is due to Microsoft Office v. X for Mac using the identical file format as:
-
Office 97 on Windows platforms
-
Office XP on Windows platforms
-
Office 2000 on Windows platforms
-
Office 2001 for Mac
-
Office 98 Macintosh Edition
Microsoft Office v. X for Mac provides the following applications:
-
Microsoft Word X; for the Mac OS X, this is a word processing and Web authoring application.
-
Microsoft Excel X; a spreadsheet application for creating reports, charts, and for analyzing data.
-
Microsoft PowerPoint X; a program fr creating business related presentations.
-
Microsoft Entourage X; an e-mail program and personal information management program.
-
-
Microsoft Internet Applications for Apple Macintosh Computers: Microsoft Internet Applications for Apple Macintosh Computers includes the following Macintosh applications to support Web browsing, Internet- e-mail and instant messaging.
-
Microsoft Internet Explore for Mac; the Web browsing software available is Internet Explorer 5 for Mac OS X, and Internet Explorer 5 for Mac OS 8.1 to 9.x.
-
Microsoft Outlook and Outlook Express for Mac;
-
Microsoft Outlook 2001 for Mac is the e-mail and collaboration client for Macintosh computers using the Microsoft Exchange Server e-mail services.
-
Microsoft Outlook Express for Mac is a internet based e-mail and newsgroup client for Mac OS v. 8.1 and 9.x.
-
-
MSN Messenger for Mac; instant messaging software that allows Mac OS X users to pass instant messaging with Windows based computers and mobile devices.
-
How to install the AppleTalk protocol
If you have Macintosh clients on the network that utilize AppleTalk, then the AppleTalk network protocol has to be installed before you install either the FSM or PSM services so that Macintosh users can access a Windows based server. If however, your Macintosh clients all utilize the TCP/IP protocol; then you do not need to install the AppleTalk network protocol
To install AppleTalk protocol,
-
Open Control Panel.
-
Open the Network Connections dialog box.
-
Click Local Area Connection to open the Local Area Connection Properties dialog box.
-
Click Install.
-
The Select Network Component Type dialog box opens.
-
Click Protocol and then click Add
-
Select the AppleTalk Protocol and then click OK.
How to configure the AppleTalk protocol
-
Open Control Panel.
-
Open the Network Connections dialog box.
-
Click Local Area Connection to open the Local Area Connection Properties dialog box.
-
Select AppleTalk Protocol and then select Properties.
-
The AppleTalk Protocol Properties dialog box opens.
-
If this is the only network adapter, then the Accept Inbound Connections On This Adapter checkbox is automatically selected and also disabled.
-
Using the This System Will Appear In Zone box, you can define which zone the particular server is in.
-
Click OK.
How to configure AppleTalk routing
To ensure that the Windows Server 2003 operating system has the necessary network information and current zone list for AppleTalk, you have to configure AppleTalk routing.
To configure AppleTalk routing:
-
Click Start, click Administrative Tools, and then click Routing And Remote Access to open the Routing And Remote Access management console.
-
Double-click the server name that you want to use.
-
Right-click AppleTalk Routing and then select Enable AppleTalk Routing from the shortcut menu.
-
For routers that should operate as an ordinary router, this configuration is fine.
How to configure a seed router
You configure a seed router for the AppleTalk network if you do not have hardware routers:
-
Click Start, click Administrative Tools, and then click Routing And Remote Access to open the Routing And Remote Access management console.
-
Double-click the server name that you want to use.
-
Select AppleTalk Routing.
-
Right-click Local Area Connection and then select Properties from the shortcut menu.
-
The Local Area Connection Properties dialog box opens.
-
Check the Enable Seed Routing On This Network checkbox.
-
Select the network numbers you want the router to seed. This is done by specifying the network numbers in the From and To boxes within the Network Range area of the Local Area Connection Properties dialog box.
-
To create a list of zones for seeding to the network, click Get Zones.
-
Click the New button to add the zones you want.
-
Delete all unnecessary zones by clicking the Delete button.
-
In the Default Zone box, provide the default zone for network nodes.
-
Click OK.
Requirements for Installing Macintosh Service Components
In order to install the Macintosh service components, there are a few requirements that have to be met or considered:
-
The adapters that you are going to use to connect to AppleTalk networks have to be installed, configured correctly, and working.
-
File Server for Macintosh (FSM) must be installed on a NTFS partition on the particular server. A Macintosh-accessible volume (MAV) can in fact only be created on a NTFS or CD-ROM File System (CDFS) partition. A MAV is the Macintosh terminology used to refer to configuring a folder for shared access.
-
A few considerations for installing the FMS service are listed here:
-
While NTFS can support 256 character filenames, classic Macintosh volumes can only support 31 character filenames. When a NTFS filename exceeds the 31 character limit, the Macintosh clients are only able to view the initial 31 characters of the filename. This is because of the FSM service truncating NTFS filenames that are longer than 31 characters in length.
-
Both NTFS and the Mac OS support a maximum path filename length of up to 255 characters.
-
MAV volume names can be up to 27 characters in length.
-
The NTFS file system and the file systems for classic Mac OS, and Mac OS X are case-insensitive.
-
How to install the FSM service
-
Open Control Panel.
-
Move to Add/Remove Programs.
-
In the Add/Remove Programs window, click Add/Remove Windows Components.
-
The Windows Components Wizard starts.
-
Click Next on the initial Wizard screen.
-
On the Windows Components page, in the component list, scroll to Other Network File And Print Service.
-
Select Other Network File And Print Service and then click Details.
-
On the Other Network File And Print Services dialog box, enable the File Services for Macintosh checkbox.
-
Click OK and then click Next.
-
Click Finish.
How to verify that the FSM service is installed correctly
-
Navigate to the Local Area Connections properties, and then confirm that the AppleTalk Protocol is running.
-
Click Start, click Administrative Tools and then open the Services Console. Verify that the File Server for Macintosh service is both installed and enabled.
-
Verify that the C: drive of the server has a folder called Microsoft UAM Volume.
-
Click Start, click Administrative Tools and then open the Computer Management console. Verify that the new Microsoft UAM Volume share for Macintosh is displayed.
How to install the Microsoft Authentication Module on a classic Mac OS client
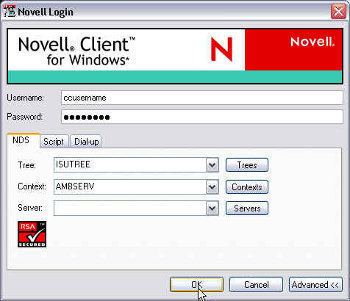
Because a Mac OS client sends its user name and password unencrypted, in clear text, you have to install an additional user authentication module (UAM) on the Macintosh end, so that the Mac OS client can encrypt its user name and password credentials through the Windows client authentication method used.
-
Access the Macintosh classic Mac OS computer.
-
From the Apple menu, open the Chooser.
-
Select the AppleShare icon in the Chooser.
li>Select the zone your FSM server resides in from the AppleTalk Zones list if there are multiple AppleTalk zones. -
Choose the FSM server that you want to connect to.
-
For connecting through the TCP/IP protocol, select Server IP Address and then enter the address of the server.
-
Click OK to establish the connection.
-
The AppleShare logon dialog box opens.
-
Log on to the FSM server and then click OK.
-
Choose Microsoft UAM Volume from the list, and click OK.
-
The Microsoft UAM Volume icon is displayed on the Macintosh desktop.
-
Open the Microsoft UAM Volume icon and start the MS UAM Installer application.
-
The MS UAM Installer application will install the UAM version which would work for this specific client.
How to configure the FSM service
The FSM service is configured from the Computer Management console located within Administrative Tools.
-
Open Computer Management.
-
Right-click Shared Folders, and then click Configure File Server For Macintosh from the shortcut menu.
-
The File Server For Macintosh Properties dialog box opens. The File Server For Macintosh Properties dialog box contains the following tab:
-
Configuration tab
-
File Association tab
-
Sessions tab.
-
The configuration options that you can set on the Configuration tab are listed here:
-
Server Name for AppleTalk Workstations; the name defined here will be displayed to AppleTalk clients by the FSM server. The name specified in the Server Name For AppleTalk Workstations field has no impact on the way that the computer is displayed in Active Directory.
-
Logon Message; any content entered in the Logon Message field will be displayed to Macintosh users in the form of a pop-up message when they log on.
-
Security area of the Configuration tab; used to enable authentication and an authentication type. The Security area contains the following configuration options:
-
Allow Workstations To Save Password checkbox; controls whether users are able to save their password locally. This is though not considered a secure option.
-
Enable Authentication box; used to choose an authentication type which the server will accept. You can choose between the following options:
-
Microsoft Only; the default option selected is Microsoft encrypted authentication only.
-
Apple Clear Text; used to specify unencrypted Apple authentication only.
-
Apple Encrypted; used to specify encrypted Apple authentication. However, at the Microsoft end, the password is stored in clear text.
-
Apple Clear Text or Microsoft, or Apple Encrypted or Microsoft; allows all log-ins
-
-
-
Sessions: used to set how many users can connect/sessions can be running concurrently. The available options you can choose between are:
-
Unlimited
-
Limited to x.
-
The File Associations tab on the File Server For Macintosh Properties dialog box is used to specify how extensions link to programs.
The Session tab is used to view the following Usage Summary information:
-
Number of Sessions running
-
Number of Open File Forks.
-
Number of File Locks.
The Message area of the Session tab is utilized to send a message to all the Macintosh users of the system.
How to create MAC shares on Windows Server 2003
-
Open the Computer Management console.
-
Expand the Shared Folders folder.
-
Right-click Shares and then select New Share from the shortcut menu.
-
The Share a Folder Wizard launches.
-
On the Folder Path page, indicate the path to the folder that you are going to share.
-
On the Name, Description, and Settings page, set how the share will be used over the network. This is where you configure whether the share will be used by Windows users and/or Macintosh users. Click Next.
-
On the Permissions page, you have to set permissions for the share. The options that you can select between are:
-
All users have read-only access.
-
Administrators have full access; other users have read-only access.
-
Administrators have full access; other users have read and write access.
-
Use custom share and folder permissions.
Click Next.
-
-
When the Summary page is displayed, verify that you have selected the proper configuration options.
-
The new share will be displayed in the Computer Management console.
-
To verify that the new share is not read-only, right-click the new share, and then select Properties from the shortcut menu.
-
Ensure that the This Volume is Read-Only checkbox is clear/blank.
How to install the PSM service
-
Open Control Panel.
-
Move to Add/Remove Programs.
-
In the Add/Remove Programs window, click Add/Remove Windows Components.
-
The Windows Components Wizard starts.
-
Click Next on the initial Wizard screen.
-
On the Windows Components page, in the component list, scroll to Other Network File And Print Service.
-
Select Other Network File And Print Service and then click Details.
-
On the Other Network File And Print Services dialog box, enable the Print Services for Macintosh checkbox.
-
Click OK and then click Next.
-
Click Finish.
How to create a user account for the PSM service
-
Open the Computer Management console.
-
Move to the Services view.
-
Locate the Print Server for Macintosh service.
-
Right-click Print Server for Macintosh service and then select Properties from the shortcut menu.
-
The PSM Properties dialog box opens.
-
Click the Log On tab.
-
Select the This Account option.
-
Choose the PSM account.
-
Enter the password in the provided fields.
-
Click OK.
How to share a printer for Macintosh users
-
Open the Chooser using the Apple Menu.
-
Choose the print driver that must be utilized for the network printer.
-
Choose the AppleTalk zone wherein the printer is.
-
Choose the printer.
-
Click the Create button.
-
The Mac OS connects to the printer and then creates a desktop printer.
How to connect a Windows print server running PSM to an AppleTalk printer for Windows users to utilize
-
Open the Printers and Faxes folder
-
Select Add Printer on the File menu.
-
The Add Printer Wizard starts.
-
Click Next on the initial screen displayed by the Wizard.
-
Select the Local Printer option.
-
Uncheck the Plug And Play Detection checkbox and then click Next.
-
On the Select A Printer Port page, click the Create A New Port option.
-
Select the AppleTalk Printing Devices option from the Type list and then click Next.
-
At this stage, the Add Printer Wizard opens an AppleTalk browser. Search through the various AppleTalk zones to locate the printer which you want to use.
-
Select the printer and click OK.
-
If prompted to capture the AppleTalk device:
-
Select the No option to connect to the printer.
-
Select the Yes option to compel clients to access the printer via the Windows print server.
-
-
Provide a name fo the printer.
-
Click Finish to complete the Add Printer Wizard.
How to enable SMB file sharing on a classic MAC server
-
On the Apple menu, select AppleShare IP Admin.
-
Choose Mac OS Server Admin.
-
Provide the appropriate username and password credentials.
-
When the server tools bar is displayed, select the File Server icon.
-
From the menu, choose the Configure File Server option.
-
On System Settings properties, switch to the Windows tab.
-
Select the Enable Windows File Sharing checkbox.
-
In the General area, provide a server name, the workgroup name and a description.
-
In the WINS Registration area, specify whether the server registers to a WINS server.
-
Click Save.
How to configure DHCP on a classic Mac
-
Access the Apple menu from the Apple desktop.
-
Move to Control Panels and then select TCP/IP.
-
On the TCP/IP window, you can specify that the Mac use either of the following components to obtain IP information:
-
A DHCP server
-
A BootP server
-
A RARP server
-
Static IP.
-
-
Select the Using DHCP Server option.
martha tjoe nij
dear tech, I Have a macintosh powerbook G3 and want to receive hotmail old style not windowslive. how do I go about that. I also want to download microsoft office for mac which is suitable for the powerbook G3 I do not have a dvd player in the lap but I have a dvd player in the applications how do I deal with dvd in this case. I want to understand how sound recordings can be stored and played with the imovie software on the powerbook G3 laptop which has the macosx 10.3 installed.