Management Tasks for the DHCP Server
The common management tasks that you need to perform for your DHCP servers are listed below:
- Delegate DHCPadministration to individuals.
- View and analyze DHCPstatistical information.
- Change the status of the DHCP service.
- Configure superscopeadministration entities.
- Back up the DHCPserver database.
- Restore the DHCPserver database.
- Repair a corruptedDHCP server database.
- Move a DHCP databaseto a different DHCP server.
Controlling DHCP Administration
With Windows Server2003, there are three built-in local groups which have rights to manage your DHCP servers:
- Enterprise Admins group: The characteristics of the Enterprise Admins group are:
- Group members have forest wide administrative rights.
- Group members have full control over the DHCP servers.
- This is the only group that can authorize DHCP servers in Active Directory.
- You should as far as possible restrict membership to the Enterprise Admins group.
- DHCP Administrators group: The Characteristics of the DHCP Administrators group are:
- This group is created on each DHCP server.
- Group members can perform all DHCP specific management tasks, including:
- Create, activate, and delete scopes.
- Create reservations.
- Backup and restore the DHCP server database.
- Configure DHCP options.
- Group members do not however have the same rights as local Administrators. DHCP Administrators group members have rights which are specific to managing DHCP servers only.
- DHCP Users group: The Characteristics of the DHCP Users group are:
- This group is created on each DHCP server.
- Group members can only view configuration information and statistical information on the DHCP server.
- Group members can check whether client connectivity issues exist because of the DHCP service, or because of the depletion of IP addresses.
- Group members can check which scopes have been activated.
How to change the status of the DHCP service
The DHCP console is the management console for administering the DHCP service. The DHCP console is automatically installed when you install the DHCP service on a Windows 2000 or Windows Server 2003 computer. The left pane or console tree in the DHCP console lists the available DHCP servers. The Action menu includes a number of options which are useful when managing your DHCP servers.
How to manage the DHCP service.
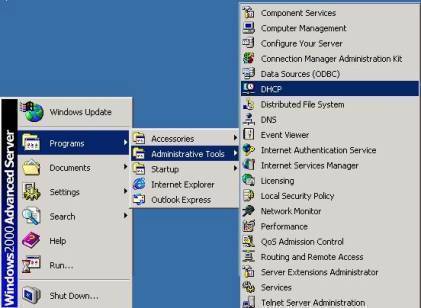
- Click Start, All Programs,Administrative Tools and then click DHCP.
- The DHCP console opens.
- Select the DHCP server that you want to manage in the console tree.
- From the Action menu, click AllTasks, and choose between the following options:
- Start, to start the DHCP service.
- Stop, to stop the DHCP service.
- Pause, to pause the DHCP service.
- Resume, to continue the DHCP service after it was paused.
- Restart, to stop and then automatically restart the DHCP service.
How to change the change the status of the DHCP service from the command-line
Use the following commands to manage the DHCP service from the command-line:
- Net Start Dhcpserver
- Net Stop Dhcpserver
- Net Pause Dhcpserver
- Net ContinueDhcpserver
How to create a superscope administration entity
- Open the DHCP console.
- Right-click the DHCP server in theconsole tree, and select New Superscope from the shortcut menu.
- The New Superscope Wizard starts.
- On the intial page of the NewSuperscope Wizard, click Next.
- On the Superscope Name page,provide a name for the new superscope. Click Next.
- On the Select Scopes page, selectone or numerous scopes that you want to be part of the new superscope.Click Next.
- On the Completing the NewSuperscope Wizard page, click Finish to create the new superscope.
- Verify that the newly created DHCPsuperscope is displayed in the DHCP console.
- You now have to activate the newsuperscope.
- Right-click the superscope in the console tree, and select Activate from the shortcut menu to activate it.
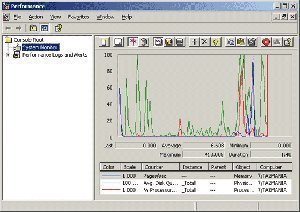
How to view and analyze DHCP statistical information
To view statistical information on your DHCP servers:
- Open the DHCP console.
- In the console tree, right-click the DHCP server, and then click Display Statistics from the shortcut menu.
- The Statistics dialog box opens,displaying the information on:
- The scopes configured for the DHCP server.
- Information on the DHCP lease process messages.
- IP address usage and availability.
The server statistic headers which are displayed in the Statistics dialog box are listed below:
- Start Time; time when the DHCP service started.
- Up Time; indicatesthe time from the last time when the DHCP service was started.
- Discovers; indicatesthe number of DHCPDISCOVER messages that was received.
- Offers; indicates the number of DHCPOFFER messages that was sent.
- Requests; indicatesthe number of DHCPREQUEST messages that was received.
- Acks; indicates the number of DHCPACK messages that was sent.
- Nacks; indicates the number of DHCPNACK messages that was sent.
- Declines; indicates the number of DHCPDECLINE messages that was received.
- Releases; indicates the number of DHCPDISCOVER messages that was received.
- Total Scopes;indicates the number of DHCP scopes which are configured for this particular DHCP server.
- Total Addresses; indicatesthe number of IP addresses that are available in the scopes that are configuredfor the DHCP server.
- In Use; indicates the number of IP addresses that are being used.
- Available; indicates number of IP addresses that are available.
You can also view statistical information on the DHCP server in the DHCP server logs.
How to view statistical information on a specific scope:
- Open the DHCP console.
- In the console tree, right-click the scope that you want to view statistical information on, and select ScopeStatistics from the shortcut menu.
- Information is displayed on the following:
- The total number of IP addresses in the particular scope.
- The number of IP addresses in the scope that are being used.
- The number of IP addresses in the scope that are available.
How to refresh DHCP statistical information:
- Open the DHCP console.
- In the console tree, right-click the DHCP server for which you want to refresh statistical information, and then select Properties from the shortcut menu.
- On the General tab, select the Automatically Update Statistics Every: checkbox.
- Use the Hours and Minutes boxes to specify when the statistical information should be refreshed.
- Click OK.
Backing up the DHCP Server Database
Backing up the DHCP database on the DHCP server is important because it enables you to recover a lost or corrupted DHCP database. With Windows Server 2003, the following methods are supported for backing up the DHCP server database:
- Manually back up the DHCP database by using the DHCP console.
- Schedule an automatic back up of the DHCP database.
When the DHCP database is backed up, the contents of the entire database is backd up: This includes the following key information:
- Scope information,multicast scope information, and superscope information.
- DHCP leases.
- DHCP reservations.
- DHCP options,including,
- Server options
- Scope options
- Class options
- Reservation options
When manually backing up the DHCP database:
- The DHCP service only needs to be stopped if you are planning to move the database to a different DHCP server.
- The location for the backup folder has to be a local directory.
How to manually back up the DHCP database
- Open the DHCP console.
- Right-click the DHCP server that contains the database that you want to back up, and select Backup from the shortcut menu.
- When the Browse For Folder dialogbox opens, select the folder to which the DHCP database should be backedup.
- Click OK.
How to restore the DHCP database :
- Open the DHCP console.
- Right-click the DHCP server for which you want to restore the DHCP database, and select Restore from the shortcut menu.
- When the Browse For Folder dialogbox opens, select the folder that contains the back up of the database that you want to restore.
- Click OK.
- Click Yes when prompted to verify that the DHCP database must be restored immediately, and that the DHCP service can be stopped and restarted.
How to repair and compact the DHCP database
Windows Server 2003 includes the jetpack command-line utility which can be used to:
- Repair anin consistent or corrupt DHCP database
- Compact the DHCP database (offline)
It is recommended to perform an offline compaction of the DHCP database when the database size is over 30 MB.
The syntax for jetpack.exe is:
jetpack database_nametemporary_database_name
To repair the DHCP database using Jetpack.exe,
- Click Start, Run, and enter cmd in the Run box.
- Locate the DHCP database directory.
- Enter
net stop dhcp. - Enter
jetpack dhcp.mdb<temp><temp>; name and location of the temporary file that is to be used to repair the DHCP database.
- Enter
net start dhcp.
How to move a DHCP database to a different DHCP server
- Open the DHCP console.
- Right-click the DHCP server whose database you want to move to a different server, and select Backup from the shortcut menu.
- When the Browse For Folder dialogbox opens, select the folder to which the DHCP database should be backedup.
- Click OK.
- To prevent the DHCP server from allocating new IP addresses to clients once the DHCP server database is backed up, you have to stop the DHCP server.
- Open the Services console.
- Double-click the DHCP server.
- When the DHCP Server Properties dialog box opens, select Disable from the Startup Type drop down list.
- Proceed to copy the folder which contains the backup to the destination DHCP server.
- You now have to restore the DHCP backup at the destination DHCP server.
- Open the DHCP console.
- Right-click the destination DHCP server for which you want to restore the DHCP database, and select Restore from the shortcut menu.
- When the Browse For Folder dialogbox opens, select the folder that contains the back up of the database that you want to restore.
- Click OK.
- Click Yes when prompted to restore the database, and to stop and restart the DHCP service.
Follow Us!