Configuring the DHCP Server Environment
The primary steps required for configuring and managing your DHCP server environment are:
- Install the DHCP service on a server.
- Authorize the DHCP server in Active Directory.
- Configure the necessary DHCP scopes for your subnets.
- Configure superscopes and multicast scopes.
- Configure the DHCP lease duration.
- Configure the DHCP options.
- Configure the DHCP reservations.
- Configure the BOOTP tables.
- Configure DHCP and DDNS integration.
- Configure split scopes for fault tolerance.
How to install the DHCP service
- Click Start, Control Panel, and then click Add Or Remove Programs.
- When the Add Or Remove Programs dialog box opens, click Add/Remove Windows Components.
- This starts the Windows Components Wizard.
- In the Components list box, select Networking Services, and then click the Details button.
- The Networking Services dialog box opens.
- In the Subcomponents Of Networking Services list box, check the Dynamic Host Configuration Protocol (DHCP) checkbox.
- Click OK.
- Click Next.
- When The Completing The Windows Components Wizard page is displayed, click Finish.
How to manage the DHCP service from the DHCP console
The DHCP console, the management console for administering the DHCP service, is automatically installed when you install the DHCP service on a Windows 2000 or Windows Server 2003 computer. When you open the DHCP console, the left pane or console tree lists the available DHCP servers.
Each DHCP server node has the following folders:
- Scope(s) folder
- Server Options folder
Each scope contains the following additional folders:
- Address Pool: This view lists address pool information.
- Address Leases: This view contains an entry for each existing IP address lease. An entry includes the following information:
- Client computer name to which the particular IP address lease was allocated.
- The IP address associated with the lease.
- Lease expiration information.
- Reservations: This view indicates which IP addresses are reserved, and the particular devices which have these reserved IP addresses.
- Scope Options: This view shows the options which are configured for the particular scope.
The Action menu includes a number of options which are useful when managing your DHCP servers.
To start, stop, pause, resume, or restart the DHCP service,
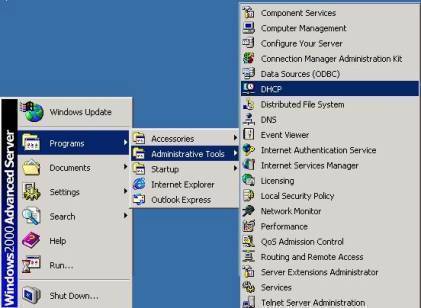
- Click Start, All Programs, Administrative Tools and then click DHCP.
- The DHCP console opens.
- Select the DHCP server that you want to manage in the console tree.
- From the Action menu, click All Tasks, and choose between the following options:
- Start, to start the DHCP service.
- Stop, to stop the DHCP service.
- Pause, to pause the DHCP service.
- Resume, to continue the DHCP service after it was paused.
- Restart, to stop and then automatically restart the DHCP service.
How to manage the DHCP service from the command-line
Use the following commands to manage the DHCP service from the command-line:
- Net Start Dhcpserver
- Net Stop Dhcpserver
- Net Pause Dhcpserver
- Net Continue Dhcpserver
How to authorize the DHCP server in Active Directory
If the Active Directory directory service is running in your networking environment, you have to authorize the DHCP in Active Directory so that it can provide IP addresses to your DHCP clients. When you authorize the DHCP server, the IP address of the server is added to the Active Directory object that contains the list of authorized DHCP servers.
You would need to manually authorize the DHCP server in Active Directory under the following circumstances:
- When the DHCP service is installed on a stand-alone server.
- When the DHCP service is installed on a member server of an Active Directory domain.
To authorize the DHCP server in Active Directory
- Click Start, All Programs, Administrative Tools and then click DHCP to open the DHCP console.
- In the console tree, expand the DHCP server node.
- Click the DHCP server that you want to authorize.
- Click the Action menu, and then select Authorize.
- After waiting for approximately 45 minutes for the authorization to occur, right-click the DHCP server, and verify that Unauthorize is displayed on the shortcut menu.
The various administration tasks for configuring DHCP scopes
The various functions associated with configuring and managing DHCP scopes are summarized below:
- Creating new scopes for your DHCP servers: You would need the following information when you create a new scope:
- The IP address range for the scope: The start and end IP addresses that defines the address range for the new scope.
- The IP addresses that should be excluded from the IP address pool.
- The IP addresses that should be reserved.
- The configuration parameters which you want to set for the DHCP options.
- Configuring properties for a scope.
- Configuring scope options.
- Configuring reservations.
- Configuring exclusions.
- Creating a new superscope.
- Creating a multicast scope.
How to create a new scope
- Click Start, All Programs, Administrative Tools and then click DHCP to open the DHCP console.
- In the console tree, expand the DHCP server node.
- Select the DHCP server.
- Click the Action menu, and then select New Scope.
- The New Scope Wizard starts.
- Click Next on the initial page of the New Scope Wizard.
- On the Scope Name page, enter a name for the new scope in the Name text box.
- Enter a description in the Description text box. Click Next.
- On the IP Address Range page, enter the start IP address and end IP address that defines the range of new scope in the Start IP Address text box, and End IP Address text box respectively.
- Enter the subnet mask in the Subnet Mask text box.
- Select the value in the Length spin box. The subnet length mask is automatically defined as 24. Click Next.
- On the Add Exclusions page, using the Start IP Address and End IP Address text boxes, define any exclusions. Click Add. Click Next.
- On the Lease Duration page, you can change the default lease duration of 8 days. Use the Days, Hours and Minutes boxes to define the lease duration. Click Next.
- On Configure DHCP Options page, click the Yes, I Want To Configure These Options Now option and then click Next.
- On the Router (Default Gateway) page, enter the IP address of the default gateway (router) that connects the subnet to the network. Click Add. Click Next.
- On the Domain Name And DNS Servers page, enter the default parent domain name that clients will be using to locate network hosts, in the Parent Domain box.
- Enter the name of the DNS server that you want clients to use for name to IP address resolution in the lower portion of the Domain Name And DNS Servers page. Click Add ad then click Next.
- On the WINS Server page, if applicable, enter the IP address of the WINS server. Click Add and then click Next.
- On the Activate Scope page, click the Yes, I want to activate this scope now option. Click Next.
- On the Completing The New Scope Wizard page, click Next.
How to change existing scope properties
To change existing scope properties, use the General tab of the Scope Properties dialog bo. The scope properties that can be changed are:
- Scope Name text box: Enables you to change the name of the scope.
- Start IP Address and End IP Address text boxes: Enables you to change the range of the existing scope.
- Subnet Mask text box: This is automatically populated, based on the IP address range that is specified.
- Lease Duration For DHCP Clients area of the General tab: Use the Days, Hours and Minutes boxes to change the existing lease duration for IP addresses of this scope.
How to configure DHCP options
DHCP options are settings which you define the DHCP server to distribute to your DHCP clients when it assigns IP addresses to clients. The DHCP options are client specific. If a DHCP client does not support a particular option, the option is ignored for the particular client.
The common DHCP options which you can define in the DHCP console are:
- Router (003): Indicates the default gateway router.
- DNS Servers (006): Indicates the DNS servers.
- DNS Domain Name (015): Indicates the parent DNS domain name for the DNS locater service.
- ARP Cache Timeout (035): Indicates the timeout for the ARP cache entries.
- WINS Servers (044): Indicates the WINS servers.
- WINS Node Type (046): Indicates the NetBIOS.
- Classless Static Routes (249): Indicates the destination, router and mask for static routes.
There are four different types of DHCP options. The DHCP options are applied in a particular sequence, with any previously applied option being overwritten by any conflicting later applied option.
The DHCP options and the order in which they are applied are listed below:
- Server options: These options apply to each scope configured on the DHCP server, and also apply to all clients that obtain an IP address from the particular DHCP server. Server options are always applied first.
- Scope options: These options are applied at the scope level, and after the Server options are applied. Scope options are applicable to a particular scope only.
- User and Vendor Class options: You can use User classes to assign options to clients that have the same requirements. Vendor classes can be used to assign vendor specific options to clients that have the same vendor.
- Reserved options. Reservations work differently from the above mentioned options. Each reservation has to be manually configured by an administrator.
To configure User Class options,
- Open the DHCP console.
- Right-click the DHCP server you want to work with, and select Define User Classes from the shortcut menu.
- When the DHCP User Classes dialog box opens, click the Add button to create a new class.
- The New Class dialog box opens.
- In the Display name field, enter the name for the new class.
- In the Description field, enter a description for new class.
- In the ID field, enter the class ID.
- Click OK to create the new user class.
- The newly created class should be displayed in the DHCP User Classes dialog box.
- Click Close to close the DHCP User Classes dialog box, and to return to the DHCP console.
- If you want to configure the class options at the server level, right-click the Server Options node in the console tree and select Configure Options from the shortcut menu.
- If you want to configure the class options at the scope level, right-click the Scope Options node and select Configure Options from the shortcut menu.
- Click the Advanced tab, and choose the class which you just created from the User Class drop-down list.
- Set the options which you want specified for the class.
- Click OK.
How to configure DHCP reservations
- Open the DHCP console.
- Expand the DHCP server node in the console tree, and then expand the Scope node.
- Right-click Reservations node, and select New Reservation from the shortcut menu.
- When the New Reservation dialog box opens, enter the following information in the fields provided in the dialog box:
- Reservation Name: Enter a name for the new reservation that uniquely identifies the particular client that is being reserved.
- IP Address: Enter the reserved IP address in this text box.
- MAC Address: Enter the MAC address of the NIC of the client.
- Description: Enter a useful description (optional).
- The options which can be selected under the Supported Types area of the New Reservation dialog box are:
- Both
- DHCP Only
- BOOTP Only
- Click OK.
How to configure BOOTP table entries
The DHCP service in Windows Server 2003 includes support for BOOTP clients. Before you can configure BOOTP client support, you first have to allow the BOOTP table folder to be viewed in the DHCP console. To do this,
- Open the DHCP console.
- Right-click the DHCP server node and select Properties from the shortcut menu.
- On the General tab, click the Show the BOOTP table folder checkbox.
- Click OK.
- Proceed to right-click the BOOTP table folder, and select New Boot Image from the shortcut menu.
- When the Add BOOTP Entry dialog box opens, enter the following information:
- Boot image file name
- Server path to the boot file image
- IP address or name of the Trivial File Transfer Protocol (TFTP)
- Click Add to create the new BOOTP table.
To enable dynamic BOOTP client support for a DHCP scope,
- Open the DHCP console.
- Expand the DHCP server node and the Scope node in the console tree.
- Right-click the particular scope and then select Properties from the shortcut menu.
- Click the Advanced tab.
- In the Assign IP Addresses Dynamically To Clients Of area, select Both, or select BOOTP only.
- In the Lease Duration For BOOTP Clients area, change the lease duration if required.
- Click OK.
The available vendor extensions that a Windows Server 2003 DHCP server can offer a BOOTP client are listed below:
- BOOTP code 1; Subnet Mask
- BOOTP code 3; Router
- BOOTP code 4; Time Server
- BOOTP code 5; Name Server
- BOOTP code 9; LPR Server
- BOOTP code 12; Computer Name
- BOOTP code 15; Domain Name
- BOOTP code 17; Root Path
- BOOTP code 42; NTP Servers
- BOOTP code 44; WINS Server
- BOOTP code 45; NetBIOS over TCP/IP Datagram Distribution Server
- BOOTP code 46; NetBIOS over TCP/IP Node Type
- BOOTP code 47; NetBIOS over TCP/IP Scope
- BOOTP code 48; Window System Font Server
- BOOTP code 49; Window System Display Manager
- BOOTP code 69; SMTP Server
- BOOTP code 70; POP3 Server
How to create a DHCP superscope
- Open the DHCP console.
- Right-click the DHCP server in the console tree, and select New Superscope from the shortcut menu.
- The New Superscope Wizard starts.
- On the initial page of the New Superscope Wizard, click Next.
- On the Superscope Name page, provide a name for the new superscope. Click Next.
- On the Select Scopes page, select one or numerous scopes that you want to be part of the new superscope. Click Next.
- On the Completing the New Superscope Wizard page, click Finish to create the new superscope.
- Verify that the newly created DHCP superscope is displayed in the DHCP console.
To activate a superscope,
- Open the DHCP console.
- Right-click the superscope that you want to activate, ad select Activate from the shortcut menu.
How to delete a superscope
- Open the DHCP console.
- Right-click the superscope that you want to delete, and select Delete from the shortcut menu.
- Only the superscope is deleted. All the scopes that were contained in the deleted superscope remain intact.
How to create a multicast scope
- Open the DHCP console.
- Right-click the DHCP server in the console tree, and select New Multicast Scope from the shortcut menu.
- The New Multicast Scope Wizard starts.
- On the initial page of the New Multicast Scope Wizard, click Next.
- On the Multicast Name page, provide a name for the new multicast scope. Click Next.
- On the IP Address Range page, enter the start IP address and the end IP address for the new multicast scope.
- Specify the Time to Live (TTL), and then click Next.
- On the Add Exclusions page, enter the IP addresses in the address range which should be excluded. Click Next.
- On the Lease Duration page, accept or change the default lease duration of 30 days. Click Next.
- On the Activate Multicast Scope page, click Yes to activate the scope immediately.
- On the Completing the New Multicast Scope Wizard page, click Finish to create the new multicast scope.
- Verify that the newly created multicast scope is displayed in the DHCP console.
How to enable DHCP and DNS integration
- Open the DHCP console.
- Right-click the DHCP server, and then select Properties from the shortcut menu.
- When the Server Properties dialog box opens, click the DNS tab.
- Ensure that the Enable DNS Dynamic Updates According To The Settings Below checkbox is selected.
- Select the Dynamically Update DNS A And PTR Records Only If Requested By The DHCP Clients option.
- Select the Discard A And PTR Records When Lease Is Deleted checkbox.
- Click OK.
How to configure clients for dynamic addressing from a DHCP server
- Click Start, Control Panel, and then click Network Connections.
- Right-click the network connection you want to work with, and then click Properties from the shortcut menu.
- If you are working with the local area connection, on the General tab, select Internet Protocol (TCP/IP), and then click the Properties button.
- When the Internet Protocol (TCP/IP) Properties dialog box opens, click the Obtain An IP Address Automatically option.
- If you want the client to automatically obtain DNS server information from the DHCP server, select the Obtain DNS Server Address Automatically option.
- Click OK.
How to enable server-end conflict detection
- Open the DHCP console.
- Right-click the DHCP server in the console tree, and select Properties from the shortcut menu.
- When the Server Properties dialog box opens, click the Advanced tab.
- Set the number of times that the DHCP server should run conflict detection prior to it leasing an IP address to a client.
- Click OK.
How to configure split scopes and clustering for fault tolerance
- Configure all the necessary scopes for your DHCP servers.
- Configure your exclusions, on the basis that the primary DHCP server will be managing 80 percent of the address pool, and the secondary will be managing 20 percent of the address pool.
- Configure a superscope that includes all the scopes for the subnet.
- From the Administrative Tools folder, open the Cluster Administrator management tool.
- Choose the cluster that will host the DHCP service.
- From the File menu, click Configure Application.
- The Configure Application Wizard starts next.
- Click Next on the initial page of the Configure Application Wizard.
- Select the Use an Existing Virtual Server option.
- Select the group, and select the Create A New Virtual Server option.
- Create a new virtual server through the Wizard.
- Select the Yes, Create A Cluster Resource For My Application Now option, and then select the DHCP resource type. Click Next.
- Provide a name and description for the DHCP resource. Click Next.
- Click Advanced Properties, and then click the Dependencies tab.
- Click the Modify button.
- Select the IP address, physical disk, and name for the DHCP server. Click OK.
- On the Application Resource Name and Description page, click Next.
- Verify your configuration settings, and then click Finish.
- Right-click the DHCP resource, and select Bring Online from the shortcut menu.
- You have to authorize the DHCP server in Active Directory.
Follow Us!