Routing and Remote Access Service Overview
The Routing and Remote Access service (RRAS) is a multi-protocol software router integrated in Windows 2000 and Windows Server 2003 that provides connectivity for remote users and remote offices to the corporate network. RRAS make it possible for remote users to perform their tasks as though they are actually physically connected to the corporate network. A remote access connection enables services such as file and print sharing to be available to remote users. To access network resources, remote access clients can use standard Windows tools.
The Routing and Remote Access service (RRAS) includes integrated support for the following dynamic routing protocols:
- Routing Information Protocol (RIP) version 2
- Open Shortest Path First (OSPF)
Routing and Remote Access service can be configured for:
- LAN-to-LAN routing
- LAN-to-WAN routing
- Virtual private network (VPN) routing
- Network Address Translation (NAT) routing
-
Routing features, including
- IP multicasting
- Packet filtering
- Demand-dial routing
- DHCP relay
A computer running Windows 2000 Server or Windows Server 2003 with Routing and Remote Access service enabled and configured is called a remote access server.
A remote access server provides the following two types of remote access connectivity:
- Dial-up networking (DUN)
- Virtual private networking
The Routing and Remote Access features are summarized below:
-
Router discovery, defined in RFC 1256 provides the means for configuring and discovering default gateways. Router discovery makes it possible for clients to:
- Dynamically discover routers.
- Use alternate or backup routers when necessary, for instance when a network failure occurs.
Router discovery consists of the following types of packets
-
Router solicitations: A router solicitation is sent by a host on the network when it needs to be configured with a default gateway. When a router solicitation is sent on the network, each router responds with a router advertisement. The host then selects a router as its default gateway. This is the router that has the highest preference. A host can send a router solicitation to the following addresses:
- Local IP broadcast address
- Limited broadcast address
- Internet Protocol (IP) multicast address (all routers)
-
Router advertisements: Routers on the network send a router advertisement in respond to a router solicitation packet, indicating that the router can be configured as the host's default gateway. To send a router advertisement, the router uses an ICMP message. A router advertisement can be sent to the following addresses:
- Local IP broadcast address (all hosts)
- Limited broadcast address
- Multicast routing through a multicast proxyprovides multicast for remote access users, thereby extending multicast support further than the true multicast router.
- Network Address Translation (NAT), defined in RFC 1631 translates private addresses to Internet IP addresses that can be routed on the Internet.
-
Remote Access Policies (RAPs): RAPs are used to grant remote access permissions. You can configure RAPs from:
- Routing and Remote Access console
- Internet Authentication Service Manager
- Layer Two Tunneling Protocol (L2TP) combines Layer 2 Forwarding (L2F) of Cisco with Point-to-Point Tunneling Protocol (PPTP) of Microsoft. L2TP is a Data-link protocol that can be used to establis Virtual Private Networks (VPNs).
- Internet Authentication Service (IAS), a Remote Authentication Dial-In User Service (RADIUS) server, provides remote authentication, authorization and accounting for users that are connecting to the network through a network access server (NAS) such as Windows Routing and Remote Access.
The Windows Server 2003 Routing and Remote Access service console, the graphical interface for managing RRAS, can be used to configure remote access server-end configuration options, including the following:
-
Remote access connectivity, through
- Dial-Up Networking (DUN)
- Virtual private networking
- Network address translation (NAT)
- Virtual Private Network (VPN) access
- Secure connectivity between two private networks
- Routing protocol configuration
- DHCP Relay configuration
- Remote access policy (RAP) options
- Remote access logging
- Custom configuration options
Understanding Dial-Up Networking (DUN)
Dial-up networking (DUN) allows a remote access client to establish a dial-up connection to a port on a remote access server. The configuration of the DUN server determines what resources the remote user can access. Users that connect through a DUN server, connect to the network much like a standard LAN user accessing resources.
The dial-up networking (DUN) connection methods are summarized below:
- Plain old telephone service (POTS): In the initial days of dial-up networking, phone lines were used to establish the dial-up connection. With POTS, the amount of data that was passed was initially limited because analog components caused signal loss. This has since improved with the connections between phone offices becoming all digital connections paths.
- Integrated Services Digital Network (ISDN): ISDN uses an all digital signal path and includes features such as caller ID, call forwarding, and fast call setup times.
-
Point-to-Point Protocol (PPP): The Point-to-Point Protocol (PPP) uses a three way PPP negotiation process to enable devices to establish a TCP/IP connection over a serial connection. The device that initiates the establishment of the TCP/IP connection is called the client. The device that obtains the request to establish the connection is referred to as the server. The following protocols operate above the PPP to enable the PPP negotiation process:
- Link Control Protocol (LCP); LCP deals with the establishment of the lower PPP connection. LCP is used for two devices to initially come to agreement on establishing a PPP link.
- Challenge Handshake Authentication Protocol (CHAP); used to enable the client to authenticate the server.
- Callback Control Protocol (CBCP); used to negotiate callback specific operations, such as whether callback is permitted, and if and when it should occur.
- Compression Control Protocol (CCP); used to negotiate and determine whether compression is required, and the type of compression that should be used.
- IP Control Protocol (IPCP); used to negotiate the IP parameters that should be used for the PPP connection.
- Internet Protocol (IP); IP makes it possible for IP datagrams to be exchanged over the connection.
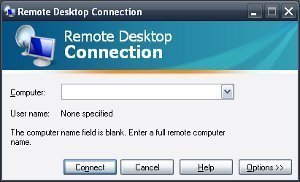
Understanding Virtual Private Networking
Virtual Private Networks (VPN's) provide secure and advanced connections through a non-secure network by providing data privacy. Private data is secure in a public environment.
VPNs fall into the following categories:
- Remote access
- Intranet access
- Extranet access
Remote access VPNs provides a common environment where many different sources such as intermediaries, cients and off-site employees can access information via web browsers or email. Many companies supply their own VPN connections via the Internet. Through their ISPs, remote users running VPN client software are assured private access in a publicly shared environment. By using analog, ISDN, DSL, cable technology, dial and mobile IP; VPN's are implemented over extensive shared infrastructures. Email, database and office applications use these secure remote VPN connections.
Remote access VPNs offer a number of advantages, including:
- Third parties oversee the dial up to the network.
- New users can be added with hardly any costs and with no extra expense to the infrastructure.
- Wan circuit and modem costs are eliminated.
- Remote access VPN's call to local ISP numbers. VPN's can be established from anywhere via the Internet.
- Cable modems enable fast connectivity and are relatively cost efficient.
- Information is easily and speedily accessible to off-site users in public places via Internet availability and connectivity.
Tunneling is the concept used to describe a method of using an internetwork infrastructure to transfer a payload. IPSec tunnel mode enables IP payloads to be encrypted and encapsulated in an IP header so that it can be sent over the corporate IP internetwork or Internet. IPSec protects, secures and authenticates data between IPSec peer devices by providing per packet data authentication. IPSec peers can be teams of hosts, or teams of security gateways. Data flows between IPSec peers are confidential and protected. Tunnel mode is used when a host wants to connect or gain access to a network controlled by a gateway. The source and destination addresses are encrypted. The original IP datagram is left in tact. The original IP header is copied and moved to the left and becomes a new IP header. The IPSec header is inserted between these two headers. The original IP datagram can be authenticated and encrypted.
IPSec supports the following:
- Unicast IP datagrams
- High-Level Data-Link Control (HDLC)
- ATM
- Point-to-Point Protocol (PPP)
- Frame Relay serial encapsulation
- Generic Routing Encapsulation (GRE)
- IP-in-IP (IPinIP)
- Encapsulation Layer 3 tunneling protocols.
The process that occurs to establish a VPN connection is outlined below:
- The VPN client accesses the Internet, and then sends a VPN connection request to the VPN server to establish a secure connection.
- Based on the VPN protocol used, the client authenticates itself to the VPN server. If authentication fails, the connection is terminated.
- If the client is authenticated, the client and server start a negotiation process. During negotiation, the client and server agree on the encryption algorithm, and parameters that should be used for the VPN connection.
- The VPN session or connection is established.
The process that occurs to convert an IP datagram to a Point-to-Point Tunneling Protocol (PPTP) packet is outlined below:
- Data is created by an application for a specific remote host.
- At the client end, the data then becomes an IP datagram. This is done by adding a TCP header and IP header to the data. At this point the packet contains all the information needed to be transmitted by IP.
- The client then establishes a connection through PPP to add the PPP header to the IP datagram. At this stage the packet becomes a PPP frame.
- The following step in the process is for the VPN to encrypt the PPP frame. This ensures that the data is sent over the Internet in an undecipherable format.
- A Generic Routing Encapsulation (GRE) header is added to the encrypted payload, to indicate that the packet is an encapsulated PPTP packet.
- The PPTP stack adds an IP header to indicate the destination address of the VPN server.
- The packet is then routed to the VPN server.
A better method than using PPTP tunneling is L2TP/IPSec tunneling:
- A secure encrypted session is established between the client and server.
- At this stage the client establishes a L2TP tunnel to the server.
- The server then sends the client an authentication challenge.
- The client responds to the server's challenge, and uses encryption when it sends its challenge response.
- The server then verifies that the challenge response received by the client is valid. If the response is valid, the connection is accepted.
Installing the Routing and Remote Access Service
How to enable Routing and Remote Access using the Manage Your Server Wizard
- Click Start, and then click Manage Your Server.
- Select the Add or remove a role option.
- The Configure Your Server Wizard starts.
- On the Preliminary Steps page, click Next.
- A message appears, informing you that the Configure Your Server Wizard is detecting network settings and server information.
- When the Server Role page appears, select the Remote Access/VPN Server option and then click Next.
- On the Summary of Selections page, click Next.
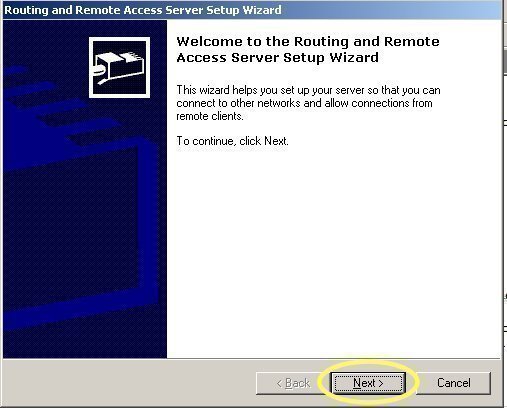
- The Welcome to the Routing and Remote Access Server Setup Wizard page is displayed.
How to install the Routing and Remote Access Services
- Click Start, Administrative Tools, and then select Routing And Remote Access to open the Routing And Remote Access management console.
- In the console tree, select the remote access server that you want to configure. Select the Action menu, and then select the Configure and Enable Routing and Remote Access. Alternatively, you can right-click the server that you want to configure, and then select Configure and Enable Routing and Remote Access from the shortcut menu.
- The Routing and Remote Access Server Setup Wizard initiates.
- On the initial page of the Routing and Remote Access Server Setup Wizard, click Next.
- On the Configuration page, select the Remote Access (Dial-Up Or VPN) option and then click Next.
- On the Remote Access page, select either the VPN server checkbox, or the dial-up server checkbox, or both of these checkboxes. Click Next.
- When the Macintosh Guest Authentication page is displayed, click the Allow Unauthenticated Access For All Remote Clients option if you want the RRAS server to accept anonymous remote access. Click Next.
- On the IP Address Assignment page, accept the default setting of Automatically, or select the From A Specified Range Of Addresses button. Click Next.
- On the Managing Multiple Remote Access Servers page, select the No, Use Routing And Remote Access To Authenticate Connection Requests option, and then click Next.
- On the Summary page, click Finish.
- The RRAS service starts.
The Routing And Remote Access console is the graphical user interface used to manage and configure routing properties.
To access the Routing And Remote Access console,
- Click Start, Administrative Tools, and then click Routing And Remote Access.
If Routing And Remote Access is only configured for LAN routing, then the following primary nodes are present in the console tree of the RRAS console:
- Network Interfaces node
- IP Routing node
If you want to add a dial-up connection, VPN connection or PPPoE connection to the Routing And Remote Access console, you have to manually add it to the Network Interfaces node. If you have already enabled the Routing And Remote Access Service, and you add a new network adapter, then you have to manually add the new network adapter to the IP Routing node.
How to manually add a dial-up connection, VPN connection or PPPoE connection
- Click Start, Administrative Tools, and then select Routing And Remote Access to open the Routing And Remote Access console.
- In the console tree, select the Network Interfaces node.
- Right-click the Network Interfaces node and then select New Demand-Dial Interface from the shortcut menu.
- The Demand Dial Interface Wizard starts.
- Follow the prompts of the Demand Dial Interface Wizard to manually add the dial-up connection, VPN connection or PPPoE connection.
How to manually add a new network adapter
- Click Start, Administrative Tools, and then select Routing And Remote Access to open the Routing And Remote Access console.
- In the console tree, select General, right-click General, and then select New Interface from the shortcut menu.
- Select the Interface that you want to add. Click OK.
Configuring the Routing And Remote Access Service Properties
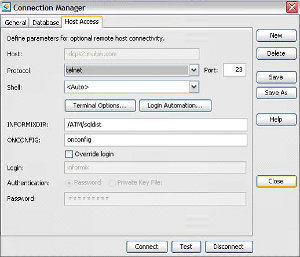
Routing And Remote Access Service properties are configured in the Routing And Remote Access console, using the RRAS server's Properties dialog box.
The configuration settings that you can configure through the properties sheet of the remote access server include:
- Configure the server to allow remote connections
- Routing
- Demand-dial
- Point-to-Point Protocol (PPP) options
- Authentication settings
- Client address assignment
- Logging options
To access the Properties dialog box of the remote access server to configure RRAS properties
- Click Start, Administrative Tools, and then select Routing And Remote Access to open the Routing And Remote Access console.
- In the console tree, select the remote access server that you want to configure, and then select Properties from the Action menu; OR right-click the server in the console tree and then select Properties from the shortcut menu.
The remote access server's Properties dialog box contains the tabs listed below. The configuration settings that you can configure on each of these tabs for the remote access server are explained as well.
-
General tab: The settings on the General tab enable you to configure the Routing And Remote Access Service as a:
- LAN router
- Demand-dial router
- Remote access server
-
Security tab: The configuration security settings that you can configure on the Security tab are:
- Authentication methods
- Preshared keys for Internet Protocol Security (IPSec)
- Connection request logging
- IP tab: The IP tab is used to configure routing properties to route IP packets over LAN connections, remote access connections, or demand-dial connections. The options available are the Enable IP Routing checkbox, and the Allow IP-Based Remote Access And Demand Dial Connections checkbox. The IP Address Assignment section of the IP tab is used to configure the manner in which the IP addresses are assigned to remote access clients. The available options are the Dynamic Host Configuration Protocol (DHCP) option and the Static Address Pool option. If you select the Static Address Pool option, you have to specify the address range that the Routing And Remote Access service will use to assign addresses to remote access clients. The last setting on the IP tab is the Enable Broadcast Name Resolution checkbox, which is enabled by default.
-
PPP tab: The options available on the PPP tab are used to configure PPP specific options. Each option on the tab is by default enabled:
- Multilink Connections; when enabled multilink connections are allowed from remote access clients.
- Dynamic Bandwidth Control Using BAP Or BACP; when enabled multilink connections either add or drop PPP connections based on the available bandwidth.
- Link Control Protocol (LCP) Extensions; when enabled advanced PPP features are supported.
- Software Compression; when enabled the RRAS can perform compression of the PPP data.
-
i>Logging tab: On this tab, you can configure Routing And Remote Access logging options:
- Log errors only
- Log errors and warnings
- Log all events
- Do not log any events
You can also enable the option to log additional information for debugging purposes.
Configuring General IP Routing Properties
There are a few Routing And Remote Access service features that apply to IP routing on the whole. These IP routing features are configured using the Properties dialog box of the General sub in the Routing And Remote Access console. The General node can be found within the IP Routing node in the console tree.
To open the Properties dialog box of the General node
- Click Start, Administrative Tools, and then select Routing And Remote Access to open the Routing And Remote Access console.
- In the console tree, expand the IP Routing node.
- Right-click the General node, and then select Properties from the shortcut menu.
- The General Properties dialog box contains three tabs: Logging tab, Preference Levels tab, and Multicast Scopes tab.
-
The General Properties dialog box contains three tabs: Logging tab, Preference Levels tab, and Multicast Scopes tab.
-
Logging tab: The options available on the Logging tab pertain to IP routing events that are recorded in the Event log. The options available on the Logging tab are:
- Log Errors Only
- Log Errors And Warnings
- Log The Maximum Amount Of Information
- Disable Event Logging
- Preference Levels tab: The options available on the Preference Levels tab are used to position the priority of routes which were obtained from a number of sources.
- Multicast Scopes tab: The tab is used to configure multicasting.
-
Logging tab: The options available on the Logging tab pertain to IP routing events that are recorded in the Event log. The options available on the Logging tab are:
How to control multilink for incoming connections
- Click Start, Administrative Tools, and then select Routing And Remote Access to open the Routing And Remote Access console.
- In the console tree, right-click the server that you want to work with, and then click Properties from the shortcut menu.
- The server Properties dialog box opens.
- Switch to the PPP tab.
- Select the Multilink Connections checkbox to allow multilink connections from remote access clients.
- If you do not want to allow multilink connections, simply disable the Multilink Connections checkbox.
- If you select the Multilink Connections checkbox, it is recommended that you enable the Dynamic Bandwidth Control Using BAP Or BACP checkbox. This allows the server to add or drop PPP connections based on the rise and fall in available bandwidth.
- Click OK.
How to configure incoming connections that use the IP protocol
- Click Start, Administrative Tools, and then select Routing And Remote Access to open the Routing And Remote Access console.
- In the console tree, right-click the server that you want to work with, and then click Properties from the shortcut menu.
- The server Properties dialog box opens.
- Click the IP tab.
- Verify that the Enable IP Routing checkbox is selected or enabled.
- Next, verify that the Allow IP-Based Remote Access And Demand Dial Connections checkbox is selected.
- If the server Properties dialog box has an IPX tab, click the IPX tab. Clear the Allow IPX-Based Remote Access And Demand-Dial Connections checkbox.
- If the server Properties dialog box has an AppleTalk tab, click the AppleTalk tab. Clear the Enable AppleTalk Remote Access checkbox.
- If the server Properties dialog box has a NetBEUI tab, click the NetBEUI tab. Clear the Allow NetBEUI-Based Remote Access Clients To Access checkbox.
- Click OK.
Aliasgar Babat
Thank you very much for such wonderful information in regards to routing and remote access service. One may even consider deploying on premise remote support appliance such as RHUB appliances in order to remotely access computers from anywhere.
Herbert Gladu
This is my first time pay a quick visit at here and i am in fact impressed
to read all at alone place.
Ravi Ranajn
This web site not update like as win 2008 server.
wind 2008 severe is all realdy in market so plz update this type of features