Configuring Web Browser Properties
To configure Web browser properties, access the Web Browser Properties dialog box in the Client Configuration node of the ISA Server management console. The different settings that you can configure on the Web Browser Properties dialog box are explained here.
On the General tab, you can configure the following settings:
-
Configure Web Browser During Firewall Client Setup checkbox; select this option if you want the Firewall client software to configure the Web browser of the client. If not, clear the checkbox for the setting.
-
DNS Name box; you can define the ISA server through the IP address of the internal network adapter or by DNS name.
-
Automatically Discover Settings checkbox; select this setting if you want clients to automatically discover the closest ISA server. You can specify Web browsers to automatically discover settings or to use an automatic configuration script. For clients to automatically discover the closest ISA server, you have to configure DHCP servers and DNS servers to support the Web Proxy Auto Discover (WPAD) feature.
-
Set Web Browsers To Use Automatic Configuration Script checkbox; select this setting if you want clients to use an automatic configuration script.
-
Use Custom URL option; if you want to use a different configuration script than the one created by ISA Server, then select this option and provide the URL for the script.
On the Direct Access tab; you can select which computers should bypass the ISA server. The available options are:
-
Bypass Proxy For Local Servers.
-
Directly Access Computers Specified In The Local Domain Table (LDT).
-
Specify the servers and domains which should be directly accessed.
On the Backup Route tab, you can specify backup routes that should be used when the ISA server cannot be accessed: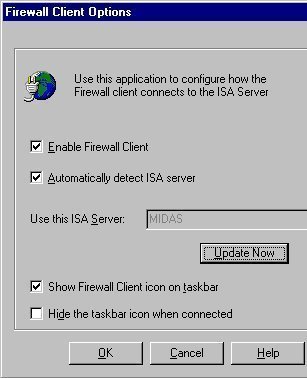
-
Directly Access
-
Alternate ISA server.
On the Application Settings tab, you can configure how ISA Server interacts with applications.
Configuring Firewall Client Properties
To configure Firewall client properties, access the Firewall Client Properties dialog box in the Client Configuration node of the ISA Server management console. The different settings that you can configure on the Firewall Client Properties dialog box are explained here.
On the General tab, you can configure the following settings:
-
DNS Name box; select this option and then enter the DNS name for clients to access the ISA server through its DNS name.
-
IP Address box; select this option if you want clients to access the ISA server through its IP address, then enter the IP address of the internal network adapter of the ISA server.
-
Enable ISA Firewall Automatic Discovery In Firewall Client checkbox; select this option if you want clients to automatically discover the closest ISA server. You have to configure DHCP servers and DNS servers to support the WinSock Proxy Auto Discover (WSPAD) feature.
Configuring SecureNAT Clients
With a SecureNAT client, you have to configure the client so that Internet requests are passed to the ISA server's internal network interface. SecureNAT clients also require ISA Server application filters to access the Internet. SecureNAT clients are supported on operating systems that support Transmission Control Protocol/Internet Protocol (TCP/ IP).
You have to ensure that the default gateway for SecureNAT clients is configured correctly. When configuring the default gateway for the SecureNAT clients, you have to take into account the network topology. In a simple network topology, routers are not configured between the SecureNAT client and the ISA Server computer. A complex network however has one or multiple routers that connect multiple subnets configured between SecureNAT clients and the ISA Server computer.
To configure a SecureNAT client:
-
When the client exists on the same logical network as the ISA Server internal network, then you have to configure the IP address of the ISA server's internal interface as the default gateway of the client.
-
When the client exists on a different internal network, then the default gateway of the client must be defined as the address of router which is configured to forward requests for Internet access to the ISA server.
How to modify the default settings for Web browser clients
-
Open the ISA Management console.
-
Navigate to the Client Configuration node in the console tree.
-
Double-click the Web Browser object.
-
The Web Browser Properties dialog box opens.
-
If you do not want the Firewall client software to configure the Web browser of the client, uncheck the Configure Web Browser During Firewall Client Setup checkbox. The current Web proxy settings of the client will remain unchanged.
-
If you want clients to access the ISA server through its IP address, then enter the IP address of the internal network adapter of the ISA server in the DNS Name box. The DNS name will no longer be used.
-
If you want clients to automatically discover the closest ISA server, enable the Automatically Discover Settings checkbox. This is usually done when you have to support roaming clients. Here, you configure DHCP servers and DNS servers to support the Web Proxy Auto Discover (WPAD) feature.
-
If you want Web browsers to use an automatic configuration script created by ISA Server, to obtain Web proxy settings, then enable the Set Web Browsers To Use Automatic Configuration Script checkbox.
-
If you want to use a different configuration script, select the Use Custom URL option and enter the URL for the script.
-
Click the Direct Access tab.
-
If you have client computers that should bypass the ISA server, then specify these client computers here.
-
Click the Backup Route tab.
-
Specify any backup route(s) which should be used when the ISA server cannot be accessed. A backup route can be a connection to:
-
-
Another ISA computer
-
Internet
-
-
Click OK.
How to modify the default settings for Firewall clients
-
Open the ISA Management console.
-
Navigate to the Client Configuration node in the console tree.
-
Double-click the Firewall Client object.
-
The Firewall Client Properties dialog box opens.
-
If you want clients to access the ISA server through its DNS name, enter the information in the DNS Name box.
-
If you want clients to access the ISA server through its IP address, then enter the IP address of the internal network adapter of the ISA server in the IP Address box. The DNS name will no longer be used.
-
If you want clients to automatically discover the closest ISA server, select the Enable ISA Firewall Automatic Discovery In Firewall Client checkbox. This is usually done when you have to support roaming clients. Here, you configure DHCP servers and DNS servers to support the WinSock Proxy Auto Discover (WSPAD) feature. Once a client has obtained a DHCP lease agreement, the client will automatically discover the closest ISA server.
-
Click the Application Settings tab.
-
This is where you can modify how ISA Server interacts with applications.
-
Click OK.
How to publish automatic discovery
-
Open the ISA Management console.
-
Navigate to the ISA server.
-
Expand the ISA server and select Properties from the shortcut menu.
-
Click the Auto Discovery tab.
-
Select the Publish Automatic Discovery Information checkbox.
-
In the Use This Port fr Automatic Discovery Requests, enter the appropriate port number.
-
Click OK.
-
When a warning message box appears, then select the Save the Changes And Restart The Services option.
-
Click OK.
How to manually configure Internet Explorer to use the Web Proxy Service
-
Open Internet Explorer.
-
Click the Tools menu and then select Internet Options.
-
The Internet Options dialog box opens.
-
Click the Connections tab.
-
Click LAN Settings.
-
Enable the Use A Proxy Server checkbox.
-
In the Address textbox, enter the ISA Server computer name of ISA Server array name.
-
In the Port textbox, enter the appropriate port number.
-
Click OK.
How to enable SecureNAT clients to route Internet requests through an active dial-up entry
To create the dial-up entry:
-
Open the ISA Management console.
-
Navigate to the Policy Elements node.
-
Expand the Policy Elements node.
-
Right-click Dial-up Entries and then select New Dial-Up Entry from the shortcut menu.
-
The New Dial-Up Entry dialog box opens.
-
In the Name box, enter a name for the new dial-up entry.
-
In the Description box, provide a description for the dial-up entry.
-
In the Use The Following Network Dial-Up Connection box, enter the name of the network dial-up connection that you created.
-
Click Set Account.
-
The Set Account dialog box opens.
-
In the User box, enter the name of the user account provided by the ISP.
-
In the Password box and Confirm Password box, enter and verify the password of the user, and then click OK.
-
Click OK in the New Dial-Up Entry dialog box.
To set the active dial-up entry:
-
Open the ISA Management console.
-
Click the View menu and select Advanced.
-
Expand the Policy Elements node.
-
Select the Dial-up Entries folder.
-
The details pane shows all existing dial-up entries.
-
Select the dial-up entry that you want as the active dial-up entry, and then select Set As Active Entry from the shortcut menu.
To set enable SecureNAT clients to use the active dial-up entry
-
Open the ISA Management console.
-
Navigate to the Network Configuration node.
-
Right-click the Network Configuration node and then select Properties from the shortcut menu.
-
The Network Configuration Properties dialog box opens.
-
Click the Firewall Chaining tab.
-
Select the Use Primary Connection option.
-
Select the Use Dial-up Entry checkbox.
-
Click OK.
To restart the restart the ISA Firewall service
-
Open the ISA Management console.
-
Expand the Monitoring node.
-
Select the Services node.
-
Right-click the Firewall service and select Stop.
-
Right-click the Firewall service once more and then select Start.
How to install the Firewall Client
A Firewall client is a client computer on which Firewall Client software is installed and enabled. Firewall Clients software is usually installed from a network installation share.
After the Firewall Client software is installed, the following components are installed on the client computer:
-
mspclnt.ini; is the client configuration file and copy of the local domain table (LDT).
-
msplat.txt; is the copy of the local address table (LAT).
-
Firewall client application.
To install the Firewall Client software:
-
Browse to the network share for servernamemspclnt share, the shared ISA Server client installation files.
-
Double-click the Setup file (setup.exe ) in the directory to install the Firewall Client software on the client.
-
The Microsoft Firewall Client Installation wizard launches.
-
Click Next on the Welcome page.
-
On the Destination page, specify the folder in which the Firewall Client software should be installed. Click Next.
-
The Ready To Install The Program page opens.
-
Click Install.
-
The firewall client is installed next.
-
Click Finish.
How to enable automatic discovery for firewall clients
-
Open Control Panel on the client computer.
-
Double-click Firewall Client.
-
Enable the Automatically Detect ISA Server checkbox.
-
Click OK.
How to configure DNS for automatic discovery of ISA Server
-
Click Start, Administrative Tools, and then click DNS to open the DNS management console.
-
Expand the Forward Lookup Zones node.
-
Right-click the domain which hosts the ISA Server array, and then select New Host from the shortcut menu.
-
The New Host dialog box opens.
-
Enter the DNS computer name for the ISA Server computer or array in the Name textbox.
-
Enter the internal IP address of the ISA Server computer in the IP Address textbox.
-
Click the Add Host button.
-
The new host record is added to the zone.
-
Right-click the forward lookup zone in the console tree, and then select New Alias from the shortcut menu.
-
The New Resource Record dialog box opens.
-
Enter WPAD in the Alias Name textbox.
-
Enter the fully qualified domain name of the ISA server.
-
Click OK.
-
Open the ISA Management console.
-
Right-click the ISA server and select Properties from the shortcut menu.
-
Click the Auto Discovery tab.
-
Enable the Publish Automatic Discovery Information checkbox.
-
Click OK.
How to configure DHCP for automatic discovery of ISA Server
-
Click Start, Administrative Tools, and then click DHCP to open the DHCP management console.
-
In the console tree, locate the DHCP server that you want to configure.
-
Right-click the DHCP server and then select Set Predefined Options from the shortcut menu.
-
The Predefined Options and Values dialog box opens.
-
Click the Add button.
-
The Option Type dialog box opens.
-
In the Name box, enter WPAD.
-
In the Data Type drop-down list box, select the String data type option.
-
In the Code box, enter the appropriate value.
-
In the Description box, enter a description.
-
Click OK in the Option Type dialog box.
-
The Predefined Options and Values dialog box should now display the WPAD entry in the Option Name drop-down list box.
-
In the String textbox, enter either of the following:
-
-
http://isaserver/wpad.dat
-
http://WPAD/wpad.dat
-
-
Click OK in the Predefined Options and Values dialog box.
-
In the console tree of the DHCP management console, select the DHCP server.
-
Right-click Server Options and select Configure Options from the shortcut menu.
-
In the Available Options box, select the WPAD option.
-
Click OK.
-
Open the ISA Management console.
-
Right-click the ISA server and select Properties from the shortcut menu.
-
Click the Auto Discovery tab.
-
Enable the Publish Automatic Discovery Information checkbox.
-
Click OK.
Troubleshooting ISA Server Client Connections
ISA Server client connectivity issues occur when you make configuration changes for ISA Server but do you do not restart the Firewall service, Web Proxy service, or H.323 Gatekeeper service. If you have a client connectivity issue where connectivity stops after it has been previously established, then you can also try restarting the appropriate service to resolve the issue.
When you make the ISA Server configuration changes listed below, you need to restart the necessary services:
-
When you enable or disable a network adapter, restart the following services:
-
Firewall service.
-
Web Proxy service.
-
-
When you modify a network adapter's IP address, restart the following services:
-
Firewall service.
-
Web Proxy service.
-
-
When you modify the H.323 Gatekeeper network interface, restart the following services:
-
H.323 Gatekeeper service
-
-
When you make any modifications to the Local Address Table (LAT) that has an impact on the network adapter's state, restart the following services:
-
Firewall service.
-
Web Proxy service.
-
-
When you make modifications to the routing table:
-
Restart the Firewall service.
-
-
When you configure firewall chaining:
-
Restart the Firewall service.
-
-
When you make changes to network configuration properties:
-
Restart the Firewall service.
-
-
When you add a server to the array, or remove a server from an array:
-
Restart the Web Proxy service.
-
-
When you configure SSL certificates:
-
Restart the Web Proxy service.
-
-
When you configure Firewall Client application settings:
-
Restart the Firewall service.
-
-
When you enable or disable packet filtering:
-
Restart the Firewall service.
-
-
When you install or remove an application filter:
-
Restart the Firewall service.
-
-
When you enable or disable an application filter:
-
Restart the Firewall service.
-
-
When you change the Web Proxy port number:
-
Restart the Web Proxy service.
-
-
When you install or remove a Web filter:
-
Restart the Web Proxy service.
-
-
When you enable or disable a Web filter:
-
Restart the Web Proxy service.
-
-
When you change the processing order of Web filters:
-
Restart the Web Proxy service.
-
How to stop an ISA service
-
Open the ISA Management console.
-
Click the View menu and select Advanced.
-
Select the Services node.
-
Right-click the service that you want to start, and then select Stop from the shortcut menu.
How to start an ISA service
-
Open the ISA Management console.
-
Click the View menu and select Advanced.
-
Select the Services node.
-
Right-click the service that you want to start, and then select Start from the shortcut menu.
To troubleshoot the different ISA Server client types, you need to understand the installation and configuration requirements for each client type:
-
A Firewall client is configured when it is installed, either from information from ISA Server, or from a custom configuration file. If you want to determine whether Firewall clients automatically detect the ISA Server, simply open the firewall client icon in the Monitor Tool.
-
A SecureNAT client needs the following configuration:
-
When the client exists on the same logical network as the ISA Server internal network, then you have to configure the IP address of the ISA server internal interface as the default gateway of the client.
-
When the client exists on a different internal network, then the default gateway of the client must be defined as the address of the router which is configured to forward requests for Internet access to the ISA server
-
-
A Web Proxy client must be configured with the correct IP address and listening port of the ISA server.
A few ISA client configuration problems and the strategies for troubleshooting these issues are summarized here:
-
If your SecureNAT clients are unable to establish Internet connectivity, the issue is probably incorrect configuration at the SecureNAT clients:
-
Check that the default gateway is correctly configured.
-
Check that the DNS server is correctly configured.
-
-
If SecureNAT clients can establish connections only when using the IP address and not the computer name, clients might be using an internal DNS server that cannot resolve Internet names: To resolve this issue, you can use either of the following approaches:
-
Configure SecureNAT clients to utilize the DNS server which forwards name resolution requests to an external DNS server.
-
Configure the DNS server to forward name resolution requests to the external DNS server.
-
-
If SecureNAT clients are unable to connect to a specific port because the connection times out, and you have defined a protocol rule that allows any IP traffic, then the protocol being used is probably not specified in the Protocol Definitions node of ISA Management console:
-
For applications that use one port, configure a protocol where that port is the primary port.
-
For applications that use more than one port, you have to define these ports through an application filter.
-
-
If clients are unable to access external SSL sites, check which port the client is using to establish a connection to the SSL site.
-
ISA Server allows tunnel connections to ports 443 and 563 by default. If you want to specify any other ports, you have to update the ISA Administration COM object – FPCProxyTunnelPortRange.
-
-
If your Firewall clients are experiencing slow internal connections, the issue could be due to clients being unable to resolve local names through an external DNS server.
-
To resolve local names, you have to configure an internal DNS server with the names and IP addresses of your internal hosts.
-
If packet filtering is enabled, you have to define a packet filter that utilizes DNS Lookup. This will enable the ISA Server computer to forward DNS name resolution queries for Internet names.
-
A few dial-up connections problems and the strategies for troubleshooting these issues are summarized here:
-
If no connections can be established to the Internet through the dial-up connection:
-
Check whether the problematic client computer is a SecureNAT client. If it is a SecureNAT client, then you have to install and enable Firewall Client software on the client computer.
-
Check whether the dial-up entry has been configured correctly.
-
-
If only manually dialing out to the Internet works, and not automatic dialing out:
-
Check whether the problematic client computer is a SecureNAT client. If it is a SecureNAT client, then you have to install and enable Firewall Client software on the client computer
-
Check whether the ISA Server computer has the necessary permission to use the dial-up connection.
-
Check the configuration of the dial-up entry credentials.
-
-
If the dial-up connection is suddenly dropped:
-
Restart the ISA Server services to automatically re-establish the connection.
-
When troubleshooting client access authentication problems, consider the following important factors:
-
SecureNAT clients cannot forward user authentication information.
-
Firewall clients can forward user authentication information.
-
Web Proxy clients that use Internet Explorer can forward user authentication information, but only when configured to forward it.
-
To require authentication, enable the Ask Unauthenticated Users for Identification checkbox on the Outgoing Web Requests page of ISA Server properties dialog box.
When troubleshooting automatic discovery problems, consider the following important factors:
-
In the ISA Management console, access the ISA Server Properties dialog box and verify the following settings on the Auto Discovery tab:
-
The Publish Automatic Discovery Information checkbox should be enabled.
-
The correct port should be specified.
-
-
For automatic discovery to work, the ISA Server and the client must have access to either of the following:
-
A DHCP server.
-
A DNS server.
-
A DHCP server and DNS server.
-
-
Check whether the network connection is being established between the client computer, DHCP server, DNS server, and ISA Server computer.
-
If you want to use automatic discovery for firewall clients, you have to install and enable the Firewall Client software on the client computer. You also have to enable firewall discovery in the Firewall Client Options dialog box.
-
If you want to use automatic discovery for Web Proxy clients, Internet Explorer version 5.0 or above must be used. You also have to configure Internet Explorer to automatically detect settings. This is done in the Local Area Network (LAN) Settings dialog box.
-
Check the DHCP server configuration:
-
The DHCP server must have the WPAD entry correctly configured.
-
Windows NT and Windows 95 clients do not support automatic discovery through DHCP.
-
-
Check the DNS server configuration:
-
The DNS server must have a host (A) record that specifies the ISA Server computer.
-
The DNS server must also have an alias record for WPAD.
-
The alias record should point to the ISA Server computer.
-
-
Verify that the correct port is specified for automatic discovery on the ISA server.
-
Verify that the port number in DHCP matches the specified port number.
-
Verify that the port number in DNS matches the specified port number.

ama
Sir iam very happy with this information realy i like it thank’s alot