Understanding ISA Object Permissions
You can assign permissions for a number of ISA Server objects, such as those listed here:
- ISA server
- H.323 gatekeeper
- ISA Server arrays
- Enterprise polices
- Sessions
- Alerts
The ISA Management MMC snap-in is used to assign permissions for ISA Server objects. The ISA Management console is the primary tool used to administer ISA Server.
To assign ISA Server object permissions:
- Click Start, click Programs, click Microsoft ISA Server and then click ISA Management.
- To connect to the ISA server, click the Internet Security And Acceleration Server icon located at the top the console tree, click the Action menu, and then select Connect To.
- Enter the name of the ISA server.
- Locate the ISA Server object that you want to view or assign permissions for.
- Right-click the object and select Properties from the shortcut menu.
- Click the Security tab.
The default ISA object permissions for the ISA Server Enterprise Edition are listed here: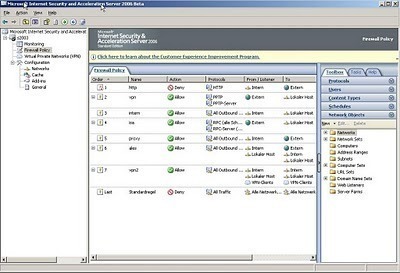
- Alerts object:
- Local Admins: Read Alerts Permissions, Read Alerts Information.
- Domain Admins: Read Alerts Permissions, Read Alerts Information.
- Enterprise Admins: Read Alerts Permissions, Read Alerts Information.
- System: Read Alerts Permissions, Read Alerts Information.
- Authenticated Users: Read Alerts Permissions, Read.
- Server object:
- Local Admins: Full Control
- Domain Admins: None
- Enterprise Admins: None
- System: Full Control
- Authenticated Users: None
- Arrays object:
- Local Admins: Full Control
- Domain Admins: Full Control
- Enterprise Admins: Full Control
- System: Full Control
- Authenticated Users: Read
- Gate-keeper object:
- Local Admins: Full Control, Modify, Read.
- Domain Admins: Full Control, Modify, Read.
- Enterprise Admins: Full Control, Modify, Read.
- System: Full Control, Modify, Read.
- Authenticated Users: Read.
- Enterprise Policy object:
- Domain Admins: Read
- Enterprise Admins: Full Control
- System: Full Control
- Authenticated Users: Read
- Session object:
- Local Admins: Stop Sessions, Read Sessions Information.
- Domain Admins: Stop Sessions, Read Sessions Information.
- Enterprise Admins: Stop Sessions, Read Sessions Information.
- System: Stop Sessions, Read Sessions Information.
- Authenticated Users: Read Sessions.
The default ISA object permissions for the ISA Server Standard Edition are listed here:
- Alerts object:
- Local Admins: Read Alerts Permissions, Read Alerts Information.
- System: Read Alerts Permissions, Read Alerts Information.
- Authenticated Users: Read.
- Server object:
- Local Admins: Full Control
- System: Full Control
- Authenticated Users: None
- Arrays object:
- Local Admins: Full Control
- System: Full Control
- Authenticated Users: None
- Gate-keeper object:
- Local Admins: Full Control, Modify, Read.
- System: Full Control, Modify, Read.
- Authenticated Users: Read.
- Session object:
- Local Admins: Stop Sessions, Read Sessions Information.
- Authenticated Users: Read Sessions.
- System: Stop Sessions, Read Sessions Information.
To access the Security tab, to configure Alerts permissions:
- ISA console rootServers and Arrays Array nameMonitoringAlerts
To access the Security tab, to configure Arrays permissions:
- ISA console rootServers and ArraysArray name
To access the Security tab, to configure Enterprise permissions:
- ISA console rootEnterprise
To access the Security tab, to configure Enterprise Policy permissions:
- ISA console rootEnterprisePoliciesEnterprise Policy
To access the Security tab, to configure Gatekeeper permissions:
- ISA console rootH.323 GatekeepersH.323 gatekeeper server
To access the Security tab, to configure Sessions permissions:
- ISA console rootServers and ArraysnameMonitoringSessions
The default permissions required by ISA Server services are listed here:
- Read this key and descendants HKLMSoftwareMicrosoftFpc; all services require this to read ISA Server settings.
- Read this and descendant CN=Fpc, CN=Services, settings CN=Configuration, DC= ; all services require this to read enterprise settings.
- Read this key and all descendant objects CN=Fpc,CN=System, DC= ; all services require this to read domain settings.
- Write this directory, subdirectory and files %programdir%ISALogs; all services require this to write log files.
- Log on as a batch job; all services require this to run as a service.
- Manage auditing and security log privilege; all services require this to create cryptography objects and read cryptography objects.
- Write directory, subdirectory and files %programdir%; the Control service needs this to write settings log summaries.
- Generate security audits; the Control service, Firewall service, and Web Proxy Service need this to record events in the Security log.
- Restore files and directories; the Control service needs this to back up and restore files and directories.
- Full control this directory subdirectories and files storage; the Web Proxy Service needs this to read and write to cache storage.
- Read, list files, delete this directory and subdirectories and files; the Control service needs this to reset cache storage.
- Read HKLMCurrentControlSetServicesW3ProxyParameters; scheduled cache content download needs this to read settings.
How to restrict Read permissions
- Click Start, Administrative Tools, and then click Active Directory Users And Computers to open the Active Directory Users and Computers management console.
- For all you domains, proceed to create a Global group to contain all ISA Servers in each particular domain.
- For all domains, proceed to create a Global group to contain each ISA Server array.
- For the root domain, proceed to create a Local group for users that are allowed to access ISA Server objects.
- Grant the Domain Admins group of all domains membership in the Local group just created.
- Grant the two Global groups that you have previously created in your domains membership in the Local group.
- Open the ISA Management console.
- For each of the ISA objects listed here, you can remove Authenticated Users permissions. To do this, access the Security tab of the Properties sheet of the ISA object. Select Authenticated Users and then click Remove :
-
- Alerts
- Server
- Arrays
- Gate-keeper object
- Enterprise Policy
- Session
- For each array, proceed to grant Read permissions to the Global group that contains each ISA Server array (created previously).
- Next, at the enterprise level, proceed to grant Read permissions to the Local group that was created for those users allowed to access ISA Server objects.
- Proceed to grant Read permissions to the default enterprise policy to the Local group.
How to configure ISA Server array permissions
- Open the ISA Management console.
- For the ISA array that you want to configure, right-click the array object and select Properties from the shortcut menu.
- Click the Security tab.
- If you want to add a new user or group, click the Add button. Select the user or group and then assign the appropriate permissions.
- If you want to modify existing permissions, select the user or group, and proceed to modify the permissions as required.
- If you want to deny permissions for a user or group, select the user or group, and then click the Remove button.
Default Access Policy, Packet Filtering, Cache, Publishing and Routing Configuration Settings
With ISA, protocol rules, and site and content rules determine access policy. Protocol rules define which protocols clients can use to access the Internet. Site and content rules define which sites and content can be accessed. If you have not configured enterprise policy settings to prohibit array level rules – allow, then a default site and content rule called Allow Rule allows all clients access to all content on all sites, all the time. Because no protocol rules are defined and applied when you install ISA Server, traffic will not be able to pass through.
Packet filters are used to manage the flow of IP packets to ISA Server and from ISA Server. Packet filtering inspects the header of each packet for protocol, port, and destination address and source address information. Packets are dropped if they are not explicitly allowed. Packet filtering is disabled in ISA cache mode. In ISA firewall mode and integrated mode, packet filtering is enabled. This means that all packets are dropped if they are not allowed by access policy, packet filters, and publishing rules.
With regard to routing, the default routing rule allows Web Proxy client requests to be directly obtained from the Internet.
The size of the ISA Server cache is determined by the settings specified during ISA Server setup. The other settings that are enabled after installation are: HTTP caching is enabled, FTP caching is enabled, and Active caching is disabled.
The default Web publishing rule enables no publishing of internal servers. All requests are dropped. This means that your internal servers cannot be accessed by external clients.
Alerts, other than these noted here are enabled after ISA Server installation: All port scan attack, Dropped packets, Protocol violation, and UDP bomb attack.
Configuring Outgoing Web Request Properties
One of the primary processes in configuring access is to configure Outgoing Web Request properties. Outgoing Web Request properties can be accessed on the Outgoing Web Request tab of the Server Properties sheet. Incoming Web requests and Oncoming Web requests are configured separately on the Server Properties sheet.
The settings that you define when configuring Outgoing Web Request properties are listed here:
- Define the IP addresses and ports of the server that listen for internal requests: When a server has more than one IP address, you have to set which IP address should be used for internal requests. A server usually has multiple IP addresses when there are different server certificate requirements, or when a number of authentication methods are required. Server certificates are used when HTTPS is used by clients to request objects from internal clients.
- Define the maximum number of connections allowed: Connection settings are used to configure the maximum number of simultaneous outgoing connections allowed. These settings are also used to specify the time duration for which inactive connections are allowed to remain open, before they are closed. Connection Timeout is configured in seconds. When it comes to servers in an ISA Server array, the maximum number of concurrent outgoing connections setting includes all servers in that specific array. The maximum value for the setting is Unlimited, and the minimum value for the setting is 1.
- Define the authentication method to use when authentication is enforced: You can configure ISA Server to allow anonymous access, deny anonymous access, and to require certain authentication methods.
The different authentication methods that you can configure are:
Kerberos can be used for authentication if the ISA server is a domain member and the client is a Windows 2000 system. The primary authentication protocol type used within a Windows Server 2003 Active Directory domain is Kerberos version 5 authentication protocol. The Kerberos authentication protocol provides the following authentication features:
The terminology used to describe the process by which both the identity of users, and the identity of services being accessed are verified, is mutual authentication. The Kerberos authentication type does not transmit passwords during the authentication process. Instead, it uses tickets. Tickets are specially formatted data packets that allow a client to access a resource. The ticket contains the identity of the user in an encrypted data format. When decrypted, the data or information verifies the identity of the client. Because the Kerberos authentication type makes use of tickets, it offers more security for the authentication process.
Kerberos authentication can be used by clients and servers running the following operating systems (OSs):
Windows 2000, Windows XP Professional, and Windows Server 2003 computers which are members of a Windows 2000 or Windows Server 2003 domain use the Kerberos protocol for network authentication for domain resources. This is the default configuration for these domains. When a down level client attempts to access a Kerberos secured resource, NTLM authentication is used; and not Kerberos authentication.
-
- Basic Authentication: This is considered the least secure authentication method that can be used because it uses a clear-text username and password. Passwords are not encrypted by clients. With basic authentication, ISA Server checks the information it receives with a domain or against its user database.
- Certificates: Secure Sockets Layer (SSL) is an encryption technology that uses public key cryptography to create an encrypted session key to secure communication between the server and user. The digital certificates are used to verify the identity of the server, verify the identity of the client, and to encrypt communications between the server and client. You can obtain a digital certificate from an external certificate authority, such as VeriSign, GlobalSign or Thawte; or you can configure an internal CA for the organization.
- Digest Authentication: Digest authentication uses the Digest Access Protocol in the authentication process. The Digest Access Protocol employs a challenge-response mechanism for applications using HTTP or Simple Authentication Security Layer (SASL) communications. Once a client is authenticated, the session key of the client is located on the server. When digest authentication transmits user information over the network, it does so using an encrypted hash. This prevents unauthorized users who may be attempting to access network resources, from intercepting the credentials of the user. Any ensuing authentication requests submitted by the same client are dealt with by using this session key. Because of this feature of digest authentication, the client does not need to authenticate each time that it submits an authentication request.
- Integrated Windows authentication: The Integrated Windows Authentication method is the standard authentication method used for authenticating users attempting to log on to a Windows 2000 or Windows Server 2003 computer or network.
-
- Verifies the identity of network users.
- Verifies whether the network service that a user is attempting to access is valid. This security feature prevents users from accessing any fake network services which could have possibly been created by unauthorized network users. These fake services are normally created to deceive network users into disclosing their logon credentials.
-
- Windows 2000
- Windows XP Professional
- Windows Server 2003
Understanding How Rules are Applied for Outgoing Requests
For each outgoing request, the following occurs:
- The requests is checked against:
- Protocol rules
- Site and content rules
- Routing rules
- The request is allowed when:
- No rule exists that specifically denies the request.
- A protocol rule, and site and content rule allow the request.
- The request is denied when:
- It is specifically denied.
- It does not match the conditions defined in a protocol rule, and in a site and content rule.
When multiple rules exist, the order in which they are evaluated and processed is illustrated here:
- Protocol rules are applied first. This is done to determine whether or not the protocol used is specified in a rule. The request continues to be processed when there is no protocol rule that denies it, and there is a rule that allows it.
- Site and content rules are evaluated next. The request continues to be processed when a site and content rule allows the request, and there is no site and content rule that denies it.
- Packet filters are examined after site and content rules to check whether or not a blocking filter has been defined.
- When protocol rules, site and content rules, and packet filters allow the request; then ISA Server uses its routing rules or firewall chaining configuration to determine how the message should be passed on.
A few common client access issues encountered are listed here:
- Client cannot use a particular protocol.
- Clients cannot use the protocol rule specified for the protocol definition.
- Clients are unable to browse external Web sites.
- Clients receive a 502 error whenever they try to browse an external Web site..
- Clients can continue to utilize a protocol when the rule for the specific protocol has since been disabled.
Configuring Policy Elements
ISA Server rules are affected by policy elements. Policy elements pertain to a part or component of a policy. They are not created explicitly for each rule. Policy elements are predefined, and can be reused and customized.
The policy elements that you can configure in the ISA Management console are listed here
- Destination sets; IP addresses of specific computers, or computer names and directories which can be accessed or cannot be accessed. Used by:
- Site and content rules
- Bandwidth rules
- Web publishing rules
- Routing rules.
- Client address sets; IP addresses of specific client computers, or authenticated users and groups. Used by:
- Protocol rules
- Site and content rules
- Bandwidth rules
- Web publishing rules
- Server publishing rules.
- Schedules; define when a rule is implemented. Used by:
- Protocol rules
- Site and content rules
- Bandwidth rules
- Bandwidth priorities; defines the priority level of a connection and are only used by Bandwidth rules.
- Protocol definitions; defines available protocols through port number, TCP or UDP, and direction. Used by:
- Protocol rules
- Server publishing rules
- Bandwidth rules
- Content groups; defines MIME types or filename extensions, and content types that exist on the Web. Used by:
- Site and content rules.
- Bandwidth rules
- Dial-up Entries; defines dial-up information. Used by:
- Routing rules.
- Firewall chaining
How to configure a destination address set
- Open the ISA Management console.
- Expand the Policy Elements folder in the console tree.
- Right-click Destination Sets and select New Set from the shortcut menu.
- The Destination Set dialog box opens.
- In the Name box, enter the name of the new destination address set.
- In the Description box, enter a description for the destination address set.
- Click the Add button.
- The Add/Edit Destination dialog box opens.
- Enter a domain name as the destination, or click the Browse button to browse to the domain.
- You can alternatively specify an IP address range.
- To specify a specific directory path or file name, enter its details in the File box.
- Click OK.
- Click OK in the Destination Set dialog box.
How to configure a client address set
- Open the ISA Management console.
- Expand the Policy Elements folder in the console tree.
- Right-click Client Address Sets and select New Set from the shortcut menu.
- The Client Set dialog box opens.
- In the Name box, enter the name of the new client address set.
- In the Description box, enter a description for the client address set.
- Click the Add button.
- The Add/Edit IP Addresses dialog box opens.
- In the From box, enter the start address that defines the start of the IP address range.
- In the To box, enter the end address that defines the end of the IP address range.
- Click OK.
- Click OK in the Client Set dialog box.
How to configure protocol rules
A few factors to consider on configuring protocol rules are listed here:
- You can configure protocol rules for any IP protocol.
- Protocol rules can be applied to:
- All IP traffic
- Specific destinations.
- All IP traffic other than the protocol defined.
- If the protocol is not included in a protocol rule, the protocol will be denied.
- In ISA Server firewall mode, protocol rules can be applied for all IP protocols.
- In ISA Server cache mode, protocol rules can only be applied to control HTTP, HTTPS, Gopher, and FTP.
- Protocol rules exist for well-known protocols.
To configure protocol rules:
- Open the ISA Management console.
- Expand the Access Policy folder in the console tree.
- Right-click Protocol Rules and elect New from the shortcut menu.
- The New Protocol Rule Wizard launches.
- Provide a name for the new protocol rule. Click Next.
- When the Rule Action page opens, select either Allow or Deny. Click Next.
- The Protocols page opens.
- In the Apply this rule to box, select between the following options to define the type of traffic:
-
- All IP Traffic
- Selected Protocols
- All IP Traffic Except Selected Protocols
- When you select the Selected Protocols type, a Protocols box is displayed. This is where you specify which protocols to allow or which protocols to block.
- You next have to define the schedule for the rule. This schedule defines when the rule will be enforced. Click Next.
- Select the client type and then click Next.
- Click Finish.
To modify existing protocol rules:
- Open the ISA Management console.
- Expand the Access Policy folder in the console tree.
- Select the Protocol Rules folder, click the View menu and then select the Advanced view option.
- Right-click the protocol rule that you want to modify and then select Properties from the shortcut menu.
- On the General tab, change the following:
-
- Rule name
- Rule description.
- Enable or disable the rule.
- On the Action tab, you can change to Allow or Deny.
- On the Protocols tab, you can modify the protocols.
- On the Schedule tab, you can create a schedule, or activate or inactivate the schedule.
- On the Applies to tab, you can define who the rule applies to.
How to configure site and content rules
- Open the ISA Management console.
- Expand the Access Policy folder in the console tree.
- Right-click Site and Content Rules and select New Rule from the shortcut menu.
- The New Site and Content Rule Wizard launches.
- Provide a name for the new site and content rule. Click Next.
- When the Rule Action page opens, select either Allow or Deny. Click Next.
- On the Rule Configuration page, specify to who the rule will apply:
-
- Destinations
- Schedules
- Clients
- Custom
Click Next.
- If you have selected the Destinations option previously, the following page lets you specify either of the following options:
-
- All Destinations
- All Internal Destinations
- All External Destinations
- Specified Destination Set
- All Destinations Except the Selected Set.
- If you have selected the Schedules option previously, you have to define the schedule on the Schedule page.
- If you have selected the Clients option previously, you have to specify the client address set, or select the default of Any Request, or select users and groups on the Client Type page.
- If you have selected the Custom option; you can define either of these:
-
- Destination
- Schedule
- Client address sets
- Content Groups
- All destinations except selected set.
- Click Next and then click Finish.
Configuring Content Group Settings
ISA Server includes a number of preconfigured content groups. If you are configuring site and content rules, you can apply the rule to one of these content groups:
- Application
- Application Data Files
- Audio
- Compressed Files
- Documents
- HTML Documents
- Images
- Macro Documents
- Text
- Video
- VRML
The Web server has an impact on which MIME types are associated with which file name extensions. The IIS default associations are listed here:
- .hta – application/hta
- .isp – application/x-internet–signup
- .crd – application/x-mscardfile
- .pmc – application/x-perfmon
- .spc – application/x-pkcs7-certificates
- .sv4crc – application/x-sv4crc
- .bin – application/octet-stream
- .clp – application/x-msclip
- .mny – application/x-msmoney
- .p7r – application/x-pkcs7-certreqresp
- .evy – application/envoy
- .p7s – application/pkcs7-signature
- .eps – application/postscript
- .setreg – application/set-registration-initiation
- .xlm – application/vnd.ms-excel
- .cpio – application/x-cpio
- .dvi – application/x-dvi
- .p7b – application/x-pkcs7-certificates
- .doc – application/msword
- .dot – application/msword
- .p7c – application/pkcs7-mime
- .ps – application/postscript
- .wps – application/vnd.ms-works
- .csh – application/x-csh
- .iii – application/x-iphone
- .pmw – application/x-perfmon
- .man – application/x-troff-man
- .hdf – application/x-hdf
- .mvb – application/x-msmediaview
- .texi – application/x-texinfo
- .setpay – application/set-payment-initiation
- .stl – application/vndms–pkistl
- .mdb – application/x-msaccess
- .oda – application/oda
- .hlp – application/winhlp
- .nc – application/x-netcdf
- .sh – application/x-sh
- .shar – application/x-shar
- .tcl – application/x-tcl
- .ms – application/x-troff-ms
- .ods – application/oleobject
- .axs – application/olescript
- .xla – application/vnd.ms-excel
- .mpp – application/vnd.ms-project
- .dir – application/x-director
- .sit – application/x-stuffit
- .* – application/octet-stream
- .crl – application/pkix–crl
- .ai – application/postscript
- .xls – application/vnd.ms-excel
- .wks – application/vnd.ms-works
- .ins – application/x-internet–signup
- .pub – application/x-mspublisher
- .wri – application/x-mswrite
- .spl – application/futuresplash
- .hqx – application/mac-binhex40
- .p10 – application/pkcs10
- .xlc – application/vnd.ms-excel
- .xlt – application/vnd.ms-excel
- .dxr – application/x-director
- .js – application/x-javascript
- .m13 – application/x-msmediaview
- .trm – application/x-msterminal
- .pml – application/x-perfmon
- .me – application/x-troff-me
- .wcm – application/vnd.ms-works
- .latex – application/x-latex
- .m14 – application/x-msmediaview
- .wmf – application/x-msmetafile
- .cer – application/x-x509-ca-cert
- .zip – application/x-zip-compressed
- .p12 – application/x-pkcs12
- .pfx – application/x-pkcs12
- .der – application/x-x509-ca-cert
- .pdf – application/pdf
- .xlw – application/vnd.ms-excel
- Texinfo – application/x-texinfo
- .p7m – application/pkcs7-mime
- .pps – application/vnd.ms-powerpoint
- .dcr – application/x-director
- .gtar – application/x-gtar
- .sct – text/scriptlet
- .fif – application/fractals
- .exe – application/octet-stream
- .ppt – application/vnd.ms-powerpoint
- .sst – application/vndms-pkicertstore
- .pko – application/vndms-pkipko
- .scd – application/x-msschedule
- .tar – application/x-tar
li>.roff – application/x-troff - .t – application/x-troff
- .prf – application/pics-rules
- .rtf – application/rtf
- .pot – application/vnd.ms-powerpoint
- .wdb – application/vnd.ms-works
- .bcpio – application/x-bcpio
- .dll – application/x-msdownload
- .pma – application/x-perfmon
- .pmr – application/x-perfmon
- .tr – application/x-troff
- .src – application/x-wais-source
- .acx – application/internet-property-stream
- .cat – application/vndms-pkiseccat
- .cdf – application/x-cdf
- .tgz – application/x-compressed
- .sv4cpio – application/x-sv4cpio
- .tgz – application/x-compressed
- .sv4cpio – application/x-sv4cpio
- .tex – application/x-tex
- .ustar – application/x-ustar
- .crt – application/x-x509-ca-cert
- .ra – audio/x-pn-realaudio
- .mid – audio/mid
- .au – audio/basic
- .snd – audio/basic
- .wav – audio/wav
- .aifc – audio/aiff
- .m3u – audio/x-mpegurl
- .ram – audio/x-pn-realaudio
- .aiff – audio/aiff
- .rmi – audio/mid
- .aif – audio/x-aiff
- .mp3 – audio/mpeg
- .gz – application/x-gzip
- .z – application/x-compress
- .tsv – text/tab-separated-values
- .xml – text/xml
- .323 – text/h323
- .htt – text/webviewhtml
- .stm – text/html
- .html – text/html
- .xsl – text/xml
- .htm – text/html
- .cod – image/cis-cod
- .ief – image/ief
- .pbm – image/x-portable-bitmap
- .tiff – image/tiff
- .ppm – image/x-portable-pixmap
- .rgb – image/x-rgb
- .dib – image/bmp
- .jpeg – image/jpeg
- .cmx – image/x-cmx
- .pnm – image/x-portable-anymap
- .jpe – image/jpeg
- .jfif – image/pjpeg
- .tif – image/tiff
- .jpg – image/jpeg
- .xbm – image/x-xbitmap
- .ras – image/x-cmu-raster
- .gif – image/gif
Configuring Custom Error Messages
While there are a number for default error messages for the common errors for incoming and outgoing requests, you can also configure custom messages. To create custom error messages, you can use the default HTML files located in the ErrorHtmls folder.
To create a custom error message:
- Open Program FilesMicrosoft ISA ServerErrorHtmlsdefault file. default.htm is for internal client errors, and defaultR.htm is for external client errors.
- Change [ERRORNUM] to the error code.
- Change [ERRORTEXT] to the error message that you want to be displayed.
- Change [SERVERNAME] to the name of the server that should return the message.
- Replace [VIAHEADER] to the Via header message string which the ISA Server computer receives for the message.
- Save the file.
How to configure bandwidth rules
Bandwidth rules make it possible for you to set the priority for requests. Bandwidth rules are configured by specifying the following elements:
- Protocol definitions
- IP addresses and users
- Destination sets
- Schedule
- Content types
- Bandwidth priority
The above elements have to be defined before you actually create the bandwidth rule.
To configure bandwidth priority:
- Open the ISA Management console.
- Expand the Policy Elements folder in the console tree.
- Right-click the folder and select New Bandwidth Priority from the shortcut menu.
- The New Bandwidth Priority dialog box opens.
- In the Name box enter the name of the bandwidth priority.
- Specify outbound bandwidth.
- Specify inbound bandwidth.
- Click OK.
To configure bandwidth rules:
ol start=”1″ type=”1″>
- Open the ISA Management console.
- Navigate to the Bandwidth Rules folder.
- Right-click the folder and select New Rule from the shortcut menu.
- The New Bandwidth Rule Wizard launches.
- In the Name box enter the name of the bandwidth rule.
- In the Description box, enter a description for the bandwidth rule. Click Next.
- Choose between the following options:
-
- Apply This Rule to All IP Traffic
- Selected Protocols
- Except Selected Protocols
Specify the selected protocols and then click Next.
- You next have to define the schedule for the rule. This schedule defines when the rule will be enforced. Click Next.
- Set the client type, and then click Next.
- Specify the destinations that the rule applies to.
-
- All Destinations
- All Internal Destinations
- All External Destinations
- Specified Destination Set
- All Destinations Except the Selected Set.
- Specify the destination set if necessary. Click Next.
- Select the content group. Options include:
-
- All Content Groups
- Selected Content Groups
Click Next.
- On the Bandwidth Priority page, specify the bandwidth priority.
- Click Next and then click Finish.
How to configure routing rules
- Open the ISA Management console.
- Navigate to the Routing folder.
- Right-click the folder and select New Rule from the shortcut menu.
- The New Routing Rule Wizard launches.
- In the Name box enter the name of the routing rule.
- In the Description box, enter a description for the routing rule. Click Next.
- When the Destination Sets page opens, specify the destination set and then click Next.
- On the Request Action page, you have to specify how client requests should be handled. Options include:
-
- Retrieve them directly from specified destination
- Route to specified upstream server
- Redirected to hosted site
- Use dial-up entry
Click Next.
- On the Cache Retrieval Configuration page, you have to define how this routing rule searches for and retrieves objects from the cache. Click Next.
- On the Cache Content Configuration page, specify whether objects should be stored in the cache. Click Next.
- Click Finish.
How to configure an ISA Server chain
- Open the ISA Management console.
- Navigate to the Routing folder.
- Select the Routing folder.
- Right-click the default routing rule and select Properties from the shortcut menu.
- The Default Rule Properties dialog box opens.
- Click the Action tab.
- Select the Routing Them to a Specified Upstream Server option.
- Click the Settings button associated with the Primary Route.
- The Upstream Server Setting dialog box opens.
- Select the ISA server and change the URL if applicable.
- Enable the Use This Account checkbox and then select the account to use for authentication.
- Select either Basic authentication or Integrated Windows authentication.
- Click OK.
- Use the same process to configure the Backup route.
Alerts object:
-
- Local Admins: Read Alerts Permissions, Read Alerts Information.
- Domain Admins: Read Alerts Permissions, Read Alerts Information.
- Enterprise Admins: Read Alerts Permissions, Read Alerts Information.
- System: Read Alerts Permissions, Read Alerts Information.
- Authenticated Users: Read Alerts Permissions, Read.
- Server object:
- Local Admins: Full Control
- Domain Admins: None
- Enterprise Admins: None
- System: Full Control
- Authenticated Users: None
- Arrays object:
- Local Admins: Full Control
- Domain Admins: Full Control
- Enterprise Admins: Full Control
- System: Full Control
- Authenticated Users: Read
- Gate-keeper object:
- Local Admins: Full Control, Modify, Read.
- Domain Admins: Full Control, Modify, Read.
- Enterprise Admins: Full Control, Modify, Read.
- System: Full Control, Modify, Read.
- Authenticated Users: Read.
- Enterprise Policy object:
- Domain Admins: Read
- Enterprise Admins: Full Control
- System: Full Control
- Authenticated Users: Read
- Session object:
- Local Admins: Stop Sessions, Read Sessions Information.
- Domain Admins: Stop Sessions, Read Sessions Information.
- Enterprise Admins: Stop Sessions, Read Sessions Information.
- System: Stop Sessions, Read Sessions Information.
- Authenticated Users: Read Sessions.
The default ISA object permissions for the ISA Server Standard Edition are listed here:
- Alerts object:
- Local Admins: Read Alerts Permissions, Read Alerts Information.
- System: Read Alerts Permissions, Read Alerts Information.
- Authenticated Users: Read.
- Server object:
- Local Admins: Full Control
- System: Full Control
- Authenticated Users: None
- Arrays object:
- Local Admins: Full Control
- System: Full Control
- Authenticated Users: None
- Gate-keeper object:
- Local Admins: Full Control, Modify, Read.
- System: Full Control, Modify, Read.
- Authenticated Users: Read.
- Session object:
- Local Admins: Stop Sessions, Read Sessions Information.
- Authenticated Users: Read Sessions.
- System: Stop Sessions, Read Sessions Information.
To access the Security tab, to configure Alerts permissions:
- ISA console rootServers and Arrays Array nameMonitoringAlerts
To access the Security tab, to configure Arrays permissions:
- ISA console rootServers and ArraysArray name
To access the Security tab, to configure Enterprise permissions:
- ISA console rootEnterprise
To access the Security tab, to configure Enterprise Policy permissions:
- ISA console rootEnterprisePoliciesEnterprise Policy
To access the Security tab, to configure Gatekeeper permissions:
- ISA console rootH.323 GatekeepersH.323 gatekeeper server
To access the Security tab, to configure Sessions permissions:
- ISA console rootServers and ArraysnameMonitoringSessions
The default permissions required by ISA Server services are listed here:
- Read this key and descendents HKLMSoftwareMicrosoftFpc; all services require this to read ISA Server settings.
- Read this and descendant CN=Fpc, CN=Services, settings CN=Configuration, DC= ; all services require this to read enterprise settings.
- Read this key and all descendant objects CN=Fpc,CN=System, DC= ; all services require this to read domain settings.
- Write this directory, subdirectory and files %programdir%ISALogs; all services require this to write log files.
- Log on as a batch job; all services require this to run as a service.
- Manage auditing and security log privilege; all services require this to create cryptography objects and read cryptography objects.
- Write directory, subdirectory and files %programdir%; the Control service needs this to write settings log summaries.
- Generate security audits; the Control service, Firewall service, and Web Proxy Service need this to record events in the Security log.
- Restore files and directories; the Control service needs this to back up and restore files and directories.
- Full control this directory subdirectories and files storage; the Web Proxy Service needs this to read and write to cache storage.
- Read, list files, delete this directory and subdirectories and files; the Control service needs this to reset cache storage.
- Read HKLMCurrentControlSetServicesW3ProxyParameters; scheduled cache content download needs this to read settings.
How to restrict Read permissions
- Click Start, Administrative Tools, and then click Active Directory Users And Computers to open the Active Directory Users and Computers management console.
- For all you domains, proceed to create a Global group to contain all ISA Servers in each particular domain.
- For all domains, proceed to create a Global group to contain each ISA Server array.
- For the root domain, proceed to create a Local group for users that are allowed to access ISA Server objects.
- Grant the Domain Admins group of all domains membership in the Local group just created.
- Grant the two Global groups that you have previously created in your domains membership in the Local group.
- Open the ISA Management console.
- For each of the ISA objects listed here, you can remove Authenticated Users permissions. To do this, access the Security tab of the Properties sheet of the ISA object. Select Authenticated Users and then click Remove :
-
- Alerts
- Server
- Arrays
- Gate-keeper object
- Enterprise Policy
- Session
- For each array, proceed to grant Read permissions to the Global group that contains each ISA Server array (created previously).
- Next, at the enterprise level, proceed to grant Read permissions to the Local group that was created for those users allowed to access ISA Server objects.
- Proceed to grant Read permissions to the default enterprise policy to the Local group.
How to configure ISA Server array permissions
- Open the ISA Management console.
- For the ISA array that you want to configure, right-click the array object and select Properties from the shortcut menu.
- Click the Security tab.
- If you want to add a new user or group, click the Add button. Select the user or group and then assign the appropriate permissions.
- If you want to modify existing permissions, select the user or group, and proceed to modify the permissions as required.
- If you want to deny permissions for a user or group, select the user or group, and then click the Remove button.
Default Access Policy, Packet Filtering, Cache, Publishing and Routing Configuration Settings
With ISA, protocol rules, and site and content rules determine access policy. Protocol rules define which protocols clients can use to access the Internet. Site and content rules define which sites and content can be accessed. If you have not configured enterprise policy settings to prohibit array level rules – allow, then a default site and content rule called Allow Rule allows all clients access to all content on all sites, all the time. Because no protocol rules are defined and applied when you install ISA Server, traffic will not be able to pass through.
Packet filters are used to manage the flow of IP packets to ISA Server and from ISA Server. Packet filtering inspects the header of each packet for protocol, port, and destination address and source address information. Packets are dropped if they are not explicitly allowed. Packet filtering is disabled in ISA cache mode. In ISA firewall mode and integrated mode, packet filtering is enabled. This means that all packets are dropped if they are not allowed by access policy, packet filters, and publishing rules.
With regard to routing, the default routing rule allows Web Proxy client requests to be directly obtained from the Internet.
The size of the ISA Server cache is determined by the settings specified during ISA Server setup. The other settings that are enabled after installation are: HTTP caching is enabled, FTP caching is enabled, and Active caching is disabled.
The default Web publishing rule enables no publishing of internal servers. All requests are dropped. This means that your internal servers cannot be accessed by external clients.
Alerts, other than these noted here are enabled after ISA Server installation: All port scan attack, Dropped packets, Protocol violation, and UDP bomb attack.
Configuring Outgoing Web Request Properties
One of the primary processes in configuring access is to configure Outgoing Web Request properties. Outgoing Web Request properties can be accessed on the Outgoing Web Request tab of the Server Properties sheet. Incoming Web requests and Oncoming Web requests are configured separately on the Server Properties sheet.
The settings that you define when configuring Outgoing Web Request properties are listed here:
- Define the IP addresses and ports of the server that listen for internal requests: When a server has more than one IP address, you have to set which IP address should be used for internal requests. A server usually has multiple IP addresses when there are different server certificate requirements, or when a number of athentication methods are required. Server certificates are used when HTTPS is used by clients to request objects from internal clients.
- Define the maximum number of connections allowed: Connection settings are used to configure the maximum number of simultaneous outgoing connections allowed. These settings are also used to specify the time duration for which inactive connections are allowed to remain open, before they are closed. Connection Timeout is configured in seconds. When it comes to servers in an ISA Server array, the maximum number of concurrent outgoing connections setting includes all servers in that specific array. The maximum value for the setting is Unlimited, and the minimum value for the setting is 1.
- Define the authentication method to use when authentication is enforced: You can configure ISA Server to allow anonymous access, deny anonymous access, and to require certain authentication methods.
The different authentication methods that you can configure are:
Kerberos can be used for authentication if the ISA server is a domain member and the client is a Windows 2000 system. The primary authentication protocol type used within a Windows Server 2003 Active Directory domain is Kerberos version 5 authentication protocol. The Kerberos authentication protocol provides the following authentication features:
The terminology used to describe the process by which both the identity of users, and the identity of services being accessed are verified, is mutual authentication. The Kerberos authentication type does not transmit passwords during the authentication process. Instead, it uses tickets. Tickets are specially formatted data packets that allow a client to access a resource. The ticket contains the identity of the user in an encrypted data format. When decrypted, the data or information verifies the identity of the client. Because the Kerberos authentication type makes use of tickets, it offers more security for the authentication process.
Kerberos authentication can be used by clients and servers running the following operating systems (OSs):
Windows 2000, Windows XP Professional, and Windows Server 2003 computers which are members of a Windows 2000 or Windows Server 2003 domain use the Kerberos protocol for network authentication for domain resources. This is the default configuration for these domains. When a down level client attempts to access a Kerberos secured resource, NTLM authentication is used; and not Kerberos authentication.
-
- Basic Authentication: This is considered the least secure authentication method that can be used because it uses a clear-text username and password. Passwords are not encrypted by clients. With basic authentication, ISA Server checks the information it receives with a domain or against its user database.
- Certificates: Secure Sockets Layer (SSL) is an encryption technology that uses public key cryptography to create an encrypted session key to secure communication between the server and user. The digital certificates are used to verify the identity of the server, verify the identity of the client, and to encrypt communications between the server and client. You can obtain a digital certificate from an external certificate authority, such as VeriSign, GlobalSign or Thawte; or you can configure an internal CA for the organization.
- Digest Authentication: Digest authentication uses the Digest Access Protocol in the authentication process. The Digest Access Protocol employs a challenge-response mechanism for applications using HTTP or Simple Authentication Security Layer (SASL) communications. Once a client is authenticated, the session key of the client is located on the server. When digest authentication transmits user information over the network, it does so using an encrypted hash. This prevents unauthorized users who may be attempting to access network resources, from intercepting the credentials of the user. Any ensuing authentication requests submitted by the same client are dealt with by using this session key. Because of this feature of digest authentication, the client does not need to authenticate each time that it submits an authentication request.
- Integrated Windows authentication: The Integrated Windows Authentication method is the standard authentication method used for authenticating users attempting to log on to a Windows 2000 or Windows Server 2003 computer or network.
-
- Verifies the identity of network users.
- Verifies whether the network service that a user is attempting to access is valid. This security feature prevents users from accessing any fake network services which could have possibly been created by unauthorized network users. These fake services are normally created to deceive network users into disclosing their logon credentials.
-
- Windows 2000
- Windows XP Professional
- Windows Server 2003
Understanding How Rules are Applied for Outgoing Requests
For each outgoing request, the following occurs:
- The requests is checked against:
- Protocol rules
- Site and content rules
- Routing rules
- The request is allowed when:
- No rule exists that specifically denies the request.
- A protocol rule, and site and content rule allow the request.
- The request is denied when:
- It is specifically denied.
- It does not match the conditions defined in a protocol rule, and in a site and content rule.
When multiple rules exist, the order in which they are evaluated and processed is illustrated here:
- Protocol rules are applied first. This is done to determine whether or not the protocol used is specified in a rule. The request continues to be processed when there is no protocol rule that denies it, and there is a rule that allows it.
- Site and content rules are evaluated next. The request continues to be processed when a site and content rule allows the request, and there is no site and content rule that denies it.
- Packet filters are examined after site and content rules to check whether or not a blocking filter has been defined.
- When protocol rules, site and content rules, and packet filters allow the request; then ISA Server uses its routing rules or firewall chaining configuration to determine how the message should be passed on.
A few common client access issues encountered are listed here:
- Client cannot use a particular protocol.
- Clients cannot use the protocol rule specified for the protocol definition.
- Clients are unable to browse external Web sites.
- Clients receive a 502 error whenever they try to browse an external Web site..
- Clients can continue to utilize a protocol when the rule for the specific protocol has since been disabled.
Configuring Policy Elements
ISA Server rules are affected by policy elements. Policy elements pertain to a part or component of a policy. They are not created explicitly for each rule. Policy elements are predefined, and can be reused and customized.
The policy elements that you can configure in the ISA Management console are listed here
- Destination sets; IP addresses of specific computers, or computer names and directories which can be accessed or cannot be accessed. Used by:
- Site and content rules
- Bandwdth rules
- Web publishing rules
- Routing rules.
- Client address sets; IP addresses of specific client computers, or authenticated users and groups. Used by:
- Protocol rules
- Site and content rules
- Bandwidth rules
- Web publishing rules
- Server publishing rules.
- Schedules; define when a rule is implemented. Used by:
- Protocol rules
- Site and content rules
- Bandwidth rules
- Bandwidth priorities; defines the priority level of a connection and are only used by Bandwidth rules.
- Protocol definitions; defines available protocols through port number, TCP or UDP, and direction. Used by:
- Protocol rules
- Server publishing rules
- Bandwidth rules
- Content groups; defines MIME types or filename extensions, and content types that exist on the Web. Used by:
- Site and content rules.
- Bandwidth rules
- Dial-up Entries; defines dial-up information. Used by:
- Routing rules.
- Firewall chaining
How to configure a destination address set
- Open the ISA Management console.
- Expand the Policy Elements folder in the console tree.
- Right-click Destination Sets and select New Set from the shortcut menu.
- The Destination Set dialog box opens.
- In the Name box, enter the name of the new destination address set.
- In the Description box, enter a description for the destination address set.
- Click the Add button.
- The Add/Edit Destination dialog box opens.
- Enter a domain name as the destination, or click the Browse button to browse to the domain.
- You can alternatively specify an IP address range.
- To specify a specific directory path or file name, enter its details in the File box.
- Click OK.
- Click OK in the Destination Set dialog box.
How to configure a client address set
- Open the ISA Management console.
- Expand the Policy Elements folder in the console tree.
- Right-click Client Address Sets and select New Set from the shortcut menu.
- The Client Set dialog box opens.
- In the Name box, enter the name of the new client address set.
- In the Description box, enter a description for the client address set.
- Click the Add button.
- The Add/Edit IP Addresses dialog box opens.
- In the From box, enter the start address that defines the start of the IP address range.
- In the To box, enter the end address that defines the end of the IP address range.
- Click OK.
- Click OK in the Client Set dialog box.
How to configure protocol rules
A few factors to consider on configuring protocol rules are listed here:
- You can configure protocol rules for any IP protocol.
- Protocol rules can be applied to:
- All IP traffic
- Specific destinations.
- All IP traffic other than the protocol defined.
- If the protocol is not included in a protocol rule, the protocol will be denied.
- In ISA Server firewall mode, protocol rules can be applied for all IP protocols.
- In ISA Server cache mode, protocol rules can only be applied to control HTTP, HTTPS, Gopher, and FTP.
- Protocol rules exist for well-known protocols.
To configure protocol rules:
- Open the ISA Management console.
- Expand the Access Policy folder in the console tree.
- Right-click Protocol Rules and elect New from the shortcut menu.
- The New Protocol Rule Wizard launches.
- Provide a name for the new protocol rule. Click Next.
- When the Rule Action page opens, select either Allow or Deny. Click Next.
- The Protocols page opens.
- In the Apply this rule to box, select between the following options to define the type of traffic:
-
- All IP Traffic
- Selected Protocols
- All IP Traffic Except Selected Protocols
- When you select the Selected Protocols type, a Protocols box is displayed. This is where you specify which protocols to allow or which protocols to block.
- You next have to define the schedule for the rule. This schedule defines when the rule will be enforced. Click Next.
- Select the client type and then click Next.
- Click Finish.
To modify existing protocol rules:
- Open the ISA Management console.
- Expand the Access Policy folder in the console tree.
- Select the Protocol Rules folder, click the View menu and then select the Advanced view option.
- Right-click the protocol rule that you want to modify and then select Properties from the shortcut menu.
- On the General tab, change the following:
-
- Rule name
- Rule description.
- Enable or disable the rule.
- On the Action tab, you can change to Allow or Deny.
- On the Protocols tab, you can modify the protocols.
- On the Schedule tab, you can create a schedule, or activate or inactivate the schedule.
- On the Applies to tab, you can define who the rule applies to.
How to configure site and content rules
- Open the ISA Management console.
- Expand the Access Policy folder in the console tree.
- Right-click Site and Content Rules and select New Rule from the shortcut menu.
- The New Site and Content Rule Wizard launches.
- Provide a name for the new site and content rule. Click Next.
- When the Rule Action page opens, select either Allow or Deny. Click Next.
- On the Rule Configuration page, specify to who the rule will apply:
-
- Destinations
- Schedules
- Clients
- Custom
Click Next.
- If you have selected the Destinations option previously, the following page lets you specify either of the following options:
-
- All Destinations
- All Internal Destinations
- All External Destinations
- Specified Destination Set
- All Destinations Except the Selected Set.
- If you have selected the Schedules option previously, you have to define the schedule on the Schedule page.
- If you have selected the Clients option previously, you have to specify the client address set, or select the default of Any Request, or select users and groups on the Client Type page.
- If you have selected the Custom option; you can define either of these:
-
- Destination
- Schedule
- Client address sets
- Content Groups
- All destinations except selected set.
- Click Next and then click Finish.
Configuring Content Group Settings
ISA Server includes a number of preconfigured content groups. If you are configuring site and content rules, you can apply the rule to one of these content groups:
- Application
- Application Data Files
- Audio
- Compressed Files
- Documents
- HTML Documents
- Images
- Macro Documents
- Text
- Video
- VRML
The Web server has an impact on which MIME types are associated with which file name extensions. The IIS default associations are listed here:
- .hta – application/hta
- .isp – application/x-internet–signup
- .crd – application/x-mscardfile
- .pmc – application/x-perfmon
- .spc – application/x-pkcs7-certificates
- .sv4crc – application/x-sv4crc
- .bin – application/octet-stream
- .clp – application/x-msclip
- .mny – application/x-msmoney
- .p7r – application/x-pkcs7-certreqresp
- .evy – application/envoy
- .p7s – application/pkcs7-signature
- .eps – application/postscript
- .setreg – application/set-registration-initiation
- .xlm – application/vnd.ms-excel
- .cpio – application/x-cpio
- .dvi – application/x-dvi
- .p7b – application/x-pkcs7-certificates
- .doc – application/msword
- .dot – application/msword
- .p7c – application/pkcs7-mime
- .ps – application/postscript
- .wps – application/vnd.ms-works
- .csh – application/x-csh
- .iii – application/x-iphone
- .pmw – application/x-perfmon
- .man – application/x-troff-man
- .hdf – application/x-hdf
- .mvb – application/x-msmediaview
- .texi – application/x-texinfo
- .setpay – application/set-payment-initiation
- .stl – application/vndms–pkistl
- .mdb – application/x-msaccess
- .oda – application/oda
- .hlp – application/winhlp
- .nc – application/x-netcdf
- .sh – application/x-sh
- .shar – application/x-shar
- .tcl – application/x-tcl
- .ms – application/x-troff-ms
- .ods – application/oleobject
- .axs – application/olescript
- .xla – application/vnd.ms-excel
- .mpp – application/vnd.ms-project
- .dir – application/x-director
- .sit – application/x-stuffit
- .* – application/octet-stream
- .crl – application/pkix–crl
- .ai – application/postscript
- .xls – application/vnd.ms-excel
- .wks – application/vnd.ms-works
- .ins – application/x-internet–signup
- .pub – application/x-mspublisher
- .wri – application/x-mswrite
- .spl – application/futuresplash
- .hqx – application/mac-binhex40
- .p10 – application/pkcs10
- .xlc – application/vnd.ms-excel
- .xlt – application/vnd.ms-excel
- .dxr – application/x-director
- .js – application/x-javascript
- .m13 – application/x-msmediaview
- .trm – application/x-msterminal
- .pml – application/x-perfmon
- .me – application/x-troff-me
- .wcm – application/vnd.ms-works
- .latex – application/x-latex
- .m14 – application/x-msmediaview
- .wmf – application/x-msmetafile
- .cer – application/x-x509-ca-cert
- .zip – application/x-zip-compressed
- .p12 – application/x-pkcs12
- .pfx – application/x-pkcs12
- .der – application/x-x509-ca-cert
- .pdf – application/pdf
- .xlw – application/vnd.ms-excel
- Texinfo – application/x-texinfo
- .p7m – application/pkcs7-mime
- .pps – application/vnd.ms-powerpoint
- .dcr – application/x-director
- .gtar – application/x-gtar
- .sct – text/scriptlet
- .fif – application/fractals
- .exe – application/octet-stream
- .ppt – application/vnd.ms-powerpoint
- .sst – application/vndms-pkicertstore
- .pko – application/vndms-pkipko
- .scd – application/x-msschedule
- .tar – application/x-tar
li>.roff – application/x-troff - .t – application/x-troff
- .prf – application/pics-rules
- .rtf – application/rtf
- .pot – application/vnd.ms-powerpoint
- .wdb – application/vnd.ms-works
- .bcpio – application/x-bcpio
- .dll – application/x-msdownload
- .pma – application/x-perfmon
- .pmr – application/x-perfmon
- .tr – application/x-troff
- .src – application/x-wais-source
- .acx – application/internet-property-stream
- .cat – application/vndms-pkiseccat
- .cdf – application/x-cdf
- .tgz – application/x-compressed
- .sv4cpio – application/x-sv4cpio
- .tgz – application/x-compressed
- .sv4cpio – application/x-sv4cpio
- .tex – application/x-tex
- .ustar – application/x-ustar
- .crt – application/x-x509-ca-cert
- .ra – audio/x-pn-realaudio
- .mid – audio/mid
- .au – audio/basic
- .snd – audio/basic
- .wav – audio/wav
- .aifc – audio/aiff
- .m3u – audio/x-mpegurl
- .ram – audio/x-pn-realaudio
- .aiff – audio/aiff
- .rmi – audio/mid
- .aif – audio/x-aiff
- .mp3 – audio/mpeg
- .gz – application/x-gzip
- .z – application/x-compress
- .tsv – text/tab-separated-values
- .xml – text/xml
- .323 – text/h323
- .htt – text/webviewhtml
- .stm – text/html
- .html – text/html
- .xsl – text/xml
- .htm – text/html
- .cod – image/cis-cod
- .ief – image/ief
- .pbm – image/x-portable-bitmap
- .tiff – image/tiff
- .ppm – image/x-portable-pixmap
- .rgb – image/x-rgb
- .dib – image/bmp
- .jpeg – image/jpeg
- .cmx – image/x-cmx
- .pnm – image/x-portable-anymap
- .jpe – image/jpeg
- .jfif – image/pjpeg
- .tif – image/tiff
- .jpg – image/jpeg
- .xbm – image/x-xbitmap
- .ras – image/x-cmu-raster
- .gif – image/gif
Configuring Custom Error Messages
While there are a number for default error messages for the common errors for incoming and outgoing requests, you can also configure custom messages. To create custom error messages, you can use the default HTML files located in the ErrorHtmls folder.
To create a custom error message:
- Open Program FilesMicrosoft ISA ServerErrorHtmlsdefault file. default.htm is for internal client errors, and defaultR.htm is for external client errors.
- Change [ERRORNUM] to the error code.
- Change [ERRORTEXT] to the error message that you want to be displayed.
- Change [SERVERNAME] to the name of the server that should return the message.
- Replace [VIAHEADER] to the Via header message string which the ISA Server computer receives for the message.
- Save the file.
How to configure bandwidth rules
Bandwidth rules make it possible for you to set the priority for requests. Bandwidth rules are configured by specifying the following elements:
- Protocol definitions
- IP addresses and users
- Destination sets
- Schedule
- Content types
- Bandwidth priority
The above elements have to be defined before you actually create the bandwidth rule.
To configure bandwidth priority:
- Open the ISA Management console.
- Expand the Policy Elements folder in the console tree.
- Right-click the folder and select New Bandwidth Priority from the shortcut menu.
- The New Bandwidth Priority dialog box opens.
- In the Name box enter the name of the bandwidth priority.
- Specify outbound bandwidth.
- Specify inbound bandwidth.
- Click OK.
To configure bandwidth rules:
ol start=”1″ type=”1″>
- Open the ISA Management console.
- Navigate to the Bandwidth Rules folder.
- Right-click the folder and select New Rule from the shortcut menu.
- The New Bandwidth Rule Wizard launches.
- In the Name box enter the name of the bandwidth rule.
- In the Description box, enter a description for the bandwidth rule. Click Next.
- Choose between the following options:
-
- Apply This Rule to All IP Traffic
- Selected Protocols
- Except Selected Protocols
Specify the selected protocols and then click Next.
- You next have to define the schedule for the rule. This schedule defines when the rule will be enforced. Click Next.
- Set the client type, and then click Next.
- Specify the destinations that the rule applies to.
-
- All Destinations
- All Internal Destinations
- All External Destinations
- Specified Destination Set
- All Destinations Except the Selected Set.
- Specify the destination set if necessary. Click Next.
- Select the content group. Options include:
-
- All Content Groups
- Selected Content Groups
Click Next.
- On the Bandwidth Priority page, specify the bandwidth priority.
- Click Next and then click Finish.
How to configure routing rules
- Open the ISA Management console.
- Navigate to the Routing folder.
- Right-click the folder and select New Rule from the shortcut menu.
- The New Routing Rule Wizard launches.
- In the Name box enter the name of the routing rule.
- In the Description box, enter a description for the routing rule. Click Next.
- When the Destination Sets page opens, specify the destination set and then click Next.
- On the Request Action page, you have to specify how client requests should be handled. Options include:
-
- Retrieve them directly from specified destination
- Route to specified upstream server
- Redirected to hosted site
- Use dial-up entry
Click Next.
- On the Cache Retrieval Configuration page, you have to define how this routing rule searches for and retrieves objects from the cache. Click Next.
- On the Cache Content Configuration page, specify whether objects should be stored in the cache. Click Next.
- Click Finish.
How to configure an ISA Server chain
- Open the ISA Management console.
- Navigate to the Routing folder.
- Select the Routing folder.
- Right-click the default routing rule and select Properties from the shortcut menu.
- The Default Rule Properties dialog box opens.
- Click the Action tab.
- Select the Routing Them to a Specified Upstream Server option.
- Click the Settings button associated with the Primary Route.
- The Upstream Server Setting dialog box opens.
- Select the ISA server and change the URL if applicable.
- Enable the Use This Account checkbox and then select the account to use for authentication.
- Select either Basic authentication or Integrated Windows authentication.
- Click OK.
- Use the same process to configure the Backup route.
Follow Us!