People have many reasons for restoring the iTunes library. These include purchasing a new computer, reloading an operating system, or suffering a hard drive crash. Once the computer is restored, the iTunes program has to be reinstalled if it is not backed up via alternative means. Once installed, music in the previous iTunes library will not be restored automatically. In fact, if an iPod, iPhone, or iPad is connected to and synced with the new iTunes installation, the entire music library stored on the portable device can be lost. When iTunes was first released, third party software was required to restore the iTunes library. However, the process can now be accomplished without additional software.
How to Restore the iTunes Library
Step 1 – Restore the computer.
Step 2 – Download the appropriate iTunes version for the computer’s Operating System (OS). After downloading the software, double click the installation file to install it on the computer. Some Windows OS configurations require that the user logs on as an administrator.
Step 3 – Connect the device (iPod, iPhone, iPad) to the computer that contains the iTunes library to restore the target computer. After connecting the device, do not allow it to sync with the iTunes application or all multimedia will be removed from the device.
Step 4 – If the files were purchased on a different computer from the one being restored, select the “Store” menu option and click the “Authorize Computer” menu option. The iTunes application will then ask for the iTunes account log in and password to proceed with authorization.
Step 5 – Choose the “File” menu button then click the “Transfer Purchases from iPod” menu choice. This option will be grayed out unless an iDevice is connected to the computer. *Note: if there is a mixture of purchased and free iTunes files, skip this step and go to step 7 or the purchased music and movies may be duplicated.
Step 6 – The music previously purchased from iTunes will now be transferred to the “Purchased” folder under the “Store” folder on the iTunes menu.
Step 7 – To recover multimedia files not purchased from the iTunes store, open Windows Explorer by pressing the “Windows” and “E” keys simultaneously or by opening the “Finder” on a Mac.
Step 8 – Allow hidden folders to be viewed by choosing the “Tools” and “Folder Options” menu options. Select the “Show Hidden Files and Folders” menu option on a Windows computer. On a Mac, choose the “Applications/Utilities” folder then open the “Terminal” application. Enter “defaults write com.apple.finder AppleShowAllFiles TRUE” then select the “Return” key. Finally, enter “killall Finder” to exit the Terminal application.
Step 9 – Open the “iPod_Control” folder on the “E Drive” then open the “Music” folder.
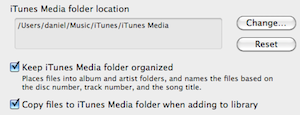
Step 10 – In the iTunes interface, open “Advanced Preferences” and check the “Copy Files to iTunes Music Folder When Adding to Library” box if not selected already.
Step 11 – Choose the “File” and “Add Folder to Library” menu options on a Windows computer. On a Mac, choose the “Add to Library” menu choice and select the “Music” folder on the iDevice opened in the previous step. Depending on the size of the library stored on the iDevice, it may take some time to complete the iTunes library restoration.


Patrick Evans
Nice sharing! And I also want to share another software called FonePaw iOS Transfer which can restore iTunes library. It can also transfer many kinds of files between iOS devices and computer. Like contacts, photos, call logs, videos etc, you can manage them with simple steps.