The DHCP server role is responsible for dynamically assigning IP addresses to DHCP clients, and for assigning additional TCP/IP configuration information to DHCP clients as well. This includes subnet mask information, default gateway IP addresses, Domain Name System (DNS) server IP addresses, and Windows Internet Naming Service (WINS) server IP addresses.
A DHCP must have at least one scope which consists of the IP addresses which the DHCP server can allocate or assign to DHCP clients. Scope information for DHCP servers is DHCP server specific. The DHCP scope includes important information, such as the specified range of IP addresses which can be leased to DHCP clients, the subnet mask, the DHCP scope options (DNS IP addresses, WINS IP addresses), the lease duration, and any reservations. Reservations include elements such as a client always receiving the same IP addresses and TCP/IP configuration information when it starts.
The common threats to DHCP servers are listed here: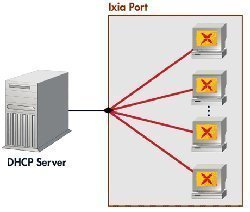
- An unauthorized user could start a denial-of-service (DoS) attack by requesting and obtaining a large number of IP addresses.
- A denial-of-service (DoS) attack can by launched through an unauthorized user that performs a large number of DNS dynamic updates through the DHCP server.
- An unauthorized user could use a rogue DHCP server to provide incorrect IP addresses to your DHCP clients.
- Assigning DNS IP addresses and WINS IP addresses through the DHCP server increases the likelihood of an unauthorized user accessing this information and then using it to attack your DNS servers and WINS servers.
As you can see, clients can obtain IP addresses and DNS and WINS server information from the DHCP server. To ensure that only authorized individuals or users connect to the DHCP server and obtain a DHCP lease, you should consider limiting physical access and wireless access to the network.
You should also consider configuring only the precise number of IP addresses required for each DHCP scope to make it less simple for hackers to intercept IP addresses. You can use the reservations feature to do this.
The DHCP server can be a single point of failure in networking environments that only have one DHCP server. You can increase the availability of DHCP servers and protect your DNS servers from DoS attacks by deploying two DHCP servers, and then using the 80/20 Rule if you have two DHCP servers located on different subnets.
The 80/20 Rule is applied as follows:
- Allocate 80 percent of the IP addresses to the DHCP server which resides on the local subnet.
- Allocate 20 percent of the IP addresses to the DHCP Server on the remote subnet.
If the DHCP server that is allocated with 80 percent of the IP addresses has a failure or is attacked, the other DHCP server would be able to assign DHCP clients with IP addresses.
With Windows Server2003, the following built-in local groups have rights to manage DHCP servers:
- Enterprise Admins group: Group members have forest wide administrative rights, and have full control over the DHCP servers. Group members can also authorize DHCP servers in Active Directory.
- DHCP Administrators group: The DHCP Administrators group is created on each DHCP server. Group members can perform all DHCP specific management tasks, including create, activate, and delete scopes; create reservations and configure DHCP options; and back up and restore the DHCP server database hosted on your DHCP servers.
- DHCP Users group: The DHCP Users group is also created on each DHCP server. Group members can only view configuration information and statistical information on the DHCP server, check whether client connectivity issues exist because of the depleton of IP addresses, and check which scopes have been activated.
You should limit membership to the above mentioned groups which include rights to change DHCP server settings. You should as far as possible restrict membership to the Enterprise Admins group.
If you are running a Windows Server 2003 DHCP server, consider implementing the following measures to further enhance security for DHCP servers:
- DHCP authorization ensures that a Windows 2000 DHCP server or Windows Server 2003 DHCP server has to be authorized in Active Directory in order for it to operate in your networking environment.
- Secure Updates forces a computer to be authenticated in Active Directory before it can obtain an IP address from a DHCP server.
Basic Security Measures for DHCP Servers
Basic security measures for securing the DHCP server role are listed here:
- Physically secure your DHCP servers.
- The NTFS file system should be utilized to protect data on the system volume.
- Apply and maintain a strong virus protection solution.
- Software patches should be kept up to date.
- If applicable, programs and software should only be allowed to be installed if they have trusted sources.
- All services and applications not being utilized on your DHCP servers should be deleted or uninstalled.
- You should perform administrative tasks on the DHCP servers with the least amount of privileges required.
- Your DHCP servers should be located behind a firewall.
- Close all open unused ports.
- To further secure the DHCP server, you can use VPN tunnels to secure DHCP traffic.
- You can also use MAC address filters.
- You should monitor DHCP activity by reviewing DHCP logs and viewing statistical information on your DHCP servers.
Backing up and Restoring the DHCP Database
By backing up a DHCP servers DHCP database, you will be in a position to recover a lost or corrupted DHCP database. The full content of the DHCP database on a DHCP server is backed up if you back up the database. This includes DHCP leases, DHCP reservations, and all DHCP scope information and DHCP options.
You can manually back up the DHCP database by using the DHCP management console or you can schedule an automatic back up DHCP database.
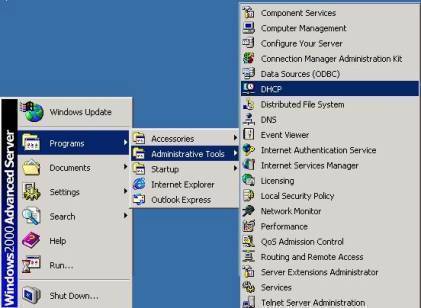
To manually back up the DHCP database,
- Click Start, Administrative Tools, and then click DHCP to open the DHCP management console.
- Right-click the DHCP server that hosts the DHCP database that you want to back up, and select Backup from the shortcut menu.
- When the Browse For Folder dialog box opens, select the folder to which the DHCP database should be backed up.
- Click OK.
To restore a DHCP database,
- Click Start, Administrative Tools, and then click DHCP to open the DHCP management console.
- Right-click the DHCP server for which you want to restore the DHCP database, and select Restore from the shortcut menu.
- When the Browse For Folder dialog box opens, select the folder that contains the back up of the DHCP database that you want to restore.
- Click OK.
- Click Yes when prompted to verify that the DHCP database must be restored immediately, and that the DHCP service can be stopped and restarted.
prashantkumar wagh
can’t we have a password authentication server?