Simple Mail Transfer Protocol (SMTP) Service Overview
The Simple Mail Transfer Protocol (SMTP) service, a primary service included as part of IIS, performs the key functions and has the characteristics listed below:
- SMTP can be used to forward mail from one SMTP host to another. SMTP cannot deliver mail directly to the client. Mail clients use POP3 or IMAP to receive e-mail. Windows Server 2003 includes the POP3 service for providing clients with mailboxes and for handling incoming e-mail.
- It enables IIS machines to operate as SMTP hosts to forward e-mail over the Internet. IIS can be utilized instead of Sendmail.
- SMTP enables IIS machines to protect mail servers such as Microsoft Exchange servers from malicious attacks by operating between these servers and Sendmail host at the organization’s ISP.
- SMTP does not provide mailboxes to users nor does it process incoming e-mail. Mail servers, such as Microsoft Exchange servers that include support for IMAP and POP3, handle incoming e-mail and e-mail storage. Windows Server 2003 includes the POP3 service.

- In order to use SMTP as an IIS component, the SMTP service must be installed first if a Windows Server 2003 Edition other than the Windows Server 2003 Web Edition is being run. The SMTP service is installed on the Windows Server 2003 Web Edition by default.
- To configure and manage the SMTP service on IIS, one may use:
- The IIS Manager.
- A Web browser using SMTP Service Manager (HTML).
- The SMTP service is fully integrated with event and performance monitoring of Windows Server 2003.
The SMTP service’s message store is created when the service is installed on IIS. SMTP utilizes this directory structure to process mail. The folders created in the InetpubMailroot directory structure (message store) are listed below:
- Pickup: The SMTP service processes messages from the Pickup folder as outbound messages or as messages for delivery. If the message is intended for users who are local domain members that the SMTP service manages, the SMTP service moves the message to the Drop folder.
- Drop: Incoming messages intended for the local domains are placed in the Drop folder. This is true for all recipients because the SMTP service does not maintain a mailbox for each recipient.
- Queue: The SMTP service moves messages that cannot be immediately delivered to the Queue folder from the Pickup folder. The SMTP service repeatedly attempts to deliver messages stored in the Queue folder.
- Badmail: The Badmail folder stores messages that could not be forwarded to the recipient, even though a predefined number of attempts were made. Another characteristic of messages in the Badmail folder is that SMTP cannot return the messages to the senders. This means that administrators have to handle messages in the Badmail message store.
- Mailbox, Route, SortTemp: Because these folders are not utilized in IIS 6, they can be deleted from the SMTP directory structure.
The events that occur when SMTP processes mail are listed below:
- The SMTP service, smtpsvc.dll, runs in-process in the Inetinfo.exe IIS process.
- Smtpsvc.dll monitors TCP port 25 for any incoming messages.
- It monitors the Pickup folder for all outgoing messages.
- SMTP places messages for users that are members of the local domain it manages in the Drop folder for delivery.
- If a message has to be sent to a user that is a member of a different or remote domain, an ASP application has to create and place the outgoing message in the Pickup folder. This is done through the ASP application with CDOSYS.
- The SMTP service then performs a DNS lookup on the name server so that it can find the SMTP host that manages the remote domain. The port used for this process is port 53. The SMTP service checks for the MX record for the remote domain.
- After the fully qualified domain name (FQDN) of the remote SMTP host is determined, the SMTP service attempts to create a connection with the remote SMTP host to transfer the message for the recipient to it. Port 25 is utilized for the message transfer.
- If a connection cannot be established with the remote SMTP host, the SMTP service places the message in the Queue folder.
- If a connection can be established with the remote SMTP host but the remote SMTP host rejects the connection, the SMTP service forwards the message sender a non-delivery report (NDR) and returns the message as well. The message is placed in the Badmail folder if it cannot be returned to the sender.
- If a connection can be established with the remote SMTP host and the remote SMTP host accepts the connection, the SMTP service transfers the message to the remote SMTP host.
- After the remote SMTP host receives the message, it is sent to the POP3 or IMAP mail server that contains the intended recipient’s mailbox.
- The message is downloaded when the client connects to the POP3 or IMAP mail server.
How to Install the SMTP Service as an IIS Component
As mentioned previously, in order to use SMTP, install the SMTP service first if Windows Server 2003 Standard Edition or Windows Server 2003 Enterprise Edition is being run.
To install the SMTP service:
- Place the Windows Server 2003 CD-ROM in the CD-ROM drive.
- Click Start, Control Panel, and Add/Remove Programs.
- Click Add/Remove Windows Components in the Add Or Remove Programs dialog box.
- Click Application Server in the Windows Components dialog box then click the Details button.
- The Application Server dialog box appears next.
- Click IIS then select the Details button.
- Click the SMTP Service checkbox.
- Click OK.
- Open IIS Manager.
- Verify that the SMTP Virtual Server node appears in the console tree.
When the SMTP service is installed on IIS, the SMTP directory structure as well as the Default SMTP Virtual Server are created. By configuring the Default SMTP Virtual Server, mail can be forwarded to multiple SMTP domains. This eliminates the need to host multiple SMTP virtual servers on one machine to forward mail.
The IIS Manager can perform the SMTP management tasks listed below:
- Create SMTP virtual servers.
- Configure SMTP virtual servers, such as configuring the following settings:
- Connection settings
- Message settings
- Delivery settings
- Security and authentication settings
- Start, stop, and pause a SMTP virtual server.
- Create and configure SMTP alias domains and remote domains.
- View current SMTP sessions.
- Terminate a particular session(s) or terminate all sessions.
How to Configure an SMTP Virtual Server
To create an SMTP virtual server:
- Open the IIS Manager.
- Locate the computer, right-click Default SMTP Server, and select New then Virtual Server from the shortcut menu.
- The New SMTP Virtual Server Wizard initiates.
- Enter a name for the SMTP site. Click Next.
- On the Select IP Address page, enter the IP address settings for the SMTP site. Click Next.
- Enter the path to the SMTP server’s home directory. Click Next.
- Provide the domain name for the SMTP server. Click Next.
- Click Finish.
Various configuration settings can be configured for an SMTP virtual server by accessing its Properties window and using the various tabs to configure these settings. The SMTP virtual server’s Properties window’s tabs are:
- General tab, Access tab, Messages tab, Delivery tab, LDAP routing, and Security tab.
To access the SMTP virtual server’s Properties window:
- Open the IIS Manager.
- Right-click the Default SMTP Virtual Server node and select Properties from the shortcut menu.
- The SMTP Virtual Server’s Properties dialog box opens.
- The settings that can be configured on each tab are discussed below.
General Tab
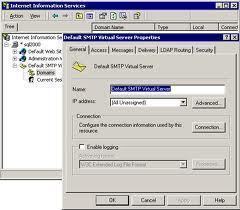
The configuration settings that can be configured are:
- IP Address text box: The IP address and TCP port number uniquely identify the SMTP virtual server. The default TCP port number is 25. The SMTP virtual server listens on port 25 to All Unassigned IP addresses on the IIS machine by default. In order for the SMTP virtual server to listen to specific IP addresses, change the All Unassigned
value in the IP Address box, click Advanced, and select the additional IP addresses. - Limit Number of Connections To checkbox: To set a limit to the number of concurrent inbound connections SMTP can accept from other hosts, select the Limit Number of Connections To checkbox and set the number desired. The default setting is that an unlimited number of concurrent inbound connections are allowed.
- Connection Timeout text box: Users can set a timeout value for outgoing connection attempts in this box.
- To enable SMTP logging, click the Enable Logging checkbox.
Access Tab
The security configuration settings that can be configured for SMTP on the Access tab are:
- Access Control section of the Access tab: Click the Authentication button to configure an authentication method for the SMTP virtual server. This authentication method will be utilized when remote hosts attempt to create an incoming connection with the SMTP virtual server. Clicking the Authentication button opens the Authentication dialog
box. The following authentication methods can be configured:- Anonymous Access: This is the default authentication method. It is recommended to leave Anonymous Access enabled when the server is connected to the Internet.
- Basic Authentication: Basic authentication utilizes a clear text user name and password and is considered the weaker authentication method. It is recommended to enable Transport Layer Security (TLS), a version of SSL encryption, when Basic Authentication is used.
- Integrated Windows Authentication: When enabled, users need to provide a user name and password for authentication. Integrated Windows Authentication is usually enabled when the SMTP virtual server transmits mail to recipients on the Internet.
- Secure Communication section of the Access tab: Click the Certificate button to start the Web Server Certificate Wizard to obtain and install a server certificate on the SMTP virtual server. After the server certificate is installed, click the Communication button to require secure communications.
- Connection Controlsection of the Access tab: Click the Connection button to specify which computers are allowed to or prevented from accessing the SMTP server. Computers can be specified by the following parameters:
- IP address
- Network ID and subnet mask
- DNS domain name
- Relay Restrictionssection of the Access tab: Click the Relay button to configure which SMTP hosts are restricted from relaying messages through the SMTP virtual server to users. Clicking the Relay button opens the Relay Restrictions dialog box:
- Users can select the Only The List Below option and specify which hosts are allowed or select the All Except The List Below option then specify which hosts are disallowed.
- It is recommended to select the Allow All Computers Which Succesfully Authenticate to Relay, Regardless Of The List Above checkbox.
When configuring security configuration settings for the SMTP virtual server, the recommended best practices are:
- Enable Anonymous access for inbound connections.
- Enable Windows Integrated Authentication for inbound connections.
- Enable the Allow All Computers Which Successfully Authenticate to Relay, Regardless Of The List Above checkbox on the Relay Restrictions dialog box so that relay access is denied to all computers with the exception being those computers that have been authenticated.
Configuring the above security configuration settings results in:
- Users on the internal network can connect to the SMTP virtual server and be authenticated through Windows Integrated Authentication. These users’ messages can then be relayed to remote domain recipients.
- SMTP hosts on the Internet use Anonymous access to convey messages to the SMTP virtual server. The SMTP virtual server forwards these messages to the POP3 server, where it is placed into the user’s mailbox.
- SMTP hosts attempting to send messages through SMTP to users in other domains are prevented from doing so.
Messages Tab
The configuration settings that can be configured for messages are:
- Limit Message Size To (KB): Users set the maximum incoming message size allowed in this box.
- Limit Session Size To (KB): Users set the maximum session size allowed in this box. This is the maximum amount of data (incoming) that can be sent in the message for a single SMTP connection.
- Limit Number Of Messages Per Connection To: Users set the maximum number of outbound messages that can be sent in a single SMTP connection. Additional outgoing connections will be opened when the value specified is exceeded.
- Limit Number Of Recipients Per Message To: Users can specify the maximum amount of recipients for a message in this box.
- Users can specify a destination where a copy of the non-delivery report (NDR) should be transmitted.
- Users can also change the SMTP Badmail folder’s location.
Delivery Tab
The configuration settings that can be configured for message delivery are:
- Outboundsection of the Delivery tab: Settings are configured for the SMTP server’s attempts to establish a connection with a remote SMTP host. The settings that can be configured specifically for delivering outbound mail are:
- Retry Intervals values – indicate the retry intervals for SMTP when it cannot establish a connection with a remote host.
- Delay Notification value – accommodates delays that network congestion typically caused.
- Expiration Timeout value – the time duration after SMTP sends a non-delivery report (NDR) to the message sender.
- Localsection of the Delivery tab: This is where users configure settings for local delivery, and includes the following:
- Delay Notification value – accommodates delays that network congestion typically caused.
- Expiration Timeout value – the time duration after SMTP sends a non-delivery report (NDR) to the message sender.
- Click the Outbound Security button to configure an outbound authentication method for the SMTP virtual server. The default authentication method is Anonymous Access. Users can only select one outbound authentication method.
- Click the Advanced buttonto configure additional delivery settings on the Advanced Delivery dialog box:
- Maximum Hop Count: Users can specify the maximum number of hops allowed between SMTP hosts to relay an outgoing message. A non-delivery report (NDR) is sent when the value is exceeded.
- Masquerade Domain (optional): Users can define the DNS domain name that should replace the local domain in the Mail From each message’s header field.
- Fully Qualified Domain Name: Users can indicate the FQDN of the SMTP virtual server in this field. If there are multiple roles and DNS names for the virtual server, this value can be modified. The default value displayed is the one specified in Control Panel on the System Properties window’s Network Identification tab.
- Smart Host: By specifying a smart host, all outgoing messages can be routed through a specific SMTP host. The smart host can be defined by its IP address or fully qualified domain name.
- Attempt Direct Delivery Before Sending To Smart Host: This checkbox becomes available when a Smart Host is specified.
- Perform Reverse DNS Lookup On Incoming Messages: It is recommended to not enable Reverse DNS Lookup because it slows the SMTP server’s performance.
LDAP Routing Tab
To configure the SMTP virtual server to access a directory service to resolve e-mail addresses from the names of senders and recipients, do so on the LDAP Routing tab. The directory services supported are:
- Exchange Server directory.
- Windows Active Directory.
- A custom directory service such as Internet services Four11 and Bigfoot.
To enable LDAP Routing, click the Enable LDAP Routing checkbox on the LDAP Routing tab and specify the following information for connecting to the directory server:
- Server, Schema type, Binding type, Domain, User name, Password, and Naming context.
Security Tab
The users and security groups that have permission to configure the SMTP server’s properties are located on the Security tab. The default groups that are assigned SMTP operator permissions are:
- Administrators.
- LocalService.
- NetworkService.
SMTP Domains
An SMTP virtual server manages one or multiple SMTP domains. SMTP domains are also called service domains. An SMTP domain is a DNS domain that manages messages for delivery. The SMTP domain is automatically the default local domain of the Default SMTP Virtual Server. Users can view the default local domain in the IIS Manager. Simply click the SMTP virtual server node in the console tree to display the default domain. A characteristic of the default domain is that it cannot be deleted. An SMTP virtual server can only have one default local domain.
However, users can change the default name by right-clicking it and selecting Rename from the shortcut menu.
To configure the default domain, right-click it and select Properties from the shortcut menu. Users can change the Drop directory’s location on the General tab. They can also select the Enable Drop Directory Quota check box to limit the Drop directory’s size. In addition to the SMTP default domain, users can create the following domains:
- Alias Domains: To create additional local SMTP domains, create a type of SMTP domain called alias domains. The SMTP virtual server manages alias domains in the same manner as the default domain. In fact, alias domains use the same setting as the default domain. They also send incoming messages to the Drop folder, which the default domain utilizes.
- Remote Domains: Users can also create remote domains to connect to the remote SMTP hosts to which mail is frequently transmitted. They can specify different delivery requirements for each remote domain, specify a predefined delivery route for a remote domain, and specify sub-domains.
How to Create an Alias Domain
The New SMTP Domain Wizard is used to create alias domains for the Default SMTP Virtual Server and remote domains.
- Open the IIS Manager.
- In the console tree, right-click the Domains node under Default SMTP Virtual Server, select New from shortcut menu, and select Domain.
- The New SMTPDomain Wizard starts.
- Select the Alias domain type option. Click Next.
- Specify the DNS name for the alias domain. Click Finish.
- In the IIS Manager’s console tree, click the Domains node to view the domains for the Default SMTP Virtual Server.
How to Create and Configure a Remote Domain
- Open the IIS Manager.
- Right-click the Domains node, select New from shortcut menu, and select Domain.
- The New SMTP Domain Wizard starts.
- Click the Remote domain type option. Click Finish.
- Open the remote domain’s Properties window.
- The delivery settings that can be configured on the General tab are:
- Users can override the default no relay setting and allow the relaying of incoming messages sent to this domain.
- Users can enable the Send HELO instead of EHLO checkbox.
- Users can configure an authentication method for outbound messages sent to the remote domain. Click the Outbound Security button and select the authentication method.
- Users can set the routing method for sending messages to the remote domain.
- Click the Advanced tab to specify that the SMTP server should store mail for an SMTP host of the remote domain. This feature is useful for a host that rarely connects to the Internet.


Chris
Hello,
Just installed SMTP Service on Windows 2003 R2 Server. Our internal CAD (computer aided dispatch) software will use this relay to send emails out to a 3rd party server which that server relays SMS texts messages to Motorola radios in the vehicles. After setting up I tested sending to a remote domain, when the email is received, there is no sender address (unknown sender). The 3rd party server requires an source email address in the email in order for the server to receive it. What am I missing here? Thanks for any help.
Karl
Thank you very much. This is a very useful post. (It’s ashame that MS does not [seem to] have such good overview material on there site. With MS, I’m always clicking from one page to another and never can seem to get to the basics.)
I have a question (thought not exactly related to configuring SMTP service, but I think it is good to understand).
My site has a webform that visitors can use to send us messages. The message is sent to use via the localhost SMTP using PHP. It works fine, except for one thing. When we get the emails, our default email address is the “From” address. This means I have to paste the sender’s email address into the “To” field when I hit reply to the message we receive from the default SMTP server.
Is this how everyone does it? I understand that I might not be able to send us an email from the website’s localhost default SMTP server and make it look to the client email program (gmail) that it came from another account on a different domaim (for security reasons).
But am I missing something?
Thanks.
ravi
can connect nokia e63 mobile phone to tv
john
What does it mean by “Remote Domain”, My guess is:
Suppose I am sending to xx@yy.com, then the smtp server will look up for a remote domain: yy.com, and use the setting of it to transmit the mail.
Is this correct?
Raj
Hi There,
I am investigating SMTP virtual server for a specific requirement that I have. I need to write an application/service that will monitor an email account on exchange server 2003 (for e.g. info@mycompany.com) and process an email when one comes into the email account.
I am trying to set up the SMTP server on one of the prod servers, and have the exchange server team forward any emails to the (info@mycompany.com) account to this SMTP server. BTW POP3 and exchange webservices are disabled on our exchange server.
My Questions are:
1. Am I on the right track? Is this the recommended approach?
2. What configuration steps above are important to me while setting up my SMTP Server? Can I specify directories from a shared storage resource (SAN) so that if the machine crashes I can have the backup server point to the same storage resource and pick up where processing was stopped?
3. What instructions I should give to the exchange server team and network team to set up forwarding of the email from (info@mycompany.com) to the SMTP Server.
Thank you in advance for the help,
Raj.
Kieran
What happened to this article? When I came back to it, it had disappeared
admin
Kieran:
Thanks very much for the error report! I just restored this article from backup.
bwerks
Oh man, this is ridiculously helpful. I found this looking for details about Outbound authentication, and while there wasn’t much here the rest of this is comprehensive and helpful. Thanks!
alex.kallu
You really helped me what i am looking from long time.. This stuff is very useful. Thanks a lot. There are lot of experienced people who doesnt know the basics.. thanks