Users can use the Event Viewer tool in the Administrative Tools folder to monitor DHCP activity. Event Viewer stores events that are logged into the system log, application log, and security log. The system log contains events that are associated with the operating system. The application log stores events that pertain to applications running on the computer. Events that are associated with auditing activities are logged into the security log. All events that are DHCP-specific are logged into the System log. The DHCP system event log contains events that are associated with DHCP service and DHCP server activities, such as when the DHCP server started and stopped, when DHCP leases are close to being depleted, and when the DHCP database is corrupt.
A few DHCP system event log IDs are listed below:
- Event ID 1037 (Information): Indicates that the DHCP server has begun to clean up the DHCP database.
- Event ID 1038 (Information): Indicates that the DHCP server cleaned up the DHCP database for unicast addresses:
- 0 IP address leases were recovered.
- 0 records were deleted.
- Event ID 1039 (Information): Indicates that the DHCP server cleaned up the DHCP database for multicast addresses:
- 0 IP address leases were recovered.
- 0 records were deleted.
- Event ID 1044 (Information): Indicates that the DHCP server has concluded that it is authorized to start and is currently servicing DHCP client requests for IP addresses.
- Event ID 1042 (Warning): Indicates that the DHCP service running on the server has detected servers on the network.
- Event ID 1056 (Warning): Indicates that the DHCP service has determined that it is running on a domain controller and no credentials are configured for DDNS registrations.
- Event ID 1046 (Error): Indicates that the DHCP service running on the server has determined that it is not authorized to start servicing DHCP clients.
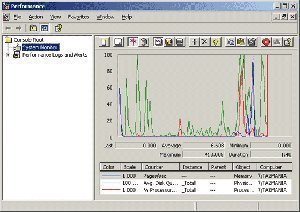
Using System Monitor to Monitor DHCP Activity
The System Monitor utility is the main tool for monitoring system performance. System Monitor can track various processes on the Windows system in real time. The utility uses a graphical display that views current data or log data. Users can specify elements or components that should be tracked on the local computer and remote computers. They can determine resource usage by monitoring trends. System Monitor can be displayed in a graph, histogram, or report format. System Monitor uses objects, counters, and instances to monitor the system.
System Monitor is a valuable tool when users need to monitor and troubleshoot DHCP traffic being passed between the DHCP server and DHCP clients. Through System Monitor, users can set counters to monitor:
- The DHCP lease process
- The DHCP queue length
- Duplicate IP address discards
- DHCP server-side conflict attempts
To start System Monitor:
- Click Start, Administrative Tools, and Performance.
- When the Performance console opens, open System Monitor.
The DHCP performance counters that track DHCP traffic are:
- Acks/sec – indicates the rate at which the DHCP server sends DHCPACK messages.
- Active Queue Length – indicates how many packets are in the DHCP queue for the DHCP server to process.
- Conflict Check Queue Length – indicates how many packets are in the DHCP queue that are waiting for conflict detection.
- Declines/sec – indicates the rate at which the DHCP server receives DHCPDECLINE messages.
- Discovers/sec – indicates the rate at which the DHCP server receives DHCPDISCOVER messages.
- Duplicaed Dropped/sec – indicates the rate at which the DHCP server receives duplicated packets.
- Informs/sec – indicates the rate at which the DHCP server receives DHCPINFORM messages.
- Milliseconds per packet (Avg.) – indicates the average time that the DHCP server takes to send a response.
- Nacks/sec – indicates the rate at which the DHCP server sends DHCPNACK messages.
- Packets Expired/sec – indicates the rate at which packets are expired while waiting in the DHCP server queue.
- Packets Received/sec – indicates the rate at which the DHCP server is receiving packets.
- Releases/sec – indicates the rate at which the DHCP server receives DHCPRELEASE messages.
- Requests/sec – indicates the rate at which the DHCP server receives DHCPREQUEST messages.
Using Network Monitor to Monitor DHCP Lease Traffic
Network Monitor can be used to monitor network traffic and to troubleshoot network issues or problems. Network Monitor shipped with Windows Server 2003 allows users to monitor network activity and use the gathered information to manage and optimize traffic, identify unnecessary protocols, and to detect problems with network applications and services. In order to capture frames, users have to install the Network Monitor application and the Network Monitor driver on the server where Network Monitor will be run. The Network Monitor driver makes it possible for Network Monitor to receive frames from the network adapter.
The two versions of Network Monitor are:
- The Network Monitor version included with Windows Server 2003: With this Network Monitor version, users can monitor network activity only on the local computer running Network Monitor.
- The Network Monitor version (full) included with Microsoft Systems Management Server (SMS): With this version, users can monitor network activity on all devices on a network segment. Users can capture frames from a remote computer, resolve device names to MAC addresses, and determine the user and protocol that is consuming the most bandwidth.
Because of these features, users can use Network Monitor to monitor and troubleshoot DHCP lease traffic. The Network Monitor version included in Windows Server 2003 can be used to capture and analyze the traffic that the DHCP server receives. Before the Network Monitor can be used to monitor DHCP lease traffic, it has to be installed. The Network Monitor driver is automatically installed when Network Monitor is installed.
How to Install Network Monitor
- Click Start then click Control Panel.
- Click Add Or Remove Programs to open the Add Or Remove programs dialog box.
- Click Add/Remove Windows Components.
- Select Management and Monitoring Tools and click the Details button.
- On the Management and Monitoring Tools dialog box, select the Network Monitor Tools checkbox and click OK.
- Click Next when returned to the Windows Components Wizard.
- If prompted during the installation process for additional files, place the Windows Server 2003 CD-ROM into the CD-ROM drive.
- Click Finish on the Completing the Windows Components Wizard page.
Capture filters disregard frames that the user does not want to capture before they are stored in the capture buffer. When a capture filter is created, define settings that can be used to detect the frames that should not be captured. Capture filters can be designed in the Capture Window to only capture specific DHCP traffic by selecting Filter from the Capture menu. Users can also create a display filter after data is captured. A display filter enables users to decide what is displayed.
How to start a DHCP lease traffic capture in Network Monitor:
- Open Network Monitor.
- Use the Tools menu to click Capture then click Start.
- In order to examine captured data during the capture, select Stop And View from the Capture menu.
Understanding DHCP Server Log Files
DHCP server log files are comma-delimited text files. Each log entry represents one line of text. Through DHCP logging, many different events can be logged. A few of these events are listed below:
- DHCP server events
- DHCP client events
- DHCP leasing
- DHCP rogue server detection events
- Active Directory authorization
The DHCP server log file format is depicted below. Each log file entry’s fields are listed below, and in this particular order as well:
- ID: This is the DHCP server event ID code. Event codes describe information about the activity being logged.
- Date: The date when the particular log file entry was logged on the DHCP server.
- Time: The time when the particular log file entry was logged on the DHCP server.
- Description: This is a description of the particular DHCP server event.
- IP Address: This is the DHCP client’s IP address.
- Host Name: This is the DHCP client’s host name.
- MAC Address: This is the MAC address that the DHCP client’s network adapter uses.
DHCP server log files use reserved event ID codes. These event ID codes describe information on the activities being logged. The actual log file only describes event ID codes lower than 50.
A few common DHCP server log event ID codes are listed below:
- 00 – indicates the log was started.
- 01 – indicates the log was stopped.
- 02 – indicates that the log was temporarily paused due to low disk space.
- 10 – indicates that a new IP address was leased to a client.
- 11 – indicates that a client renewed the lease.
- 12 – indicates that a client released a lease.
- 13 – indicates that an IP address was detected to be in use on the network.
- 14 – indicates a lease request could not be satisfied due to the scope’s address pool being exhausted.
- 15 – indicates that a lease was denied.
- 16 – indicates that a lease was deleted.
- 17 – indicates that a lease was expired.
- 20 – indicates that a BootP address was leased to a client.
- 21 – indicates that a dynamic BOOTP address was leased to a client.
- 22 – indicates that a BOOTP request could not be satisfied because the scope’s address pool for BOOTP is exhausted.
- 23 – indicates that a BOOTP IP address was deleted after confirming it was not being used.
- 24 – indicates that an IP address cleanup operation has started.
- 25 – indicates IP address cleanup statistics.
- 30 – indicates a DNS update request.
- 31 – indicates that the DNS update failed.
- 32 – indicates that the DNS update was successful.
The following DHCP server log event ID codes are not described in the DHCP log file. These DHCP server log event ID codes relate to the DHCP server’s Active Directory authorization status:
- 50 – Unreachable domain: The DHCP server could not locate the applicable domain for its Active Directory installation.
- 51 – Authorization succeeded: The DHCP server was authorized to start on the network.
- 52 – Upgraded to a Windows Server 2003 operating system: The DHCP server was recently upgraded to a Windows Server 2003 OS, therefore, the unauthorized DHCP server detection feature (used to determine whether the server has been authorized in Active Directory) was disabled.
- 53 – Cached authorization: The DHCP server was authorized to start using previously cached information. Active Directory was not visible at the time the server was started on the network.
- 54 – Authorization failed: The DHCP server was not authorized to start on the network. When this occurs, it is likely followed by the server being stopped.
- 55 – Authorization (servicing): The DHCP server was successfully authorized to start on the network.
- 56 – Authorization failure: The DHCP server was not authorized to start on the network and Windows Server 2003 OS shut it own. Users must first authorize the server in the directory before re-starting it.
- 57 – Server found in domain: Another DHCP server exists and is authorized for service in the same Active Directory domain.
- 58 – Server could not find domain: The DHCP server could not locate the specified Active Directory domain.
- 59 – Network failure: A network-related failure prevented the server from determining if it is authorized.
- 60 – No DC is DS enabled: No Active Directory DC was located. For detecting whether the server is authorized, a domain controller that is enabled for Active Directory is needed.
- 61 – Server found that belongs to DS domain: Another DHCP server that belongs to the Active Directory domain was found on the network.
- 62 – Another server found: Another DHCP server was found on the network.
- 63 – Restarting rogue detection: The DHCP server is trying once more to determine whether it is authorized to start and provide service on the network.
- 64 – No DHCP enabled interfaces: The DHCP server has its service bindings or network connections configured so that it is not enabled to provide service.
How to Change the DHCP Log Files Location
- Open the DHCP console.
- Right-click the DHCP server node and select Properties from the shortcut menu.
- The DHCP Server Properties dialog box opens.
- Click the Advanced tab.
- Change the audit log file location in the Audit Log File Path text box.
- Click OK.
How to Disable DHCP Logging
- Open the DHCP console.
- Right-click the DHCP server node and select Properties from the shortcut menu.
- The DHCP Server Properties dialog box opens.
- On the General tab, clear the Enable DHCP Audit Logging checkbox to disable DHCP server logging.
- Click OK.
Troubleshooting the DHCP Client Configuration
A DHCP failure usually exists when the following events occur:
- A DHCP client cannot contact the DHCP server
- A DHCP client loses connectivity
When these events occur, one of the first things to do is determine whether the connectivity issues occurred because of the actual DHCP client configuration or whether it occurred because of some other network issue. Do this by determining the DHCP client’s IP address type.
To determine the address type:
- Use the Ipconfig command to determine if the client received an IP addresses lease from the DHCP server.
- The client received an IP address from the DHCP server if the Ipconfig /all output displays:
- The DHCP server as being enabled.
- The IP address is displayed as IP Address. It should not be displayed as Autoconfiguration IP Address.
- Users can also use the network connection’s status dialog box to determine the client’s IP address type.
- To view this information, double-click the appropriate network connection in the Network Connections dialog box.
- Click the Support tab.
- The IP address type should be displayed as being Assigned By DHCP.
If after the above checks it can be concluded that the DHCP server assigned the IP address to the client, some other network issue is the cause of the DHCP server connectivity issues being experienced. The issue is not due to an IP addressing issue on the client.
When clients have the incorrect IP address, it is probably due to the computer not being able to contact the DHCP server. When this occurs, the computer assigns its own IP address through Automatic Private IP Addressing (APIPA).
Computers could be unable to contact the DHCP server for a number of reasons:
- A problem might exist with the DHCP server’s hardware or software.
- A data link protocol issue could be preventing the computer from communicating with the network.
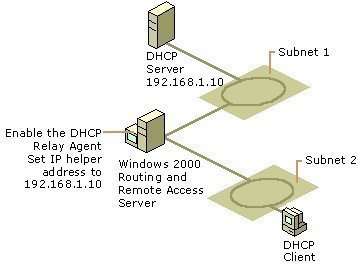
- The DHCP server and the client are on different LANs and there is no DHCP Relay Agent. A DHCP Relay Agent enables a DHCP server to handle IP address requests of clients that are located on a different LAN.
When a DHCP client is assigned an IP address that another client is currently using, an address conflict has occurred.
The process that detects duplicate IP addresses is illustrated below:
- When the computer starts, the system checks for any duplicate IP addresses.
- The TCP/IP protocol stack is disabled on the computer when the system detects duplicate IP addresses.
- An error message is shown that indicates the other system’s hardware address that this computer is in conflict with.
- The computer that initially owned the duplicate IP address experiences no interruptions and operates normally.
- Reconfigure the conflicting computer with a unique IP address so that the TCP/IP protocol stack can be enabled on that particular computer again.
When address conflicts exist, a warning message is displayed:
- A warning is displayed in the system tray.
- A warning message is displayed in the System log, which can be viewed in Event Viewer.
Address conflicts usually occur under the following circumstances:
- There are competing DHCP servers in one’s environment: One can use the Dhcploc.exe utility to locate any rogue DHCP servers. The Dhcploc.exe utility is included with the Windows Support Tools. To solve the competing DHCP server issue, locate the rogue DHCP servers, remove the necessary rogue DHCP servers, then check that no two DHCP servers can allocate IP address leases from the same IP address range.
- A scope redeploymenthas occurred: recover from a scope redeployment through the following strategy:
- Increase the conflict attempts on the DHCP server.
- Renew the DHCP client leases.
One of the following methods can be used to renew the DHCP client leases:
-
- Use the Ipconfig /renew command.
- The Repair button of the status dialog box (Support tab) of the connection can be used to renew the DHCP client lease.
When the Repair button of the status dialog box (Support tab) of the connection is clicked to renew the DHCP client lease, the following process occurs:
- A DHCPREQUEST message is broadcast on the network to renew the DHCP clients’ IP address leases.
- The ARP cache is flushed.
- The NetBIOS cache is flushed.
- The DNS cache is flushed.
- The NetBIOS name and the client’s IP address is registered again with the WINS server.
- The client’s computer name and IP address are registered again with the DNS server.
Enable server-side conflict detection through the following process:
- Open the DHCP console.
- Right-click the DHCP server in the console tree and select Properties from the shortcut menu.
- When the Server Properties dialog box opens, click the Advanced tab.
- Set the number of times that the DHCP server should run conflict detection prior to it leasing an IP address to a client.
- Click OK.
A few troubleshooting strategies that can be used when a DHCP client cannot obtain an IP address from the DHCP server are summarized below:
- Use the Ipconfig /renew command or the Repair button of the status dialog box (Support tab) of the connection to refresh the client’s IP configuration.
- Verify that the DHCP server is enabled and that a configured DHCP Relay Agent exists in the broadcast range.
- If the client still cannot obtain an IP address from the DHCP server, check that the actual physical connection to the DHCP server or DHCP Relay Agent is operating correctly and is not broken.
- Verify the status of the DHCP server and DHCP Relay Agent.
- If the issue still persists after all the above checks have been performed, there might be an issue at the DHCP server or a scope issue might exist.
- When troubleshooting the DHCP server:
- Check that the DHCP server is installed and enabled.
- Check that the DHCP server is correctly configured.
- Verify that the DHCP server is authorized.
- When troubleshooting the scope configured for the DHCP server:
- Check that the scope is enabled.
- Check whether all the available IP leases have already been assigned to clients.
A few troubleshooting strategies to use when a DHCP client obtains an IP address from the incorrect scope are summarized below:
- First determine whether competing DHCP servers exist on the network. Use the Dhcploc.exe utility included with the Windows Support Tools to locate rogue DHCP servers that are allocating IP addresses to clients.
- If no rogue DHCP servers are located through the Dhcploc.exe utility, verify that each DHCP server is allocating IP address leases from unique scopes. There should be no overlapping of the address space.
- If there are multiple scopes on the DHCP server and the DHCP server is assigning IP addresses to clients on remote subnets, verify that a DHCP Relay Agent that is used to enable communication with the DHCP server has the correct address.
Troubleshooting the DHCP Server Configuration
If users have clients that cannot obtain IP addresses from the DHCP server even though they can contact the DHCP server, do the following:
- Verify that the DHCP Server service is running on the particular server.
- Check the actual TCP/IP configuration settings on the DHCP server.
- If using the Active Directory directory service, verify that the DHCP server is authorized.
- The DHCP server could be configured with the incorrect scope. Check that the scope is correct on the DHCP server and verify that it is active.
To verify the DHCP server’s configuration, use the following process:
- First check that the DHCP server is configured with the correct IP address. The network ID of the address being used must be the same for the subnet for which the DHCP server is expected to assign IP addresses to the client.
- Verify the DHCP server’s network bindings. The DHCP server must be bound to the particular subnet. To check this:
- Open the DHCP console.
- Right-click the DHCP server in the console tree and select Properties from the shortcut menu.
- When the Server Properties dialog box opens, click the Advanced tab.
- Click the Bindings button.
- Check that the DHCP server is authorized in Active Directory. The DHCP server has to be authorized in Active Directory so that it can provide IP addresses to the DHCP clients. To authorize the DHCP server:
- Open the DHCP console.
- In the console tree, expand the DHCP server node.
- Click the DHCP server to be authorized.
- Click the action menu then select Authorize.
- Verify the scope configuration associated with the DHCP server:
- Check that the scope is activated. To activate a scope:
- Open the DHCP console.
- Right-click the scope in the console tree and select Activate from the shortcut menu.
- Verify that the scope is configured with the correct IP address range.
- Verify that there are available IP address leases that can be assigned to the DHCP clients.
- Verify the exclusions specified in the address pool. Confirm that all exclusions are valid and necessary. Verify that no IP addresses are being unnecessarily excluded.
- Verify the reservations specified. If there is a client that cannot obtain a reserved IP address, check whether the same address is also defined as an exclusion in the address pool. All reserved IP addresses must fall within the scope’s address range. Also, check that the MAC addresses were successfully registered for all IP addresses that are reserved.
- If you there are DHCP servers that contain multiple scopes, check that each scope is configured correctly.
Troubleshooting DHCP Database Issues
The DHCP service uses a number of database files to maintain DHCP specific data or information on IP addresses leases, scopes, superscopes, and DHCP options. The DHCP database files that are located in the systemrootSystem32DHCP folder are listed below. These files remain open while the DHCP service is running on the server. Therefore, do not change any of these files while the DHCP service is running.
- Dhcp.mdb: This is considered the main DHCP database file because it contains all scope information.
- Dhcp.tmp: This file contains a backup copy of the database file created during DHCP database re-indexing.
- J50.log: This log file contains changes prior to it being written to the DHCP database.
- J50.chk: This checkpoint file informs DHCP on those log files that still have to be recovered.
To change the DHCP server’s role and move its functions to another server, it is recommended that the DHCP database be migrated to the new DHCP server. This strategy prevents errors that occur when someone manually attempts to recreate information in the destination DHCP server’s DHCP database.
To migrate an existing DHCP database to a new DHCP server:
- Open the DHCP console.
- Right-click the DHCP server whose database will be moved to a different server and select Backup from the shortcut menu.
- When the Browse For Folder dialog box opens, select the folder to which the DHCP database should be backed up. Click OK.
- To prevent the DHCP server from allocating new IP addresses to clients once the DHCP server database is backed up, stop the DHCP server.
- Open the Services console.
- Double-click the DHCP server.
- When the DHCP Server Properties dialog box opens, select Disable from the Startup Type drop down list.
- Copy the folder that contains the backup to the new DHCP server. Restore the DHCP backup at the destination DHCP server.
- Open the DHCP console.
- Right-click the destination DHCP server for which the DHCP database will be restored and select Restore from the shortcut menu.
- When the Browse For Folder dialog box opens, select the folder that contains the back up of the database to be restored. Click OK.
- Click Yes when prompted to restore the database and to stop and restart the DHCP service.
If the lease information in the DHCP database does not correspond with the actual IP addresses leased to clients on the network, delete the existing database files and commence with a clean (new) database. To do this:
- Stop the DHCP service.
- Remove all the DHCP database files from the systemrootsystem32DHCP folder.
- Restart the DHCP service.
- Rebuild the database’s contents by reconciling the DHCP scopes. The DHCP console is used for this.
When DHCP database information is inconsistent with what is on the network, corrupt, or when information is missing, reconcile DHCP data for the scopes to recover the database. The DHCP service stores IP addresses lease data as follows:
- Detailed IP address lease information is stored in the DHCP database.
- Summary IP address lease information is stored in the DHCP database.
These sets of information are compared when scopes are reconciled. Before reconciling the DHCP server’s scopes, stop the DHCP service running on the server. Repair any inconsistencies that the comparison between the DHCP database and the Registry contents detects.
How to Reconcile the DHCP Database
- Open the DHCP console.
- Right-click the DHCP server for which the DHCP database should be reconciled, then select Reconcile All Scopes from the shortcut menu. The Reconcile All Scopes command also appears as an Action menu item.
- When the Reconcile All Scopes dialog box opens, click Verify to start the DHCP database reconciliation process.
- When no inconsistencies are reported, click OK.
- When inconsistencies are detected, select the addresses that need to be reconciled then click Reconcile.
- The inconsistencies are repaired.
How to Reconcile a Single Scope
- Open the DHCP console.
- In the console tree, expand the DHCP server node that contains the scope to be reconciled.
- Right-click the scope then select Reconcile from the shortcut menu.
- When the Reconcile All Scopes dialog box opens, click Verify to start the scope reconciliation process.
- When no inconsistencies are detected, click OK.
- When inconsistencies are detected, select the addresses that need to be reconciled then click Reconcile.
- The inconsistencies are repaired.
Follow Us!