Configuring DNS Client Settings
Configuring DNS client computers typically entail the execution of the following administrative tasks:
-
Setting the client computer names for each computer. The computer names that you configure should not be greater than 63 bytes. The name can only include:
-
Uppercase letters; A – Z
-
Lowercase letters; a – z
-
Numbers; 0 – 9
-
Hyphens
-
-
Configure a primary DNS suffix for the computer. The primary DNS suffix of the computer is the name of the Active Directory domain that the computer is a member of, by default. To configure or change the primary DNS suffix of the computer, access the System Properties dialog box. Next, click the Computer Name tab and then click the Change button. When the Computer Name Changes dialog box opens, click the More button.
-
Identify the DNS servers for the DNS clients to query for name resolution. You can configure preferred DNS servers, and alternate DNS servers. The alternate DNS servers would be used when the preferred DNS servers are unavailable. The preferred and alternate DNS servers are configured on the Internet Protocol (TCP/IP) Properties dialog box for the connection.
-
Customize the query behavior for your defined DNS clients.
-
Configure a DNS suffix search list that DNS clients can use when they perform queries for unqualified domain names.
-
Configure a connection specific DNS suffix for every individual adapter on the DNS client. When a DNS computer has a connection specific DNS suffix, the FQDN is assigned to a specific adapter on the computer. To configure connection specific DNS suffix for a specific adapter on the DNS client, access the Advanced TCP/IP Settings dialog box of the connection, and click the DNS tab to create the connection specific DNS suffix.
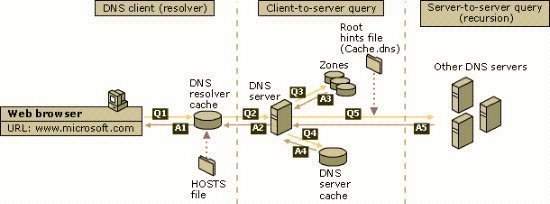
The order in which the DNS Client service queries the DNS servers to resolve names is illustrated below:
-
The DNS Client service passes the DNS query to the first server specified in the list of DNS servers on the preferred adapter.
-
If no response is received from this DNS server after one second, the DNS Client service passes the query to each first DNS server on all adapters.
-
If no response is received after 2 seconds, the DNS resolver sends the query to all the DNS servers on all the adapters.
-
If no response is received after 2 seconds, the DNS resolver sends the query all the DNS servers on all the adapters.
-
If no response is received after 4 seconds, the DNS resolver sends the query all the DNS servers on all the adapters.
-
This time the resolver waits for 8 seconds.
How to statically configure TCP/IP Settings for a DNS client
-
Click Start, Control Panel, and then click Network Connections.
-
Select Local Area Connections dialog box, and then click Properties.
-
In the list, select Internet Protocol (TCP/IP), and then click Properties.
-
When the Internet Protocol (TCP/IP) dialog box opens, click the Use the following DNS server addresses button.
-
In the Preferred DNS Server text box, enter the IP address of the preferred DNS server.
-
In the Alternate DNS Server text box, enter the address of the alternate DNS server.
-
Click OK.
How to configure advanced TCP/IP Settings for a DNS client
-
Click Start, Control Panel, and then click Network Connections.
-
Select Local Area Connections dialog box, and then click Properties.
-
In the list, select Internet Protocol (TCP/IP), and then click Properties.
-
When the Internet Protocol (TCP/IP) dialog box opens, click the Advanced button.
-
The Advanced TCP/IP Settings dialog box opens.
-
Click the DNS tab.
-
If you want to add an additional DNS server IP address, click the Add button beneath the DNS server addresses, in order of use: box.
-
Select the Append Primary And Connection Specific DNS Suffixes option if you want the DNS client to be able to resolve an unqualified name through adding the primary DNS suffix and the connection specific DNS suffixes.
-
You can also select the Append Parent Suffixes Of The Primary DNS Suffix checkbox beneath the previous option.
-
Click the Append These DNS Suffixes option if you want DNS clients to resolve hosts from multiple domains on the DNS server. Click the Add button to add the suffixes.
-
In the DNS Suffix For This Connection text box, enter the DNS suffix for a connection specific DNS suffix.
-
If you want the DNS client to register the connection's IP address, leave the Register This Connection's Addresses In DNS checkbox enabled.
-
Select the Use This Connection's DNS Suffix In DNS Registration checkbox if you want the DNS client to register the connection's IP address with a connection specific FQDN.
-
Click OK.
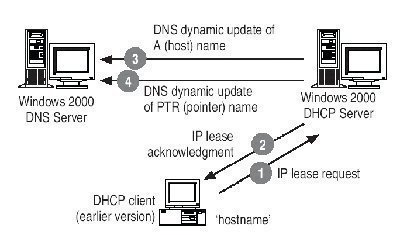
Configure DNS Clients through DHCP
Before DHCP can assign DNS server IP addresses to clients, you have to assign the DNS servers IP addresses to the DHCP scopes.
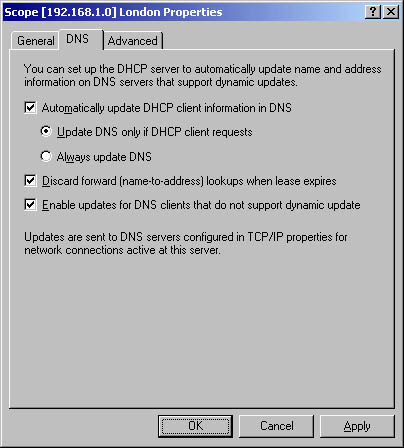
To enable DHCP and DNS integration
-
Open the DHCP console.
-
Right-click the DHCP server, and then select Properties from the shortcut menu.
-
When the Server Properties dialog box opens, click the DNS tab.
-
Ensure that the Enable DNS Dynamic Updates According To The Settings Below checkbox is selected
-
Select the Dynamically Update DNS A And PTR Records Only If Requested By The DHCP Clients option.
-
Select the Discard A And PTR Records When Lease Is Deleted checkbox.
-
Click OK.
To create a DHCP scope
-
Click Start, All Programs, Administrative Tools and then click DHCP to open the DHCP console.
-
In the console tree, expand the DHCP server node.
-
Select the DHCP server.
-
Click the Action menu, and then select New Scope.
-
The New Scope Wizard starts.
-
Click Next on the initial page of the New Scope Wizard.
-
On the Scope Name page, enter a name for the new scope in the Name text box.
-
Enter a description in the Description text box. Click Next.
-
On the IP Address Range page, enter the start IP address and end IP address that defines the range of new scope in the Start IP Address text box, and End IP Address text box respectively.
-
Enter the subnetmask in the Subnet Mask text box.
-
Select the value in the Length spin box. The subnet length mask is automatically defined as 24. Click Next.
-
On the Add Exclusions page, using the Start IP Address and End IP Address text boxes, define any exclusions. Click Add. Click Next.
-
On the Lease Duration page, you can change the default lease duration of 8 days. Use the Days, Hours and Minutes boxes to define the lease duration. Click Next.
-
On Configure DHCP Options page, click the Yes, I Want To Configure These Options Now option and then click Next.
-
On the Router (Default Gateway) page, enter the IP address of the default gateway (router) that connects the subnet to the network. Click Add. Click Next.
-
On the Domain Name And DNS Servers page, enter the default parent domain name that clients will be using to locate network hosts, in the Parent Domain box.
-
Enter the name of the DNS server that you want clients to use for name to IP address resolution in the lower portion of the Domain Name And DNS Servers page. Click Add ad then click Next.
-
On the WINS Server page, if applicable, enter the IP address of the WINS server. Click Add and then click Next.
-
On the Activate Scope page, click the Yes, I want to activate this scope now option. Click Next.
-
On the Completing The New Scope Wizard page, click Next.
To assign the DNS servers IP addresses to the DHCP scopes
-
Click Start, Administrative Tools and then click DHCP to open the DHCP console.
-
I the console tree, expand the DHCP server node.
-
Expand the DHCP scope that you want to work with.
-
Select the Scope Options folder, and right-click and choose Configure Options from the shortcut menu.
-
The Scope Options dialog box opens.
-
On the General tab, in the Available Options list, select the checkbox alongside the 006 DNS Servers option.
-
Use the IP address box and associated Add button to insert all the appropriate DNS server IP addresses.
-
Back in the Available Options list, select the checkbox alongside the 015 DNS Domain Name option.
-
Use the String Value text box to specify the primary DNS domain name suffix.
-
Click OK.
How to manage the DNS Client Cache
Before DNS clients query the DNS server, the DNS client cache is checked to attempt to resolve the query. An entry is added to the DNS client cache whenever the DNS server sends a response to a client and resolves a query. The DNS client cache is also called the DNS resolver cache.
The commands that can be used at a command prompt to view and flush the contents of the DNS client cache are:
-
ipconfig /displaydns: Lists the contents of the DNS client cache.
-
ipconfig /flushdns: Clears the contents of the DNS client cache.
How to permanently disable DNS client caching
-
Click Start, Administrative Tools, and then click Services.
-
Locate and double-click the DNS Client service
-
In Startup Type, select Disabled.
-
Reboot the computer to disable DNS client caching.
How to configure a primary DNS suffix
-
Log on the computer that you want to configure.
-
Open Control Panel.
-
Open the System Properties dialog box.
-
Switch to the Computer Name tab.
-
Click Change.
-
When the Computer Name Changes dialog box opens, click the More button.
-
The DNS Suffix And NetBIOS Computer Name dialog box appears.
-
Enter the valid information in the Primary DNS Suffix Of This Computer text box.
-
Click OK.
-
When a message appears stating that the computer needs to be restarted, click OK to restart the computer and implement the change.
-
Click OK in the System Properties dialog box.
-
When the System Settings Change dialog box appears, click Yes to restart the computer immediately.
-
The computer restarts, and your change is implemented.
Follow Us!