Configuring DNS Server and DHCP Integration
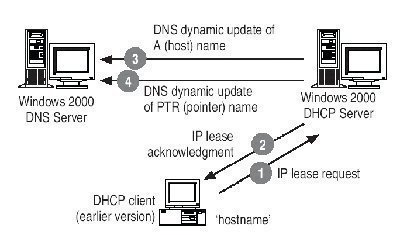
Windows 2000, Windows XP, and Windows Server 2003 clients can dynamically update their own resource records in Windows Server 2003 DNS. DHCP can also be used to configure down-level clients as DHCP clients.
To enable the DHCP server to dynamically update clients;
-
Click Start, Administrative Tools, and then click DHCP to open the DHCP console.
-
Expand the DHCP server node in the console tree.
-
Select and then right-click the DHCP scope, and then click Properties on the shortcut menu.
-
Click the DNS tab.
-
The DHCP updating DNS configuration settings on the DNS tab determine the manner in which DHCP client leases are integrated with the Windows Server 2003 DNS server's database.
-
Select the Enable DNS dynamic updates according to the settings below checkbox to enable the DHCP server to dynamically update its clients.
-
Select the Dynamically update DNS A and PTR records only if requested by DHCP clients option if the client is a Windows 2000, Windows XP or Windows Server 2003.
-
Select the Dynamically update DNS A and PTR records for DHCP clients that do not request updates (for example, clients running Windows NT 4.0) checkbox if the client is a down-level client such as a client running Windows NT 4.0.
-
Select the Always dynamically update A and PTR records option to enable the DHCP server to always dynamically update both the A and PTR resource records in DNS.
-
Select the Discard A and PTR records when lease is deleted checkbox if you want the A record associated with a client deleted when the DHCP server receives a DHCP release message.
-
Click OK.
In order for a DHCP server to register host names for DHCP clients, you have to perform the following tasks:
-
Create a user account in Active Directory that the DHCP server will use for dynamic updates.
-
Configure each DHCP server in your environment to use this specific account
To create an Active Directory user account;
-
Open the Active Directory Users and Computers console.
-
In the console tree, right-click the container in which the new user account should be created, and then select New, and then User from the shortcut menu.
-
When the New Object – User dialog box appears, enter the user's first name, initials, and last name in the provided fields. The information specified in these fields is used to populate the Full Name field. This is the user's display name.
-
Enter the logon name for the user in the User Logon Name field, and select the domain to which the account should be associated with.
-
The initial characters of the User Logon Name field populate the User logon name (pre-Windows 2000) field. Click Next.
-
Proceed to set the password of the user in the Password and Confirm Password fields, and enable any applicable options available in the dialog box for the new user account.
-
Click Next, and then click Finish.
To configure each DHCP server use this specific account;
-
Click Start, Administrative Tools, and then select DHCP to open the DHCP console.
-
In the console tree, right-click the specific DHCP server, and then select Properties from the shortcut menu.
-
When the DHCP server's Properties dialog box opens, click the Advanced tab.
-
In the DNS dynamic updates registration credentials section of the Advanced tab, click the Credentials button.
-
When the DNS Dynamic Update Credentials dialog box opens, specify the user name, domain and password of the user account that the DHCP server should use.
-
Click OK.
Configuring DNS Server and WINS Integration
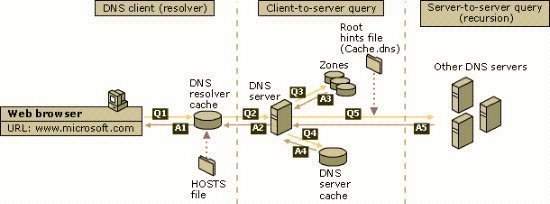
When WINS and DNS are integrated, DNS is able to query the name database of the WINS server on behalf of its clients for name resolution after the query cannot be resolved in DNS.
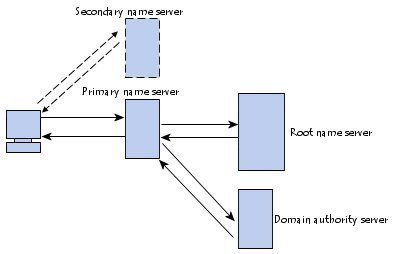
The process that occurs to resolve names when DNS and WINS are integrated is illustrated below.
-
The name resolution query is sent to the preferred DNS server.
-
This preferred DNS server than passes the query to the authoritative DNS server for the particular zone.
-
The authoritative DNS server sends the request for name resolution to its specified WINS lookup server.
-
The specified WINS lookup server resolves the name into its associated IP address.
-
The IP address is returned to the authoritative DNS server for particular zone.
-
The authoritative DNS server returns the IP address to the preferred DNS server.
-
The preferred DNS server returns the resolved query to the original client that sent the query for name resolution.
To configure DNS and WINS integration;
-
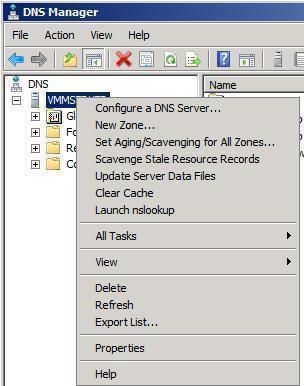
Click Start, Administrative Tools, and then click DNS to open the DNS console.
-
In the console tree, expand the DNS server node.
-
Expand the Forward Lookup Zones folder.
-
Locate and right-click the zone that you want to configure, and then select Properties from the shortcut menu.
-
Select the WINS tab.
-
Select the Use WINS forward lookup checkbox.
-
Enter the IP address of the WINS server and then click the Add button.
-
If you want to add additional WINS server IP addresses, enter each individual IP address and click the Add button each time.
-
Click the Advanced button.
-
The options that you can configure on the Advanced dialog box are Cache time-out and Lookup time-out intervals.
-
Enter the cache time-out TTL value in the Cache time-out field. The value you set would determine the time duration that your DNS servers can cache WINS records which originated from the WINS forward lookup server.
-
Enter the lookup time-out TTL value in the Lookup time-out field. The value you enter would determine how long the DNS server waits for a response from a WINS forward lookup server.
-
Click OK
Follow Us!