The total number of Unix commands is immense. No normal user or system administrator would ever need to know them all.
The Unix commands available to you will vary based upon several factors:
- The version of Unix you are using (FreeBSD, Linux, Solaris, AIX, HP-UX, OpenBSD, etc…)
- The Unix shell you are using (sh, csh, tcsh, ksh, bash, etc…)
- The packages installed on the system and the way the system is configured
- Your access level on the system
This list of basic Unix commands will get you started using and learning Unix.
Chart of Basic Unix Commands
| Unix Command | Description |
|---|---|
| ls | List directory contents |
| cp | Copy files |
| rm | Remove directory entries |
| file | Determine file type |
| find | Walk a file hierarchy |
| which | Locate a program file in the user’s path |
| whereis | Locate programs |
| gcc, g++ | GNU project C and C++ Compiler |
| gdb | The GNU Debugger |
| less | View the contents of a text file |
| diff | Find differences between two files |
| cmp | Compare two files |
| vi | Text editor |
| chmod | Change file modes |
| man | Display the on-line manual pages |
| mv | Move and rename files |
| ispell | Interactive spelling checker |
| biff | Be notified if mail arrives and who it is from |
| lpr | Print a file |
| lpq | Show the print queue |
| ftp | Transfer a file to another Unix system |
| logout | Quit using the system |
| pwd | Print working directory name |
| cd | Change working directory |
| ln | Make a file link |
| mkdir | Make directories |
| rmdir | Remove directories |
| chmod | Change file modes |
| quota | Display disk usage and limits |
| history | Display a list of recent commands |
| ps | Show the status of processes |
| kill | Stop a running processes |
| passwd | Change your password |
| alias | Create a command alias |
| unalias | Delete a command alias |
| export | Set an environment variable |
| script | Record your terminal session to a file |
| bg | Send a job to the background |
| fg | Bring a job to the foreground |
| jobs | Print a list of current jobs |
The basic Unix commands are fairly standard across the various Unix platforms, although command arguments differ at times. In addition, the basic Unix commands vary between Unix shells.
Use the Unix `man` command to learn more about any of these commands.
Basic Unix Commands in Detail
mkdir
Create the DIRECTORY(ies), if they do not already exist.
Usage
mkdir [OPTION] DIRECTORY
Options
Note: Mandatory arguments to long options are mandatory for short options too.
-m, mode=MODE set permission mode (as in chmod), not rwxrwxrwx – umask
-p, parents no error if existing, make parent directories as needed
-v, verbose print a message for each created directory
-help, display this help and exit
-version, output version information and exit
Examples
Create single directory
>mkdir tmp
Create 3 directories
>mkdir memos letters e-mail
cd
Use cd to change directories. Type cd followed by the name of a directory to access that directory.Keep in mind that you are always in a directory and can navigate to directories hierarchically above or below.
Usage
cd DIRECTORYNAME
Example
>cd /home/rich/www
mv
To change the name of a directory. Type mv followed by the current name of a directory and the new name of the directory.
Usage and Example
>mv junk precious
This renames the filejunkas the fileprecious.
pwd
print working directory; will show you the full path to the directory you are currently in. This is very handy to use, especially when you need to perform other directory related tasks.
Usage
pwd
Example:
> pwd
/home
> cd /home/rich/www
> pwd
/home/rich/www
>
rmdir
Remove an existing directory
Usage
rm DIRECTORYNAME
Options
rm -r
Removes directories and files within the directories recursively.
Example
To delete a directory named usersmith, type the following command ((from any directory except usersmith):
>rmdir usersmith
chown
change file owner and group; Change the owner and/or group of each FILE to OWNER and/or GROUP. With –reference, change the owner and group of each FILE to those of RFILE
Usage
chown [OPTION] OWNER[:[GROUP]] FILE
chown [OPTION] :GROUP FILE
chown [OPTION] –reference=RFILE FILE
Options
-c, changes like verbose but report only when a change is made
-dereference affect the referent of each symbolic link, rather than the symbolic link itself
-h, no-dereference affect each symbolic link instead of any referenced file (useful only on systems that can change the ownership of a symlink)
-from=CURRENT_OWNER:CURRENT_GROUP
change the owner and/or group of each file only if its current owner and/or group match those specified here. Either may be omitted, in which case a match is not required for the omitted attribute.
-no-preserve-root do not treat `/’ specially (the default)
-preserve-root fail to operate recursively on `/’
-f, -silent, -quiet suppress most error messages
-reference=RFILE use RFILE’s owner and group rather than the specifying OWNER:GROUP values
-R, -recursive operate on files and directories recursively
-v, -verbose output a diagnostic for every file processed
The following options modify how a hierarchy is traversed when the -R option is also specified. If more than one is specified, only the final one takes effect.
-H if a command line argument is a symbolic link to a directory, traverse it
-L traverse every symbolic link to a directory encountered
-P do not traverse any symbolic links (default)
Examples
>chown hiox test.txt
The owner of the ‘test.txt’ file is root, Change to new user hiox.
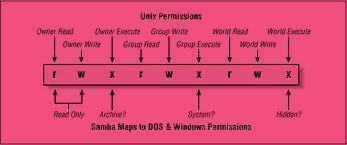
chmod
change file access permissions
Usage
chmod [-r] permissions filenames
r Change the permission on files that are in the subdirectories of the directory that you are currently in.
permission Specifies the rights that are being granted. Given below are the different rights that you can grant in an alphanumeric format.
u – User who owns the file.
g – Group that owns the file.
o – Other.
a – All.
r – Read the file.
w – Write or edit the file.
x – Execute or run the file as a program.
Numeric Permissions:
CHMOD can also to attributed by using Numeric Permissions:
400 read by owner
040 read by group
004 read by anybody (other)
200 write by owner
020 write by group
002 write by anybody
100 execute by owner
010 execute by group
001 execute by anybody
Examples
>chmod u=rwx,g=rx,o=rx filename.cgi
gives:
read, execute, and write access to the user (that’s you)
read and execute access to the group and
read and execute access to others
The same can be achieved by using the command
>chmod 775 filename.cgi
ls
Short listing of directory contents
Usage
ls [OPTION]
Options
-a list hidden files
-d list the name of the current directory
-F show directories with a trailing ‘/’
executable files with a trailing ‘*’
-g show group ownership of file in long listing
-i print the inode number of each file
-l long listing giving details about files and directories
-R list all subdirectories encountered
-t sort by time modified instead of name
Example
To list the contents of the current directory:
>ls
cp
To copy files
Usage and Examples
>cp myfile yourfile
Copy the files “myfile” to the file “yourfile” in the current working directory. This command will create the file “yourfile” if it doesn’t exist. It will normally overwrite it without warning if it exists.
>cp -i myfile yourfile
With the “-i” option, if the file “yourfile” exists, you will be prompted before it is overwritten.
>cp -i /data/myfile
Copy the file “/data/myfile” to the current working directory and name it “myfile”. Prompt before overwriting the file.
>cp -dpr srcdir destdir
Copy all files from the directory “srcdir” to the directory “destdir” preserving links (-doption), file attributes (-p option), and copy recursively (-r option). With these options, a directory and all it contents can be copied to another directory.
ln
Creates a symbolic link to a file.
Usage and Example
>ln -s test symlink
Creates a symbolic link named symlink that points to the file test.
Typing “ls -i test symlink” will show the two files are different with different inodes.
Typing “ls -l test symlink” will show that symlink points to the file test.
locate
A fast database driven file locator.
<! >
<! >
Usage
locate [options] name(s)
Options
-q – to suppress error messages
-n – followed by an integer, this option limits the results to a specific number
-i – performs a case-insensitive search
Examples
>locate "*.png"
Diplays all the files that have .png file extension.
>locate -n 15 "*.html"
Displays 15 results from a search for files with .html extension
>locate -i "*.HtmL"
Returns all files with extensions .html, .HTML or any such similar combination.

Follow Us!