The Microsoft Windows operating system (OS) is one of the most popular OSs in the world. Although the company releases a new OS every three to four years (sometimes a bit faster), there are a number of common tasks that extend across software versions; albeit, the specific steps required to accomplish the task may differ a bit. For consumers or even administrators that share single computes with multiple users, a common need that arises is determining how to add a user to Windows.
Microsoft Windows Timeline
Since the release of Windows 1.0 in November of 1985, there have been a number of upgrades, features, and capabilities added to the highly popular operating system. The follow is a timeline highlighting the major release dates and OS versions released by Microsoft over the years. This article will focus on active versions of the Windows OS while providing instructions on how to add a user to Windows.
Date Operating System Version
20 Nov 1985 Windows 1.0

9 December 1987 Windows 2.0
27 May 1988 Windows 2.10
13 March 1989 Windows 2.11
22 May 1990 Windows 3.0
6 April 1992 Windows 3.1
27 July 1993 Windows NT 3.1
21 Sept 1994 Windows NT 3.5+
30 May 1995 Windows NT 3.51
24 August 1995 Windows 95
24 August 1996 Windows NT 4.0
25 June 1998 Windows 98
5 May 1999 Windows 98 SE
17 Feb 2000 Windows 2000
14 Sept 2000 Windows ME
25 October 2001 Windows XP
25 October 2001 Windows XP 64-Bit Edition (v2002)
31 October 2002 Windows XP Media Center Edition
28 March 2003 Windows XP 64-Bit Edition (v2003)
24 April 2003 Windows Server 2003
30 Sept 2003 Windows XP Media Center Edition 2004
12 October 2004 Windows XP Media Center Edition 2005
25 April 2005 Windows XP Professional x64 Edition
6 December 2005 Windows Server 2003 R2
8 July 2006 Windows Fundamentals for Legacy PCs
8 November 2006 Windows Vista for Business use
30 January 2007 Windows Vista for Home use; released in fifty countries
7 November 2007 Windows Home Server
27 Feb 2008 Windows Server 2008
22 July 2009 Windows 7
22 October 2009 Windows Server 2008 R2
6 April 2011 Windows Home Server 2011
4 Sept 2012 Windows Server 2012
26 October 2012 Windows 8
26 October 2012 Windows RT
18 November 2013 Windows 8.1
18 November 2013 Windows Server 2012 R2
Popular Microsoft Windows Versions
At the time of this writing, the most installed versions of Microsoft Windows in industry include: Windows 7, Windows 8.1, Windows 8, Windows Vista, and to a lesser extent, Windows XP Service Pack 2,and Windows Me.
Windows 8.1 is the newest version of the OS designed for use in the home and includes a number of bug and user interface “fixes” demanded by fans of the OS from the original release of Windows 8 in October of 2012. Windows 7 continues to enjoy the largest market share, while use of Windows XP is finally starting to wane primarily due to not being sold or supported any longer by Microsoft.
How to Add a User to Windows
Microsoft Windows allows administrators to add new users to a computer. Depending on the preferences of the admin, these users can have their own user profiles as well as share common resources installed on the PC to include software and access to printers and shared storage drives. The specific procedure required to add a new user will depend on the specific version of Microsoft Windows. Some variants of the OS also include multiple ways to add a new user. When this is the case, the most straight-forward method to add a user has been demonstrated.
Steps to Add a User to Windows 8 and Windows 8.1
Although Windows 8.1 is an upgrade to the originally released Windows 8, the steps to add a user to the OS will vary a bit depending on which is installed on your computer.
Step 1 – Open the Windows 8 Charms bar by either sliding the cursor from the bottom-right corner of the center of the screen. Alternatively, you can press the “Windows” and “C” keys simultaneously to display the bar.
Step 2 – Choose the “Settings Charm” and then select or click the “Change PC Settings” menu option.
Step 3 – On a Windows 8 computer, pick the “Users” menu option located on the left-hand side of the PC Settings panel. Then, you will scroll through to the right pane of the panel to display the “Other Users” menu section or portion.
On a Windows 8.1 computer, you will choose the “Accounts” menu option located on the left-hand section of the “PC Settings” menu. Then, choose the “Other Accounts” menu option. Next, choose the “Add a User” menu choice.
Step 4 – If the new user that you want to add to the computer already has a Microsoft account, enter their email address in the appropriate field on he subsequently displayed page and click the “Next” menu button.
Step 5 – Pick the option of whether or not the new user is a child. If you say yes, Windows 8.x will turn on “Family Safety” in order to help you keep track of their computer usage and provides access for other content blocking software to the administrator. After choosing the desired options, select the “Finish” menu button. The first time the new user logs in to their account, the computer will need to be connected to the Internet. On Windows 8.1, this action will also synchronize the users apps with their Microsoft account.
Step 6 – If the new user does not have an existing Microsoft account, one can be created for them at this point. After you choose the “Add a User” menu option, input the desired email address that the new user will want to use to login to the account.
Step 7 – After validating that the email address is not associated with a Microsoft account, the computer will then prompt you for new account information. At this point, enter the new password for the account and the user’s first and last name followed by their country of residence. After completing the form, select the “Next” menu button.
Step 8 – Enter the appropriate security information for the new account. This will include the new user’s date of birth and two of the following three security options:
1 – Alternate Email – This is another email account that Microsoft will use to help the user make secure account changes or recover passwords.
2 – Secret Question – Similar to other secret question security features found online, this allows a question and answer to be selected that only the account user should know to help make account changes., or
3 – Phone Number – This allows Microsoft to text a security code to one’s phone to aid in lost password recovery or when making account changes.
Step 9 – Select the desired communication preferences and whether or not Microsoft is allowed to use the new account user’s information for advertising and promotional offers. Pick the “Next” menu button after making your selections.
Step 10 – Enter the captcha displayed on the screen and click the “Next” menu button when complete.
Step 11 – Let Microsoft know if this is a child’s account on the next menu and turn Family Safety on or off. When complete with the configuration options, click the “Finish” menu button to complete adding the new Microsoft user account to the computer.
Steps to Add a New Local Account in Windows 8 / Windows 8.1
A number of Windows users do not want to create new Microsoft accounts for the children or teenagers in the home. Luckily, Windows 8 does provide the ability to add a new local user account without having to use additional email addresses.
Step 1 – After selecting the “Add a user” menu option as detailed in the previous steps, choose the “Sign in without a Microsoft account” menu option.
Step 2 – Ignore the subsequently displayed prompts by the operating system to sign up for an account and choose the “Local Account” menu option.
Step 3 – Input the username, password, and password hint for the new account and click the “Next” menu button.
Step 4 – Select whether or not this is a child’s account. If so, then choose whether or not to enable Family Safety and click the “Finish” menu button to complete setting up a local user account in Windows 8.
How to Grand Administrator Privileges in Windows 8
After adding a new user account in Windows 8, a related task for the end user is to grant the new account admin access to the computer. This capability will allow the user to make changes to the system settings and install new programs without the primary administrator’s permission (or even knowledge).
Step 1 – Open the Windows 8 Charms menu.
Step 2 – Choose the “Settings” charm.
Step 3 – Click the “Change account type” menu option located under the “User Accounts and Family Safety” menu choice.
Step 4 – Pick the user account that you want to grant administrator permissions to and then pick the “Change the account type” menu option. On Windows 8.1, you will want to click the “Edit” menu option.
Step 5 – Click the “Administrator” menu option. Similarly, you can use these steps to remove admin permissions by selecting the “Standard” menu option on this step. On Windows 8.1, you will want to select the appropriate option from the “Account Type” drop down menu followed by choosing the “OK” menu button.
Step 6 – Click the “Change account type” menu option to make the changes final.
Steps to Remove User Accounts on Windows 8 / Windows 8.1
Another related task for user accounts in Windows 8/8.1 is removing an account for a variety of reasons.
Windows 8
Step 1 – Open the Windows Control Panel.
Step 2 – Choose the “User Accounts and Family Safety” menu option.
Step 3 – Choose the “Remove User Accounts” menu choice located under the “User Accounts” menu label.
Step 4 – Choose or select the specific account that you want to remove and then click on the “Delete the account” menu option.
Step 5 – Now, make the decision of whether or not you want to keep the user account’s files on the computer’s hard drive or to delete them by picking the “Delete Files” or “Keep Files” menu option and click the “Delete Account” menu option to finish removing the user account in Windows 8.
Windows 8.1
Step 1 – Load the “PC Settings” panel.
Step 2 – Choose the “Other Accounts” menu choice and then pick the user account to delete.
Step 3 – Click the “Remove” menu button. There is not an option in Windows 8.1 to keep the user account’s personal files when removing their account.
Step 4 – Choose the “Delete account and data” menu option to finish removing the user’s account from Windows 8.1
How to Add a User in Windows 7
Windows 7 remains the most popular version of the Windows OS. The following are the steps to take to add a user in this version of Windows.
Step 1 – Log in to your computer with an account that already has administrator permissions.
Step 2 – Select the “Start” menu button and then choose the “Control Panel” and “User Accounts and Family Safety” menu options.
Step 3 – Select the “Add user accounts” menu choice.
Step 4 – Enter the new account name and select the account type. For most new accounts, the “Standard user” menu option will be the appropriate option unless you want to make the user an “administrator.”
Step 5 – Add a password to the account and save the profile settings.
Step 6 – Restart or log out of the computer to test the new Windows 7 user account.
How to Add a User to Windows XP
Although Windows XP is starting to show its age, it remains in use throughout much of the world at the time of this writing!
Step 1 – Select the Windows “Start” Button and open the “Control Panel.”
Step 2 – Double click the “User Accounts” program icon.
Step 3 – Choose the “Create a new account” menu option.
Step 4 – Enter a name for the new user account in the text field and click the “Next” menu button.
Step 5 – Choose the menu option on whether to make the account an “administrator or a “Limited” account.
Step 6 – Choose the “Create account” menu button.
Steps to Add a Local User to Windows Server 2003
Windows Server 2003 gives the administrator the option to create either a local user or Active Directory account. The steps to create a local user are:
Step 1 – Select the Windows “Start” and “Control Panel” menu options.
Step 2 – Under the Windows Classic View choose the “Switch” option to change to the “Category View.”
Step 3 – Double click the “Performance and Maintenance” program icon followed by picking the “Administrative Tools” menu option.
Step 4 – Select the “Computer Management” menu option and then select the + sign that is located next to the “Local Users and Groups” to expand the menu.
Step 5 – Click the “Users” menu label and right click a single time in the right window pane.
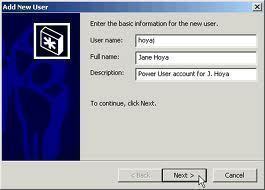
Step 6 – Choose the “New User” menu option and enter the user name for the new account.
Step 7 – Input the full name for the new account as well as a description and the new password for the user account.
Step 8 – Re-enter the account password and then choose the appropriate options for the new account that include:
User must change password at next login (Recommended)
User cannot change password
Password next expires
Account is disabled
Step 9 – Choose the “Create” menu button and then exit from the screen by clicking the “Close” button when complete.
Steps to Add an Active Directory User to Windows Server 2003
Step 1 – Select the “Start” menu button and the Windows “Control Panel” program icon.
Step 2 – Switch the Windows Classic View to “Category View” and double click the “Performance and Maintenance” icon.
Step 3 – Select the “Administrative Tools” program icon.
Step 4 – Select the “Active Directory Users and Computers” menu option and then click the “Users” menu label in the left window pane.
Step 5 – Right click a single time in the right window pane and click the “New” and “User” menu options.
Step 6 – Enter the first name, initials, and last name for the new user account. Then, enter a user logon name for the account.
Step 7 – Input the domain for the new account (or select it from the drop down list).
Step 8 – Enter a password for the new account and re-enter the password to ensure it has been entered correctly.
Step 9 – Select the appropriate menu options for the account from the following:
User must change password at next login (Recommended)
User cannot change password
Password next expires
Account is disabled
Step 10 – Choose the “Next” and “Finish” menu buttons to finish adding a new Active Directory user to Windows Server 2003.


Georges
Dear sit , i’m using a foxpro on windows server 2003 sp2 , i’m working remotly , the problem is that when i create a limited user foxpro don’t open cause he need to right on D , how can i create a user with limited acess . Regards
Yashwant R Chendvankar
Kindly send me your all latest news