Understanding Security Policy Types
With Windows Server 2003, you can implement and manage security settings at the following levels:
-
Local computer (local security policies)
-
Active Directory site, domain, or organizational unit (domain security policies)
Local security policies are managed through Local Computer Group Policy Objects (GPOs), and domain security policies are managed through Group Policy with the Active Directory Domain Controller GPOs. However, domain security policies override local security policies.
In Windows Server 2003 Active Directory environments, group policies include configuration settings for the following:
-
Software policies
-
Scripts
-
Security policies
-
Application and file deployment policies
What is Group policy and GPOs?
Group Policy settings are stored in a Group Policy Object (GPO). Group Policy is an Active Directory feature that provides the means for you to effectively and efficiently manage large numbers of computers. You can manage both user and computer configuration settings centrally. You can define group policies that affect a computer, irrespective of the particular user logging on to the computer. For instance, you can through a policy, configure the proxy server settings for a computer. You can define group policies that affect a user, irrespective of the computer which the user utilizes to log on to the system. For instance, you can use group policies to specify the applications or programs which are available to the user, and the programs which should exist on the user's desktop
You can define group policies as being a collection of user and computer configuration settings which you can link to computers, sites, domains and organizational units (OUs). Once linked, Group Policy defines the manner in which the operating system, network resources, and applications and programs operate for users within the organization.
A group policy object (GPO) is an Active Directory object which contains one or more Group Policy settings which affect the configuration settings for users or computers. A GPO acts as a container for the settings configured in Group Policy files. The Active Directory components that can be linked to a GPO are computers, sites, domains, organizational units (OUs). By linking a GPO to sites, domains, and OU actually applies the GPO settings to any user or computer objects within that particular container.
An important Group Policy concept is that Group Policy settings are hierarchical. What this means is that it can be linked and applied at different levels, as illustrated below:
-
Sites: You can define GPOs, and link it to an entire site in Active Directory. The GPOs would then apply to each domain and server that belongs to the particular site. If the site contains multiple domains, the GPOs are applied to all the domains within the site.
-
Domains: When you define GPOs, and link it to a particular domain in Active Directory, it is applied to all Computer objects and User objects that belong to, or are stored within that particular domain.
-
Organizational Units (OUs): As is the case with the other two levels at which you can link and apply GPOs, you can define and link GPOs to a specific OU in Active Directory. The GPOs are then applied to all Active Directory objects stored within the particular OU.
All computers and users located beneath the container that the GPO is linked to, is automatically within the scope of the particular GPO. They will therefore be affected by each and every Group Policy setting specified in the GPO.
Because multiple GPOs can be linked to sites, domains, and OUs, they are applied to either the user or to the computer in a particular sequence or order. This concept is illustrated below:
-
Local GPO: A computer running Windows Server 2003 has a local GPO. The local GPO is applied first and therefore has te least precedence when group policies are applied. They are always overridden by Active Directory based GPOs. Active Directory based GPOs are also referred to as nonlocal GPOs.
-
Site GPOs: A GPO linked to a site in Active Directory is applied after the local GPO is applied. Because multiple GPOs can be linked to a particular site, the site GPOs are applied in the order as specified by the Administrator.
-
Domain GPOs: Domain GPOs are applied next, and therefore have higher precedence than site GPOs and the local GPO. Again, when multiple GPOs are linked to a particular domain, they are applied in the order as defined by the Administrator.
-
OU GPOs: OU GPOs have the highest precedence. Group Policy application starts at the top of the tree, and then moves down to the OU containing the user object or computer object.
Group Policy settings are usually passed from a parent OU to a child OU. This is known as Group Policy inheritance. When Group Policy settings are specified for a parent OU, the Group Policy settings are applied to each child OU associated with the particular parent OU. If the same Group Policy setting is specified for a parent OU and a child OU, the setting of the child OU overrides the setting of the parent OU. You can however override Group Policy inheritance to prevent a child OU from receiving the Group Policy settings of its parent OU.
To configure and manage policy settings in GPOs, and link GPOs to computers, sites, domains and organizational units (OUs), Windows Server 2003 provides the following set of management tools:
-
The Active Directory Users And Computers (ADUC) console
-
The Group Policy Management console
-
The Group Policy Object Editor
-
The Resultant Set Of Policy snap-in
-
The Windows Settings node in the Computer Configuration node and in the User Configuration node contains the following nodes: Scripts extension: You can define the following types of scripts:
-
In Computer Configuration: Startup and shutdown scripts execute when the computer starts, or shuts down
-
In User Configuration: Logon and logoff scripts execute when the user logs on or logs off the particular computer.
-
-
When more than one script exists for a user or computer, logoff scripts are processed before shutdown scripts.
-
Security Settings node: You can define the security levels assigned to a local GPO or nonlocal GPO.
The security policies that can be configured are:
-
Account policies
-
Local policies
-
Public key policies
-
Software Restriction Policies
-
IP Security Policies
-
Understanding and Configuring Account Policies
-
Account policies contain the following security configuration settings:Password policy
-
Account lockout policy
-
Kerberos Policy
Through account policies, you can configure security settings for passwords, account lockout options, and Kerberos authentication.
Account policies can be accessed by expanding Local Computer Policy, Computer Configuration, Windows Settings, Security Settings, then expanding Account Policies.
-
If you are logged on to a Windows Server 2003 member server, the following nodes are displayed within the Account Policies node:Password policy
-
Account lockout policy
-
If you are logged on to a Windows Server 2003 domain controller, the following nodes are displayed within the Account Policies node: Password policy
-
Account lockout policy
-
Kerberos Policy
Password Policies
Passwords are probably the component that presents the most vulnerability in an authentication implementation. Passwords that are weak can easily be identified, even when password encryption is used. Password policies dictate the characteristics of passwords which are allowed for user accounts and ensure that they are enforced on the computer. Password policies are configured on a computer, and not for individual user accounts.
-
You can implement a strong password policy by using the following security policy settings located in the Password Policy node within Account Policies :Enforce password history: Prevents users from re-specifying or reusing previously used passwords. You can specify the number of previous passwords which have to be maintained so that users cannot reuse the same password.
-
Minimum password age: Determines the length of time that a user has to keep a password before he/she can modify the password. It specifies how long a user has to wait before being allowed to change a newly specified password.
-
Maximum password age: Determines the duration after which a user is forced to change a password. Users have to change their passwords when the maximum password age is reached.
-
Minimum password length: Specifies the minimum length that a password can have. When a user attempts to use a password that has fewer characters than the minimum password length, the password is rejected.
-
Passwords Must Meet Complexity Requirements: Used to control which format a user utilizes when defining passwords. When enabled, passwords specified by users should include characters from three of the following groups:
-
Uppercase characters: Letters A through to Z
-
Lowercase characters: Letters a through to z
-
Non-alphabetic characters such as: $, #, %
-
Numeric digits such as 0 through to 9
-
-
Store Password Using Reversible Encryption For All Users In The Domain: User passwords are stored using reversible encryption. To use the Challenge Handshake Authentication Protocol (CHAP) authentication method, you have to use group policy and enable the Store Passwords Using Reversible Encryption password policy and then reset all users password so that it can be interpreted by CHAP.
How to configure password policy on a computer
-
Click Start, click Run, enter mmc in the Run dialog box, and click OK
-
A blank MMC console is opened
-
Click Add/Remove Snap-In from the File menu. Click Add
-
When the Add Standalone Snap-In dialog box is displayed, choose Group Policy. Click Add
-
The Select Group Policy Object dialog box is displayed next. This is where you point the Group Policy snap-in at either the local computer or at a remote computer
-
The Allow The Focus Of The Group Policy Snap-In To Be Changed When Launching From The Command Line check box is where you set whether the option should be given when you launch the MMC to select the computer on which to use Group Policy.
-
Click Finish to have the Group Policy pointed at the local computer.
-
Click Close to exit the Add Standalone Snap-In dialog box
-
Click OK in the Add/Remove Snap-In dialog box, and save the console with Local Group Policy
-
Proceed to expand Local Computer Policy and beneath Computer Configuration expand Windows Settings, expand Security Settings, then expand Account Policies and click Password Policy.
1 -
You can configure the following settings in the details pane: Enforce Password History, Maximum Password Age, Minimum Password Age, Minimum Password Length, Passwords Must Meet Complexity Requirements, Store Password Using Reversible Encryption For All Users In The Domain.
How to configure a domain password policy
-
Open the Active Directory Users and Computers console under the Administrative Tools Menu.
-
In the console tree, locate and right-click the domain for which you want to implement a password policy, and then select Properties from the shortcut menu.
-
When the Properties dialog box for the domain opens, select the Group Policy tab.
-
From Group Policy tab, you can create a new password policy for the domain, or you can change the default domain policy.
-
To create a new olicy, click New; or alternatively click Edit to change the default policy.
-
Click Edit to change the default policy.
-
Click Computer Configuration, expand Windows Settings, Security Settings, Account Policies, and then expand Password Policy.
-
Right-click the password policy that you want to implement and then select Properties from the shortcut menu. You can configure the following password policies from here:
Enforce password history, Maximum password age, Minimum password age, Minimum password length, Password must meet complexity requirements, Store passwords using reversible encryption.
-
Account Lockout Policies
Account lockout policies should be implemented if your networking environment is particularly vulnerable to threats arising from passwords which are being guessed. Implementing an account lockout policy basically ensures that the account of a user is locked after an individual has unsuccessfully tried for several times to provide the correct password.
The important factor to remember when defining an account lockout policy is that you should implement a policy that permits some degree of user error, but that also prevents unauthorized usage of your user accounts.
The following account lockout settings are located in the Account Lockout Policy area of the Account Policies node:
-
Account lockout threshold: Controls the number of times after which an incorrect password attempt results in the account being locked out of the system.
-
Account lockout duration: Controls the duration that an account which is locked, remains locked. A setting of 0 means that an administrator has to manually unlock the locked account.
-
Reset account lockout counter after: Determines the time duration that must pass subsequent to an invalid logon attempt occurring prior to the reset account lockout counter being reset.
How to configure an account lockout policy for a domain
-
Open the Active Directory Users and Computers console under the Administrative Tools Menu.
-
In the console tree, locate and right-click the domain that you want to work with, and then select Properties from the shortcut menu.
-
Select Default Domain Policy, and then click Edit.
-
Click Computer Configuration, expand Windows Settings, Security Settings, Account Policies, and then expand Account Lockout Policy.
-
Right-click the account lockout policy that you want to implement and then select Properties from the shortcut menu. You can configure the following password policies from here:
Account lockout duration, Account lockout threshold, Reset account lockout counter after.
-
How to reset a locked out user account
-
Access the workstation using a Domain Admins account, or the local Administrator account.
-
Click Start, All Programs, Administrative Tools and then click Computer Management.
-
This action opens the Computer Management console.
-
In the left console tree, click Computer Management, click System Tools, click Local Users and Groups, and then click Users.
-
Right-click the user account that you want to reset the password of, and select Set Password from the shortcut menu.
-
When a message dialog appears, warning that the user could possibly lose data as a result of the password reset process, click the Proceed button.
-
Set the new password for the user.
-
Click OK.
-
The system next informs you that the password of the local user account was successfully reset. Click OK.
-
In the Computer Management console, right-click the user account that you just reset the password for, and then select Properties from the shortcut menu.
1 -
Enable the User Must Change Password at Next Logon option
1 -
Click OK.
Kerberos Policies
The Kerberos authentication does not transmit passwords during the authentication process. nstead, it uses tickets. Tickets are specially formatted data packets that allow a client to access a resource. The Kerberos authentication type is dependant on the Key Distribution Center (KDC) to issue tickets. Each network client makes use of DNS to find the closest available KDC to obtain a Kerberos ticket. The ticket usually remains active for about 8 or 10 hours. The Key Distribution Center (KDC) is a service which runs as a component of Active Directory. In fact, each domain controller in a Windows Server 2003 domain operates as a Key Distribution Center (KDC). It is the Key Distribution Center (KDC) which manages the database of security account information for each security principal within a domain. Security principals that form the foundation of the Active Directory security architecture are user accounts, security groups, and computer accounts.
-
Kerberos policies are used to define and configure Kerberos specific settings for domain user accounts only. The following Kerberos policy settings are located within the Kerberos Policy area of the Account Policies node: Enforce User logon restrictions: When enabled, the Kerberos Key Distribution Center (KDC) validates each request received for a session ticket against the user rights policy of the user account sending the request.
-
Maximum lifetime for service ticket: Specifies the time (in minutes) that a user can utilize a Kerberos session ticket to access a specific service.
-
Maximum lifetime for user ticket: Specifies the maximum time duration for which a user is allowed to utilize a ticket granting ticket (TGT) before the user has to request a new ticket granting ticket. The default setting is 10 hours.
-
Maximum lifetime for user ticket renewal: Specifies the amount of time that a user can renew a ticket granting ticket (TGT). The default value is 7 days.
-
Maximum tolerance for computer clock synchronization: Specifies the maximum time difference which can be present between the server and the client computer.
Understanding and Configuring Local Policies
-
Local policies contain the following security policy settings: Audit policy
-
User Rights Assignment policy
-
Security Options policy
Local policies can be accessed by expanding Local Computer Policy, Computer Configuration, Windows Settings, Security Settings, then expanding Local Policies.
Audit Policies
-
Auditing of security event categories are disabled by default. To track access to objects, and files and folders, you have to define and configure an audit policy. For each security event category, you can choose between three values when you enable auditing. These values in turn determine the condition for which an audit entry would be created:Successes only; an audit entry will be created when a particular event or action successfully finalizes.
-
Failure only; an audit entry will be created when a particular event or action fails.
-
Successes and Failures; an entry will be created when a particular event or action successfully finalizes or fails.
-
The different audit policy options you can configure are listed here: Audit Account logon events: Enabled on domain controllers to track users which are logging on to the computer.
-
Audit Account management: Tracks account management tasks performed on the computer, including creating, changing, and deleting user objects; and changing account passwords.
-
Audit Directory service access: Tracks when users access Active Directory objects which have system access control lists (SACLs).
-
Audit Logon events: Tracks when the user logs on and logs off.
-
Audit Object access: Tracks when a user accesses operating system components such as files, folders or registry keys.
-
Audit Policy change: Tracks when a chane is made to the security configuration settings of the computer, and includes changes made to audit policies, trust policies and user rights.
-
Audit Privilege use: Tracks when a user effects a user right. The user rights excluded from auditing because of the volume of log entries which they generate are Back Up Files And Directories, Bypass Traverse Checking, Create A Token Object, Debug Programs, Generate Security Audits, Replace Process Level Token, and Restore Files And Directories.
-
Audit Process tracking: Tracks when certain events take place on the computer, such as when a program starts, or a process ends.
-
Audit System events: Tracks system events such as when the computer restarts, or shuts down; and all other events that impact the security log or the security of the system.
How to configure an audit policy for the local computer
-
Click Start, Programs, Administrative Tools, and then click Local Security Policy.
-
Expand the Local Policies in the left pane.
-
Click Audit Policy.
-
The options which you can define audit policy for are listed in the right pane.
-
Proceed to select and double-click the desired option.
-
When the Properties dialog box for the policy which you have selected opens, enable success audit, failure audit, or both success and failure audits.
-
Click OK.
How to configure an audit policy for a domain controller
-
Click Start, Programs, Administrative Tools, and then click Domain Controller Security Policy.
-
Expand the appropriate nodes in the left pane to move to Computer Configuration, Windows Settings, Security Settings, Local Policies, and then Audit Policy.
-
Click Audit Policy.
-
Proceed to select and double-click the desired option.
-
When the Properties dialog box for the policy which you have selected opens, enable success audit, or failure audit, or both success and failure audits.
-
Click OK.
User Rights Assignment Policies
It is important not to confuse user rights with permissions. Permissions determine which users are allowed to access specific objects such as files and folders. User rights determine which actions a user is allowed to perform.
-
The user rights assignment policies which you can configure are listed here: Access This Computer From The Network; enables a user to access the computer over the network.
-
Act As Part Of The Operating System; enables authentication services to authenticate as a user.
-
Add Workstations To Domain; enables a user to create computer accounts for the domain.
-
Adjust Memory Quotas For A Process; enables a user to change the memory that a process can utilize.
-
Allow Log On Locally; enables a user to interactively log on to a computer when Ctrl+Alt+Del is pressed.
-
Allow Log On Through Terminal Services; enables a user to log using a Terminal Services client.
-
Back Up Files And Directories; the user is able to back up files and directories.
-
Bypass Traverse Checking; enables a user to traverse the directory even when the user has no permission to list the directory's content.
-
Change The System Time; the user is able to modify the time of the computer.
-
Create A Page File; the user is able to create a page file and change the size of the page file.
-
Create A Token Object; enables a process to create a token object.
-
Create Permanent Shared Objects; enables a process to create directory objects using the Windows Server 2003 Object Manager.
-
Debug Programs; enables a user to use debug programs.
-
Deny Access To This Computer From The Network; used to deny users access to a computer from over the network.
-
Deny Logon As A Batch Job; used to prevent users from logging on as abatch job.
-
Deny Logon As A Service; used to prevent users from logging on as a service.
-
Deny Logon Locally; used to prevent a user from interactively logging on to a computer when Ctrl+Alt+Del is pressed.
-
Deny Log On Through Terminal Services; used to prevent a user from logging on using a Terminal Services client.
-
Enable Computer And User Accounts To Be Trusted For Delegation; users are allowed to specify the Trusted For Delegation setting for user and computer objects.
-
Force Shutdown From A Remote System; the system can be shut down by a remote user.
-
Generate Security Audits; a user/group/process is able to add entries to the Security log.
-
Increase Scheduling Priority; enables a process to change the priority that is assigned to other processes.
-
Load And Unload Device Drivers; enables a user to both load and unload Plug and Play device drivers.
-
Lock Pages In Memory; used to keep pages in physical memory. Not available in Windows Server 2003.
-
Log On As A Batch Job; used to allow a process to log on as a batch job.
-
Log On As A Service; used to allow a service to log on as a service.
-
Manage Auditing And Security Log; enables a user to manage the Security log.
-
Modify Firmware Environment Variables; enables a user/process to change the firmware environment variables.
-
Perform Volume Maintenance Tasks; enables users to run maintenance tasks for a volume.
-
Profile Single Process; enables a user to track non-system processes.
-
Profile System Performance; enables a user to track system processes.
-
Remove Computer From Docking Station; users are allowed to undock a laptop using a Windows Server 2003 user interface.
-
Replace A Process Level Token; enables a process to replace a process level token.
-
Restore Files And Directories; a user is able to restore files and directories.
-
Shut Down The System; enables the user to shut down the local computer.
-
Synchronize Directory Service Data; the user is able to synchronize directory service data.
-
Take Ownership Of Files Or Other Objects; enables a user to take ownership of objects.
How to configure user right assignment policies
-
Click Start, click Administrative Tools, and then Security.
-
Expand the Local Computer Policy snap-in, expand Computer Configuration, Windows Settings, Security Settings, Local Policies, and then expand User Rights Assignment.
-
Open the user rights assignment policies that you want to configure.
Security Options Policies
You can enable Security Options policies to secure server components from a number of threats and accidents. Security Options policies is used to define security for the computer.
-
Because there are over 70 security options which you can configure in Windows Server 2003, the security options are organized into a number of categories: Accounts; contains a number of security options such as:
-
Administrator Account Status; enables/disables the local Administrator account of the computer.
-
Guest Account Status; enables/disables the local Guest account of the computer.
-
Rename Administrator Account; defines the alternative name for the security identifier (SID) of the local Administrator account.
-
Rename Guest Account; defines the alternative name for the security identifier (SID) of the local Guest account.
-
-
Audit; contains security options which are specific to auditing, such as:
-
The Use Of Backup And Restore Privilege; when the Audit Privilege Use policy is enabled, it configures the computer to audit user privileges
-
Shut Down System Immediately If Unable To Log Security Audit; results in the computer shutting down when no further auditing entries can be written to the security log due to the log reaching its maximum size limit.
-
-
Devices; contains options that control access to devices, such as:
-
Allowed To Format And Eject Removable Media; defines those local groups which are allowed to format and eject removable NTFS file system media.
-
Restrict CD-ROM Access To Locally Logged-on User Only; stops users from accessing the CD-ROM drives of the computer.
-
Restrict Floppy Access To Locally Logged-on User Only; stops users from accessing the floppy disk drive of the computer.
-
-
Domain controllers; contains options that be used to apply security on a domain controller, such as:
-
Maximum Machine Account Password Age; sets the frequency at which the computer account password of the system is modified.
-
-
Domain member; contains options that be used for encryption, session keys, and computer account passwords.
-
Interactive Logon; contains options for interactive log on, such as
-
Do Not Require CTRL+ALT+DEL; specifies the Disable option so that users are secured from Trojan horse attacks.
-
Require Domain Controller Authentication To Unlock Workstation; stops the computer from being unlocked through cached credentials.
-
-
Microsoft Network Client; contains options for specifying digitally signed communications, such as:
-
Digitally Sign Communications (Always); sets the computer to require packet signatures for Server Message Block client communications.
-
-
Microsoft Network Server; contains options for specifying digitally signed communications and session idle timeout, such as:
-
Digitally Sign Communications (Always); sets the computer to require packet signatures for Server Message Block server communications
-
-
Network Access; contains options to configure anonymous network access settings, such as:
-
Do Not Allow Anonymous Enumeration Of SAM Accounts And Shares; stops anonymous users from gathering information on the names of local user accounts and shares.
-
Remotely Accessible Registry Paths And Sub-paths; defines the registry paths and sub-paths which certain users can access.
-
Shares That Can Be Accessed Anonymously; defines the shares which can be accessed by anonymous users.
-
-
Network Security; contains options for configuring network security, such as:
-
Force Logoff When Logon Hours Expire; configures the computer to end any current local user connections that have used up their defined logon hours or time.
-
-
Recovery Console; contains options for specifying Recovery Console security.
-
Shutdown; contains options that control system shutdown, such as:
-
Allow System To Be Shut Down Without Having To Log On; enables the Shut Down button in the Log On To Windows dialog box.
-
-
System Cryptography; contains options for encryption, signing, and hashing.
-
System Objects; contains options for system objects.
-
System Settings; contains options for additional system security settings.
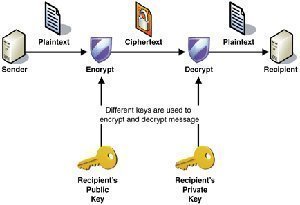
Public Key Policies
These policies are used to define how computers send requests to Certificate Authorities (CAs) so that they can install public keys.
Defining System Policies
-
There are a number of policy settings which can be defined and configured through System Policies: User Profiles policies: A few common User Profiles policies which you can configure are:
-
Delete Cached Copies Of Roaming Profiles; the local copy of the roaming profile is not saved to the local computer.
-
Do Not Detect Slow Network Connections; the system will not detect and respond to slow network connections.
-
Slow Network Connection Timeout For User Profiles; used to define slow network connections.
-
Wait For Remote User Profile; used to specify that the roaming user profile should be used over the cached copy of the user profile.
-
Prompt User When Slow Link Is Detected; used to notify a user of slow network connections. The user can then select to use either the roaming user profile or the locally cached copy.
-
Timeout For Dialog Boxes; used to set the time-out value for dialog boxes.
-
Log Users Off When Roaming Profile Fails; logs the user off when the roaming profile is unavailable.
-
Maximum Retries To Unload And Update User Profile; used to set the maximum number of retries allowed when the system is unable to update user profile information.
-
-
Logon policies: A few common Logon policies which you can configure are:
-
Run Logon Scripts Synchronously; when enabled, logon scripts are run and completed before the Windows Explorer interface is run.
-
Run Startup Scripts Asynchronously; when enabled, startup scripts are run at the same time.
-
Run Startup Scripts Visible; when enabled, the startup scripts' instructions are displayed.
-
Run Shutdown Scripts Visible; when enabled, the shutdown scripts' instructions are displayed.
-
Maximum Wait Time For Group Policy Scripts; used to set the maximum time for which the system waits for scripts.
-
-
Disk quota policies: A few common Disk Quota policies which you can configure are:
-
Enable Disk Quotas; enables disk quota management for each NTFS volume for the computer.
-
Enforce Disk Quota Limit; enforces the disk quota limit if it is defined.
-
Default Quota Limit And Warning Level; used to define the default quota limit and disk usage threshold settings.
-
Log Event When Quota Limit Exceeded; used to enable logging for when users exceed their specific quota limits.
-
Log Event When Quota Warning Level Exceeded; used to enable logging for when users reach their specific warning levels.
-
-
Group Policy policies: A few common Group Policy policies which you can configure are:
-
Turn Off Background Refresh Of Group Policy; group policies are not updated when the computer is being utilized.
-
Apply Group Policy For Users Asynchronously During Startup; the Windows Desktop is displayed before Group Policy for the computer is updated.
-
Group Policy Refresh Intervals For Computers; used to set the rate at which Group Policy of computers will be updated.
-
Group Policy Refresh Intervals For Domain Controllers; used to set the rate at which Group Policy of domain controllers will be updated.
-
User Group Policy Loopback Processing Mode; used to define whether group policy is replaced or merged.
-
Group Policy Slow Link Detection; used to define a slow network connection in terms of updating group policies.
-
Registry Policy Processing; used to define how Registry policies are applied or processed.
-
Internet Explorer Maintenance Policy Processing; used to define how Internet Explorer Maintenance policies are applied or processed.
-
Software Installation Policy Processing; used to define how Software Installation policies are applied or processed.
-
Folder Redirection Policy Processing; used to define how Folder Redirection policies are applied or processed.
-
Scripts Policy Processing; used to define how shared script policies are applied or processed.
-
Security Policy Processing; used to define how security policies are updated.
-
IP Security Policy Processing; used to define how IP security policies are processed.
-
EFS Recovery Policy; used to define how encryption policies are processed.
-
Disk Quota Policy Processing; for defining the manner in which quota policies are updated.
-
-
Windows file protection policies: A few common Windows file protection policies which you can configure are:
-
Set Windows File Protection Scanning; used to set how often Windows File Protection scans.
-
Hide the File Scan Progress Window; used to hide the File Scan Progress window.
-
Limit Windows File Protection Cache Size; used to set a limit for the amount of disk space which Windows File Protection can use.
-
Specify Windows File Protection Cache Location; used to set the Windows File Protection cache's location.
-
Configuring and Applying Security Templates
A security template is a collection of security configuration settings that can be applied to a domain controller, member server or a workstation. The settings within a security template are used to control the security configuration of a computer through both local policies and group policies. The security configuration settings contained within security templates are stored in text files. A security template can be applied to a local computer, or incorporated into a Group Policy object in Active Directory. Security templates enable administrators to create consistent security settings within the organization. In addition, the security settings can also be reproduced.
-
Windows Server 2003 includes predefined security templates that hold security settings for different levels of security. The predefined security templates are listed here:setup security.inf; contains the default security settings created by the Windows Server 2003 Setup program when a computer is installed.
-
Compatws.inf; enables most types of applications to run, thereby enabling the older applications to run.
-
DC security.inf; defines default system services settings, default security settings, and file system and Registry settings for a domain controller.
-
hisecdc.inf; highly secure template which contains security settings for domain controllers.
-
hisecws.inf; a highly secure server or workstation template which contains security settings for workstations.
-
securedc.inf; contains security settings for domain controllers that enhance security on a domain controller while at the same time maintaining compatibility with most functions and applications.
-
ecurews.inf; contains enhanced security settings for workstations and member servers that are not domain controllers.
-
Rootsec.inf; the template contains the default file system permissions that can be applied as the root permissions to the system drive of a computer.
-
iesacls.inf; includes settings that can be utilized to audit registry settings that control Internet Explorer security.
The Security Configuration and Analysis feature, initially introduced in Windows 2000, enables you to create, modify and apply security settings in the Registry through the use of security templates. The tool is useful for scanning, analyzing, and setting local system security. A security template makes it possible for you to configure security settings and store these settings in a file. You can apply security templates which were created in the Security Templates console to the local computer by importing them into a GPO.
-
The common process for using the Security Configuration and Analysis tool is listed below: Create, or open an existing security configuration and analysis database. This is the database that the Security Configuration And Analysis feature would compare the current security settings of the local computer to.
-
Analyze the system security of the local computer.
-
Examine the results of the security analysis, and resolve any reported discrepancies.
-
Export the security database settings to a security template
There are seven Security Template areas where you can configure security for Windows 2000, Windows XP, and Windows Server 2003 networking environments:
-
Account poliies, Local policies, Event log, Restricted groups, System services, Registry, and File System
To avoid settings implemented through the Security Configuration And Analysis tool from overriding local Group Policy settings, you should only use the Security Configuration And Analysis tool to configure security settings for system services, local files/folders, and registry keys.
How to open the Security Configuration and Analysis console
-
Click Start, Run, and enter mmc in the Run dialog box. Click OK.
-
In the Console menu, click Add/Remove Snap-In, and click Add.
-
Click Security Configuration And Analysis, and then click Add
-
Click Close, click OK,
-
In the Console menu, click Save.
-
Enter a name for the console, and then click Save.
-
You can now access the Security Configuration And Analysis console from the Administrative Tools menu.
How to analyze the security settings of the local computer
-
Open the Security Configuration And Analysis console
-
Right-click Security Configuration And Analysis and then select Analyze Computer Now on the shortcut menu.
-
When the Perform Analysis dialog box opens, verify that the path specified for the log file is correct. If not, enter the proper path for the log file.
-
Click OK to start the analysis of the computer.
-
You can view the contents of the log file by right-clicking the Security Configuration And Analysis, and then clicking View Log File on the shortcut menu.

Emman
I have legally bought software with restrictive users/technicians. The company that developed this programme has closed down so there is no upgrades or support; and I want to increase the number of user access by unlocking such limitation. What must I do.