With Windows NT 4.0, came the launch of the System Policy Editor feature which enabled administrators to manage the security settings of the system through a single user interface. The System Policy Editor feature allowed administrators to easily manage configurations of multiple computers because configuration settings could be copied between systems.
With the introduction of Windows 2000, the System Policy Editor feature was replaced by Active Directory Group Policy and security templates. Windows 2000, Windows XP, and Windows Server 2003 utilize Active Directory Group Policy and security templates to distribute security configuration settings between computers.
A security template can be defined as a collection of security configuration settings or parameters that can be applied to a domain controller, member server or a workstation. The security configuration settings contained within security templates are stored in text files (inf extension). The settings within a security template are used to control the security configuration of a computer through both local policies and group policies. A security template can be applied to a local computer, or incorporated into a Group Policy object in Active Directory. When a security template is imported into Group Policy, all computers to which the Group Policy object applies will receive the security settings of the particular security template. You can therefore manage one computer or multiple computers through the security settings contained within a security template. For computers that do not belong to an Active Directory domain, you can use the Security Templates snap-in and the Security Configuration and Analysis feature to both create and apply security templates to specific computers.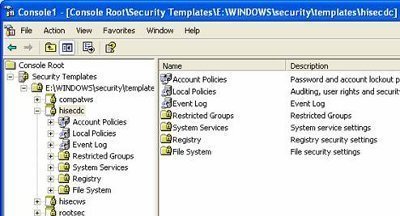
Security templates enable administrators to create consistent security settings within the organization. In addition, the security settings can also be reproduced. Because the security configuration settings contained within security templates are stored in plain text files, it is easy to work with these files. You can manipulate the files manually (cut and paste) as required. You can also store a number of different security settings within a security template, which enables you to apply different levels of security to computers that have different roles within the organization.
Windows Server 2003 includes predefined security templates that hold security settings for different levels of security. The security level is determined by the type of server that the template is applied to. Security templates can be used to apply a number of security policies and also customize a number of security policies to suit the security requirements of your organization.
There are basically seven Security Template areas identified, where you can configure security for Windows 2000, Windows XP, and Windows Server 2003 networking environments:
- Account policies. The Account Polices area is associated with policies that are connected to user accounts. Account Policies include the following:
- Password Policy; for configuring passwords – password history, minimum password length, password change frequency, and so forth.
- Kerberos Policy; for configuring ticket lifetime and renewal time, and so forth.
- Account Lockout Policy; for configuring how many failed logon attempts are allowed, when accounts are reset, and so forth.
- Local policies. These policies deal with who has local access or network access to the computer. It also includes the manner in which events are audited. Local Policies include the following:
- Audit Policy; includes options for:
- Account logon auditing
- Account management
- Policy change auditing
- Object auditing
- Processing auditing
- Privilege use
- User Rights Assignment; for configuring the actions that users can perform, including logon rights, and so forth.
Security Options; for authentication and connection prevention, and so forth.
- Audit Policy; includes options for:
- Event log. This includes settings that indicate the manner in which Application logs, Security logs, and System logs performs, when the logs are overwritten, and how long logs are kept, and so forth. You can view Event logs in the Event Viewer tool.
- Restricted groups.Restricted groups are used to add members to built-in user groups. Built-in user groups consist of Administrators, Backup Operators and Power Users.
- System services.System Services include security settings of the system services (file, network, print) on the local computer.
- Registry. Registry includes settings for registry keys.
- File System. File System is used to set access permissions for the directories and files on the local system.
Windows Server 2003 Predefined Security Templates
With Windows Server 2003 come a number of predefined security templates that have the following common characteristics:
- Provide different levels of security for servers performing different roles.
- Can be applied straightaway.
- Can be modified.
The predefined security templates can be found in the following directory:
- %systemroot%/SecurityTemplates directory
The predefined security templates are categorized according security level, as follows:
- Secure security level; provide a medium level of security:
- securews – secure server or workstation template.
- securedc – secure domain controller template.
- Highly secure security level; used in Windows Server 2003 native-mode environments, and enables maximum protocol protection.
- hisecws – highly secure server or workstation template.
- hisecdc – highly secure domain controller template.
- Compatible security level; compatible server or workstation template that enables most applications to function. The security levels of Power Users are still maintained though.
- Out of the box security level; default settings template that can be used for installation and for the initial configuration of servers and workstations.
The different predefined security templates are listed here:
- setup security.inf; contains the default security settings created by the Windows Server 2003 Setup program when a computer is installed. The setup security template differs between machines because it is determined by the nature of the installation, that is, whether an operating system was upgraded, or whether a clean installation was performed. The setup security template can be utilized to restore the default settings of the system.
- Compatws.inf; enables most types of applications to run, thereby enabling the older applications to run. With Compatws.inf, all members in the Power Users group on computers running Windows Server 2003 is removed, and security is relaxed to enable applications to run without errors. The compatws template results in a non-secure environment and should be used with extreme caution.
- DC security.inf; defines default system services settings, default security settings, and file system and Registry settings for a domain controller. The DC security template gets created when a server is first promoted to a domain controller.
- hisecdc.inf; highly secure template which contains security settings for domain controllers. The hisecdc template is considered a stronger more secure setting than the securedc template. The hisecdc template provides improved security for NTLM (NTLM version 2), and applies both Registry and file security. The hisecdc template also disables all additional services and removes all members from the Power Users group.
- hisecws.inf; a highly secure server or workstation template which contains security settings for workstations. The hisecws template applies security settings to severs and workstations, which are similar to those applied in the hisecdc template to domain controllers. The hisecws template provides improved security for NTLM. It also removes any members in the Power Users group. Membership in the local Administrators group of the computer is limited to the Domain Admins and Administrator groups. You should test the hisecws template before deployment to verify that applications can run.
- securedc.inf; contains security settings for domain controllers that enhance security on a domain controller while at the same time maintaining compatibility with most functions and applications. The securedc template includes enhanced security options and auditing policies. It also includes restrictions for anonymous users. The impact on applications is minimized, and computers are configured to LAN Manager responses.
- securews.inf; contains enhanced security settings for workstations and member servers that are not domain controllers. The template improves security while at the same time maintaining compatibility with most functions and applications. The securews template includes enhanced security options and auditing policies.
- Rootsec.inf; the template contains the default file system permissions that can be applied as the root permissions to the system drive of a computer. The permissions are then propagated to all subfolders and files that do not have explicit permissions configured. This template can be utilized to restore the default permissions to a system drive, and can also be used to apply the system drive permissions to the other drives of a computer.
- iesacls.inf; includes settings that can be utilized to audit registry settings that control Internet Explorer security.
The secure template provides a good starting point for applying security settings to member servers and workstations.
A few recommendations for improving the secure template security without compromising application functionality as the high security templates typically do are listed below. The security settings listed here are found in the Security Options container and the Audit Policies container of the Local Policies container:
- Audit System Events; Success or Failure.
- Additional Restrictions For Anonymous Connections; No access without explicit anonymous permissions.
- Audit The Use Of Backup And Restore Privilege; Enabled.
- Do Not Display Last User Name In Logon Screen; Enabled.
- LAN Manager Authentication Level; Send NTLMv2 response only, refuse LM and NTLM.
- Number Of Previous Logons To Cache; 0 logons but not for laptop users.
- Rename Administrator Account; to anything other than admin or root.
- Restrict CD-ROM Access To Locally Logged-On Users Only; Enabled.
- Unsigned Driver Installation Behavior; Not allowed
- Unsigned Non-Driver Installation Behavior; Not allowed.
Security Template Settings which Affect Network Security
There are a number of security options under the Local Policy container which impact network security for both servers and clients.
The different security options under Local Policies that affect network security are listed here:
- Network security: Do not store LAN Manager hash value on next password change; determines whether the LM hash value is stored in the local database when the password is changed. The setting is disabled by default.
- Network security: Force logoff when logon hours expire; when enabled network connectivity is disabled between the server and user when the configured logon hours expire.
- Network security: LAN Manager authentication level; has an impact on the authentication protocols used by the server and clients.
- Network security: LDAP client signing requirements; determines the level of LDAP client signing used to verify data integrity. The different LDAP client signing levels are:
- None; the caller specifies options.
- Negotiate signin; options are specified by the caller if TLSSSL is being utilized. If TLSSSL is not being used, then LDAP BIND requests occur with the LDAP data signing option specified together with the options defined by the caller. This is the default level configured.
- Require signature; the client and server configurations have to match for the client to connect to the server. When a mismatch occurs, the client receives a LDAP BIND request failed message.
- Network security: Minimum session security for NTLM SSP-based (including secure RPC) clients; provides the following options:
- Require message integrity; to continue with the connection, message integrity has to be negotiated. Message signing is used to verify message integrity.
- Require message confidentiality; to continue with the connection, an encryption method must be negotiated.
- Require NTLMv2 session security; to continue with the connection, the NTLMv2 protocol must be used.
- Require 128-bit encryption; to continue with the connection, 128-bit encryption must be used.
- Network security: Minimum session security for NTLM SSP-based (including secure RPC) servers; provides the following options:
- Require message integrity; to continue with the connection, message integrity has to be negotiated. Message signing is used to verify message integrity.
- Require message confidentiality; to continue with the connection, an encryption method must be negotiated.
- Require NTLMv2 session security; to continue with the connection, the NTLMv2 protocol must be used.
- Require 128-bit encryption; to continue with the connection, 128-bit encryption must be used.
The recommended Security Options to configure to improve network security are listed here:
- Access this computer from the network (User Rights); specifies which users/computers are allowed to access the computer.
- Add workstations to a domain (User Rights); domain users by default can add up to 10 computers to the domain.
- Logon rights – multiple settings (User Rights); includes a number of logon rights that can be specified.
- Digitally encrypt or sign secure channel data – multiple settings (Security Options); defines how data that should be secured passes over the network.
- Allow anonymous – multiple settings (Security Options); determines the anonymous connections types and anonymous access which should be permitted.
- Do not store LAN Manager hash value on next password change (Security Options); computers using only LM will not be allowed to authenticate.
- LAN Manager authentication level (Security Options); determines which LM protocol should be allowed:
- NTLM
- NTLMv2
- Kerberos
- Minimum Sessions security (Security Options); sets whether the following are required:
- Message integrity
- Message confidentiality
- Encryption
Implementing the Principle of Least Privilege
Through security templates, you can use the following methods to implement the principle of least privilege:
- Design and enforce a strong password policy that prevents unauthorized users from accessing your networks and systems.
- Reduce the user rights of your users to only include rights that are required.
- The Restricted Groups area can be utilized to restrict membership in sensitive groups.
- Implement file access control lists, and Registry access control lists.
- Security Options can be used to prevent access and to also limit the activities which users can perform.
- Through the Services area, disable all unnecessary services. You should also limit the number of individuals which are allowed to manage your services.
- Design and implement an auditing solution.
- It is recommended that you create a baseline plan for each of your computers. Next,implement your plan using security templates. Import your security templates into Active Directory Group Policy Objects (GPOs).
There are also additional methods, other than using security templates which can be used to implement the principle of least privilege:
- Secure your servers physically.
- Implement a firewall solution to protect private network.
- To limit the resources on the private network that external users are able to access, use Web proxies.
- Group the users that need to access the network according to role, and then grant permissions based on these roles.
- Implement access control lists to control the level of access allowed to users. Specifically, implement access control lists for the following components:
- Folders and files
- Active Directory directory objects
- Printers
- Registry keys
- Regularly examine audit logs.
Using the Security Templates Snap-In
You can use the Security Templates snap-in to create a security template file which can be deployed using either of these methods:
- The text security template file can be imported to the Security Settings extension to configure security policy for the local computer, Active Directory domain, or Active Directory organizational unit (OU).
- The Secedit.exe command-line tool can be used to apply a security template as well.
- The Security Configuration and Analysis snap-in can be used to analyze system security based on the settings within the security template.
The Security Templates snap-in can be used to view the predefined security templates or to create and modify security templates.
How to add the Security Templates snap-in to a MMC console
- Click Start, and run Mmc.exe from the Run dialog box
- Use the File menu to select Add/Remove Snap-In.
- Click Add on the Stand-alone tab
- Select Security Templates from the list of snap-ins.
- In the Add Stand-alone Snap-in dialog box, click Add to include the Security Templates entry to the Add/Remove Snap-in dialog box.
- Click close
- Click OK in the Add/Remove Snap-in dialog box.
How to copy a predefined security template
- First create a MMC console and add the Security Templates snap-in to it.
- In the console tree, expand the Security Templates node, and then expand Windows, Security, and then Templates.
- Locate and right-click the particular security template which you want to copy, and then click Save As from the shortcut menu.
- In the Save As dialog box, provide a name for the new security template and then click the Save button.
How to customize an existing security template
- First create a MMC console and add the Security Templates snap-in to it.
- Open the Security Templates management console.
- Proceed to expand the Security Templates node.
- Select the default path folder
- Right-click the security template you want to change in the right pane
- Click Save As
- Enter a name for the security template
- Click Save
- The security template you just created is displayed in the right pane.
- Double-click the new security template to change the security settings.
- To change a setting, right-click the appropriate attribute, and then select Properties from the shortcut menu.
How to create a new security template
- First create a MMC console and add the Security Templates snap-in to it.
- Open the Security Templates management console.
- Proceed to expand the Security Templates node.
- Right-click the Security Templates node and then select New Template Search Path from the shortcut menu.
- Enter the location which will be used to store your new security template. Click OK.
- Now, right-click the security template search path, and then click New Template from the shortcut menu.
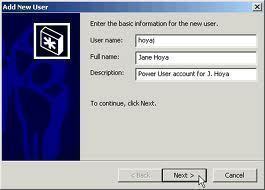
- Enter a name and description for the new security template.
- Click OK.
- You should now edit your new security template. Through the Security Templates snap-in, you can add security policies to the template.
Applying Security Templates through Group Policies
If you need to configure a large number of computers, you can import a security template into a Group Policy Object (GPO) for an Active Directory site, domain or organizational unit (OU).
If you want to view the linked group policies for a site, domain or OU, open the Properties dialog box of the site, domain or OU; and click the Group Policy tab. On the Group Policy tab, you can view all group policies that are linked. The buttons on the Group Policy tab that you can use to configure the GPO are listed here:
- New; to create a new GPO.
- Add, to link a group policy to the site, domain or OU.
- Edit; to access the Group Policy Object Editor and configure the GPO.
- Options; used to enable/disable the following options:
- No Override option; to define that the GPO cannot be overridden.
- Disable option; to define that settings in the GPO should not be applied.
- Delete; to delete a group policy from the site, domain or OU. The options are:
- Remove the link from the list option; removes the existing link.
- Remove the link and delete the Group Policy Object permanently option; removes and deletes the GPO.
- Properties; to open the properties of the group policy.
How to create a GPO
- You need to open the Active Directory Sites And Services console if you want to create a GPO for a site. To open the console, click Start, Administrative Tools, and click Active Directory Sites And Services. You have to use the Active Directory Users And Computers console if you want to create a GPO for a domain or OU. To open the console, click Start, Administrative Tools, and click Active Directory Users And Computers.
- In the console which you opened, locate and right-click the site, domain or OU that you want to create a GPO for, and then click Properties on the shortcut menu.
- When the Properties dialog box for the site, domain or OU opens, click the Group Policy tab.
- Click New.
- Provide a name for the GPO.
- Click Close.
- The new GPO is linked to the site, domain, or OU which you chose in the MMC, by default. The Group Policy settings contained in the GPO are applied for objects in that particular site, domain, or OU.
The default processing order in which Group Policy settings stored in GPOs are applied to a user object or computer object is listed below:
- Local GPO
- Site GPO
- Domain GPO
- OU GPO
When multiple site GPOs, domain GPOs and OU GPOs exist, the order in which they are processed can be specified. You can change the processing order of GPOs for a site, domain, or OU by using the steps listed below:
- To change the processing order of GPOs for a site, click Start, Administrative Tool, and click Active Directory Sites And Services. To change the processing order of GPOs for a domain or OU, click Start, Administrative Tool, and click Active Directory Users And Computers.
- Right-click the particular site, domain, or OU whose GPO processing order you want to change, and click Properties on the shortcut menu.
- When the Properties dialog box for the site, domain, or OU opens, click the Group Policy tab.
- Click the GPO in the Group Policy Object Links list, and use the Up button or the Down button to change the processing order of the GPO.
- The GPO located at the top of the list has the highest priority. GPO processing of the GPOs in the list starts at the bottom of the list, and moves up the list.
How to import a security template into a Group Policy object
- Open Active Directory Users and Computers
- Right-click the domain or Organizational Unit wherein the security settings should be applied.
- Click Properties.
- Select the Group Policy tab.
- You can click New to create a new group policy, or you can click Edit to change an existing group policy
- In the Group Policy console, expand Computer Configuration, and expand Windows Settings to right-click Security Settings.
- Select Import Policy.
- Select the security template that should be imported from the list of .INI files.
Applying Security Templates through the Security Configuration And Analysis Snap-In
The Security Configuration and Analysis feature, initially introduced in Windows 2000, enables you to create, modify and apply security settings through the use of security templates. The tool is useful for scanning, analyzing, and setting local system security.
The Security Configuration and Analysis tool is also capable of comparing a security template(s) to the existing security settings of a local computer so that you can identify any potential security discrepancies. Once the analysis is complete, you are shown all detected discrepancies. You should use the Secedit command-line tool to analyze a large number of computers.
The process for using the Security Configuration and Analysis tool is listed here:
- Create, or open an existing security configuration and analysis database. This is the database that the Security Configuration And Analysis feature would compare the current security settings of the local computer to.
- Analyze the system security of the local computer.
- Examine the results of the security analysis, and resolve any reported discrepancies.
- Export the security database settings to a security template.
How to save the Security Configuration And Analysis snap-in console under the Administrative Tools menu
- Click Start, Run, and enter mmc in the Run dialog box. Click OK.
- In the Console menu, click Add/Remove Snap-In, and click Add.
- Click Security Configuration And Analysis, and then click Add
- Click Close, click OK,
- In the Console menu, click Save.
- Enter a name for the console, and then click Save.
- You can now access the Security Configuration And Analysis console from the Administrative Tools menu.
How to create a security configuration and analysis database
- Open the Security Configuration And Analysis console
- Right-click Security Configuration And Analysis, and select Open Database on the shortcut menu.
- To use an existing database, select the database, and click Open
- To create a new database, enter the name of the file in File Name, and click Open
- When the Import Template dialog box opens, choose the security template that should be imported into the new database. Click Open.
How to apply a security template to a local policy
- Open the Security Configuration and Analysis console
- Right-click Security Configuration and Analysis, and then click Open Database from the shortcut menu.
- Enter a name for the database, and click Open
- Choose a template from the Import Template window. Click Open
- Right-click Security Configuration and Analysis, and then click Configure Computer Now to apply the security settings to the local computer
How to analyze the security settings of the local computer
- Open the Security Configuration And Analysis console
- Right-click Security Configuration And Analysis and then select Analyze Computer Now on the shortcut menu.
- When the Perform Analysis dialog box opens, verify that the path specified for the log file is correct. If not, enter the proper path for the log file.
- Click OK to start the analysis of the computer.
- You can view the contents of the log file by right-clicking the Security Configuration And Analysis, and the clicking View Log File on the shortcut menu.
How to view the security analysis results of the local computer
- Open the Security Configuration And Analysis console
- Expand Security Configuration And Analysis, expand the appropriate security policies node such as Account Polices or Local Policies, and then select the policy whose results you want to examine.
- The analysis results are displayed in the details pane of the Security Configuration And Analysis console.
How to configure system security for the local computer to match the security settings of the security configuration and analysis database
- Open the Security Configuration And Analysis console
- Right-click Security Configuration And Analysis and then select Configure Computer Now on the shortcut menu.
- Accept, or change the path for the log file.
- Click OK.
How export the security database settings to a security template
- Open the Security Configuration And Analysis console
- Right-click Security Configuration And Analysis and then select Export Template on the shortcut menu.
- Enter a name for the file in the File Name box; and in the Save In box, enter the path wherein the template should be saved.
- Click Save.
Applying Security Templates through Secedit.exe
The secedit.exe command-line tool is basically a command-line version of the Security Configuration And Analysis snap-in which can be utilized to view, analyze, edit, and apply security templates. You should use the Secedit command-line tool to analyze a large number of computers.
The parameters of secedit.exe are listed here:
- secedit /analyze; used to analyze the security settings of a computer by comparing the settings of the computer to the settings in the database template. Can be used to audit security settings for compliance purposes. The different parameters of the secedit /analyze command are:
- /db FileName.sdb; specifies the database to be used for the analysis process.
- /cfg FileName; specifies the security template which should be imported and used for the analysis.
- /overwrite; specifies that the database has to be emptied before the security template is imported.
- /log FileName; indicates the log file for recording events.
- /quiet; specifies that the user is not prompted for information during the analysis process.
- secedit /configure; used to apply security settings from the security template to a specific computer. The security areas which you can specify are:
- SECURITYPOLICY; includes the following: Account policies, Audit policies, Security Options, and event log settings.
- GROUP_MGMT; includes restricted groups settings.
- USER_RIGHTS; includes user rights assignment settings.
- REGKEYS; includes Registry permissions
- FILESTORE; includes file permissions.
- SERVICES; includes settings for system services.
- secedit /export; exports security settings from the database to a security template.
- secedit /import; used to import a security template into the database.
- secedit /validate; used to validate the syntax of a security template prior to importing the template into the database.
- secedit /GenerateRollback; used to create a rollback template which can be used to remove the security settings applied with a security template.
Testing Security Templates
Before you deploy security settings through security templates, you should test your deployments. A typical testing solution should include the following steps:
- Create a test plan; the test plan should define the objective of testing and should include the following types of testing:
- Hardware compatibility testing.
- Operating system compatibility testing
- Application compatibility testing.
- Security testing.
- Hardware and software evaluation.
- Performance baseline determination.
You should also document all installation, configuration and administrative processes which you are going to utilize.
- Create relevant test cases; for each test case which you define, you should include the following:
- Purpose of the test case.
- Hardware needed to perform the test.
- Software needed to perform the test.
- Necessary configuration which should be applied before the test can be performed.
- How the test should be performed.
- Build a testing environment; the testing environment which you create is determined by a number of elements, such as the size and requirements of the organization, the network infrastructure, the degree of testing which should be performed, and how much time can be set aside for testing. A testing environment or test lab can be utilized to perform a number of operations, including performance planning, capacity planning, bandwidth requirement determination, and to assess new hardware and software products.
- Perform the actual security configuration testing; the main purpose of performing the test should be to determine the following:
- Whether the security configuration settings provide the expected and required security for the organization.
- Whether the operation of the network is affected.
You should evaluate and document the results of your testing.

Follow Us!