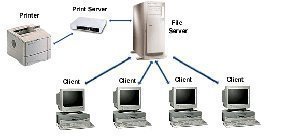
The file server role stores data for network users, and provides access to users for files stored on the file server. File servers enable users to store files in a centralized location and share files with another user. The print server role provides network printing capabilities for the network. Through the print server role, you can configure a server to manage printing functions on the network. The print server is the computer where the print drivers are located that manage printing between printers and client computers. The print servers also manage communication between the printers and the client computers.
With Windows Server 2003, securing file and print servers are simpler than it was with the prior Windows operating systems because Internet Information Services (IIS) is no longer installed on computers, by default.
Both file servers and print servers need you to implement security measures to protect these servers:
-
Set the appropriate permissions on files and folders.
-
Use antivirus software
-
Perform regular backups.
-
If necessary, implement an encryption solution.
-
Protect print servers from being used inappropriately.
Basic Security Measures for Securing File and Print Servers
Basic security measures for securing file and print servers are listed here:
-
Physically secure your file and print servers.
-
The NTFS file system should be utilized to protect data on the system volume.
-
You should though implement the NTFS file system on all system volumes.
-
Apply and maintain a strong virus protection solution.
-
Software patches should be kept up to date.
-
If applicable, programs should only be allowed to be installed when they have trusted sources.
-
All unnecessary services and applications not being used on your file and print servers should be deleted.
-
Users should only be configured with those permissions which they need to access and use files and folders, and perform printing.
-
Enforce the usage of strong passwords through Password Policy security settings.
-
Secure the following well-known accounts:
-
Administrator account
-
Guest account.
-
-
It is recommended that you perform all administrative tasks on file and print servers with the smallest amount of privileges. You should steer clear of using Administrator privileges.
-
It is also recommended that you regularly examine the Power Users groupâ€TMs members simply because members of this group are able to manage file and print servers. It is recommended that you also audit the activities of the group.
The recommended changes which you should make to the baseline installation security policy settings for the file and print server role are:
-
You should enable the Print Spooler service, and configure the service startup type as Automatic, to ensure that the print server can be accessed by network computers and receive print jobs from these computers.
-
You should disable the Microsoft Network Server: Digitally Sign Communications (Always) security policy so that clients can access and view the print queue on the print server.
One of the more important security measures which you should implement is to protect data stored on the file and print servers drives.
The best approach for securing data on your file and print servers drives are listed here:
-
Using NTFS partitions enable you to specify security for the file system after a user has logged on.
-
NTFS permissions can then be used to control the access users and groups have to files and folders on NTFS partitions. You can set an access level for each particular user to the folders and files hosted on NTFS partitions.
-
You can use a Group Policy Object (GPO) to set permissions for NTFS formatted file and print srver drives.
How to use a GPO to configure permissions for NTFS formatted file and server drives
-
Open the Group Policy Object Editor console.
-
Navigate to the File System container.
-
Click the Action menu item, and then select the Add File command.
-
You can now indicate which files and folders are to be set with file permissions.
-
You can configure the permissions for the files and folders previously indicated.
-
You can also define whether the permissions should be inherited by any sub-folders contained within parent folders.
Implementing Security for the File Server Role
As mentioned previously, one of the best approaches for securing the file server role is to implement the NTFS file system on all system volumes. The NTFS file system allows you to define local security for files and folders stored on NTFS partitions. You can specify access permissions on files and folders which control which users can access files and folders. You can also specify what level of security is allowed for users or group. On NTFS partitions, permissions are applied to users who access the computer locally, and who access a NTFS folder which has been shared over the network. By default, permissions of NTFS volumes are inheritable. What this means is that files and sub-folders inherit permissions from their associated parent folder. You can however, configure files and sub-folders not to inherit permissions from their parent folder.
With Windows Server 2003, basic NTFS permission settings are assigned for five default users and groups when a new NTFS partition is created. The users/groups and the default permissions file permissions created are listed below:
-
Administrators: Full Control â€" Allow
-
System: Full Control â€" Allow
-
Users: Read â€" Allow, Read and Execute â€" Allow, List Folder Contents â€" Allow
-
Creator Owner: Have no default permissions set
-
Everyone: Have no default permissions set
To assign NTFS permissions on files,
-
Right click the file that access should be controlled to.
-
Select Properties from the shortcut menu.
-
Select the Security tab.
-
Click Add to set the object name.
-
Select the file permission desired for the file. When you select the Full Control and Modify permission, all permissions listed beneath it are enabled. When you select the Read & Execute permission, the Read permission is automatically enabled.
To deny permission to files and folders,
-
Simply right-click the file, and select Properties
-
Click the Security tab
-
Select the group or user, and click Edit
-
Proceed to check the Deny column. A Deny permission takes precedence over an enabled Allow permission.
Another important security feature of the NFTS file system is the Encrypting File System (EFS) feature. EFS can be used to secure confidential corporate data from unauthorized access, because it enables you to encrypt files and folders to further enhance the security of these files and folders. Even when an unauthorized person manages to access the files and folders because of incorrectly configured NTFS permissions, the files and folders would be encrypted.
EFS uses keys to encrypt and decrypt data, and the cryptography application programming interface (CryptoAPI) architecture to provide cryptographic functions. EFS can work on computers that are members of a domain, and on standalone computers. The keys which EFS uses to encrypt and decrypt data, is a public and private key pair, and a per file encryption key. EFS generates a file encryption key (FEK) which is a symmetric encryption key to encrypt the data. The File Encryption Key (FEK) is next encrypted by means of asymmetric encryption using the userâ€TMs public key. Asymmetric encryption actually uses a public and private key pair for stronger security. The encrypted FEK is then stored with the encrypted file. When the file needs to be decrypted, the FEK must be decrypted. The userâ€TMs private key is used to decrypt the FEK. The FEK is then used to decrypt the data of the file.
A few security features of EFS are:
-
With Windows Server 2003, the triple-DES (3DES) encryption algorithm can be utilized to further enhance the security of EFS.
-
EFS can encrypt and decrypt files on a remote computer.
-
Files that are encrypted can be stored in Web folders.
-
Offline files can also be encrypted by EFS. You should encrypt offline files to ensure protection for locally stored documents.
-
All temporary files in a folder that is encrypted are encrypted as well.
-
You can back up encrypted files.
-
You can use Server Message Block (SMB) signing to ensure that files are securely transmitted and received over the network.
-
You can also use IPSec to encrypt data as it moves over the network.
You can strengthen security by replacing the DESX algorithm that EFS utilizes with the stronger 3DES algorithm. You can use the system cryptography Group Policy setting to enable 3DES for encryption for IP Security and EFS. You can however change the appropriate registry setting in the HKEY_LOCAL_MACHINESOFTWAREMicrosoftWindowsNTCurrentVersionEFS key through the Registry Editor to enable 3DES for encryption for EFS only.
To enable 3DES for encryption for EFS only,
-
Open the Registry Editor
-
Locate the HKEY_LOCAL_MACHINESOFTWAREMicrosoftWindows NTCurrentVersionEFS registry subkey.
-
Use the Edit menu to click New, and then DWORD Value
-
Insert AlgorithmID for value name, and 0x6603 for value data
-
These values enable 3DES
-
Restart the computer
Implementing Security for the Print Server Role
A few measures of implementing security for the print server role are listed here:
-
When deciding on a print server, consider implementing a print server cluster if your enterprise needs exceptional reliability and performance when it comes to printing.
-
For physical security, printers which are used for printing of confidential data should be placed in secure locations. Access to these printers should be limited to only those individuals authorized to view the confidential data.
-
IPSec can be used to secure data as it being transmitted over the network to your printers.
-
Configure the appropriate print permissions. Print permissions are used to manage printing and specify those users which are allowed to print to the printer.
You access the printerâ€TMs properties by opening the Printers And Faxes folder, right-clicking the particular printer, and selecting Properties from the shortcut menu. The Security tab of the printerâ€TMs Properties dialog box is used to configure security settings that either allow or deny access to the printer.
The following print permissions can be configured:
-
Print; enables the user or group to connect to the printer and transmit print jobs.
-
Manage Printers; grants administrative control of the printer to a user or group. This means the user can perform the following functions:
-
Change print permissions
-
Change the print spooler settings.
-
Share the printer
-
Start, stop, pause and resume the printer
-
-
Manage Documents; enables a user or group to manage documents being printed.
When configuring print permissions for your users, you should remove the print permission from the Everyone group. The print permission is automatically assigned to the Everyone group. You should then only configure print permissions for those users and groups that need to access the printer to print documents.

Follow Us!