Internet Authentication Service (IAS) Overview
In most organizations that have multiple network access servers, the centralization of authentication and accounting of connections being established at a centralized server is the better approach than each network access server performing authentication and accounting services.
The Remote Authentication Dial-In User Service (RADIUS) protocol is the recognized protocol for providing a centralized authentication, accounting, authentication and authorization for remote network access. RADIUS is a internet Engineering Task Force (IETF) standard. Essentially, the RADIUS protocol can be used to control access for dial-up networks, VPNs and for wireless networks. The Internet Authentication Service (IAS), included in Windows Server 2003, is an implementation of a RADIUS server and RADIUS proxy. IAS performs authentication, authorization, and accounting functions for remote users attempting to establish a connection through dial-up access or through a VPN. IAS can manage the complete login process of remote access connection attempts.
ISPs can also use the RADIUS protocol. Third-party ISPs can utilize IAS to authenticate dial-in users to the Active Directory database of the organization. Here, the user names and passwords credentials stored in Active Directory is used, and the ISP not providing the Active Directory directory service does not really matter.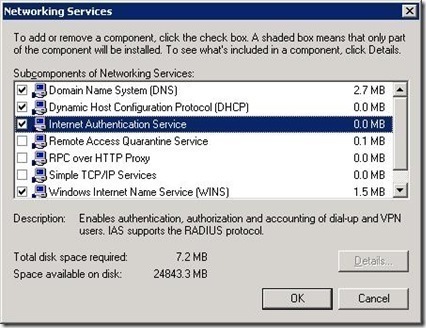
IAS provides the following functions for dial-up connections, VPN connections, and wireless connections:
- Centralized authentication: The majority of the standard authentication methods such as Challenge Handshake Authentication Protocol (CHAP), MS-CHAP version 1 and version 2, and other authentication protocols are supported by IAS.
- Centralized accounting: IAS is capable of collecting accounting information from the network access servers.
- Centralized auditing: IAS can log a number of events, including all authentication requests which were rejected/accepted, and user usage information as well.
IAS can also be used for the following purposes:
- Authenticate switches: IAS can be used to authenticate switches so that no unauthorized switches are activated within the network. Here, remote access policies are used to enable IAS to be the RADIUS server for Ethernet switches that can authenticate to a centralized server.
- Outsource remote access connections: IAS can also be used to enable an organization to outsource its remote access solution to a third-party ISP. Here, the IAS server in the organization's network is responsible for authenticating the credentials of the user, and for monitoring and tracking remote access users.
In order to implement RADIUS, the following RADIUS components are needed:
All functions are centralized at the RADIUS server. Each remote access server does not perform any of the just mentioned functions. Based on the information that the RADIUS server has in its user account database, and the information associated with the actual connection, the connection attempt is either allowed or denied. The RADIUS server also makes it possible to centralize remote access policy application in Windows 2000 and Windows Server 2003 networks.
A RADIUS client has the following responsibilities:
-
A RADIUS server: The RADIUS server is responsible for a number of functions when a remote access client attempts to establish a connection:
- Authentication
- Authorization
- Accounting
-
A RADIUS client: The RADIUS client forwards all connection attempts made to the RADIUS server for authentication and authorization functions. This basically means that RADIUS clients do not perform any authentication, authorization, and accounting functions. A RADIUS client can be either of the following types of servers:
- Dial-up server
- VPN server
- Wireless Access Point (WAP)
- Forward all authentication requests and accounting requests to the configured RADIUS server.
- To obtain remote access policy from the RADIUS server.
A RADIUS proxy: When there are multiple RADIUS servers within the same organization, the RADIUS proxy determines the specific RADIUS server that the connection request should be forwarded to.
RADIUS proxies have the following responsibilities:
- Allow authentication services for many organizations to be hosted through the identical tunnel server IP address.
-
Facilitate forwarding of RADIUS authentication request packets to the proper RADIUS server, based on either of the following information:
- Prefix provided by the remote access client.
- Suffix provided by the remote access client.
IAS provides a number of benefits over using standard RRAS authentication. The advantages of using IAS are:
- Centralized user authentication, and authorization and accounting: With IAS, remote users connect to the RRAS server acting as the RADIUS client who in turn connects to the IAS server to authenticate users. All RRAS servers within the organization can connect to a single IAS server for authentication functions. The IAS service can also track usage of the system, and key events which occur.
- Integration with current features of RRAS: IAS can integrate with the Remote Access Policy settings of RRAS, and you can configure multiple RRAS servers to authenticate remote access connections through the IAS server. IAS manages the remote access policy when your RRAS servers authenticate using IAS.
- Remote access policies support: With IAS, you can define remote access policies on the IAS server that are then applied for each RRAS server that authenticates remote access connection attempts through IAS.
- Scalability: With IAS, you can scale from having one IAS server to having multiple IAS servers. You can also add RRAS servers and include them with existing RRAS servers using IAS for authentication. You do not need to configure security for each new RRAS server individually.
Windows Server 2003 IAS Features
IAS is available in the following editions of Windows Server 2003:
- Windows Server 2003 Standard Edition
- Windows Server 2003 Enterprise Edition
- Windows Server 2003 Datacenter Edition
The new IAS features provided with a Windows Server 2003 implementation of IAS are summarized below:
-
The RADIUS proxy: IAS can be configured to forward authentication requests to one or multiple external RADIUS servers that are running a RFC compliant RADIUS installation. Basically, the external RADIUS servers do not have to be IAS installations. IAS is capable of distinguishing between connection requests which it should handle, and connection requests which it should forward to other external RADIUS servers. Authentication requests can be forwarded to external RADIUS servers, based on a number of criteria, including:
- Username
- IP address of the external RADIUS server
- Remote-RADIUS-to-Windows-User mapping feature: This feature allows users to be authenticated by one server, and then authorized by another server. Remote-RADIUS-to-Windows-User mapping allows the authentication function and the authorization function to be performed by two different servers.
- The Windows Server 2003 IAS implementation includes the capability of IAS to authenticate switches. Remote access policies are used to enable IAS to be the RADIUS server for Ethernet switches that can authenticate to a centralized server. IAS can then be used to authenticate switches so that no unauthorized switches are activated within the network.
- IAS can also authenticate wireless users through the Protected Extensible Authentication Protocol (PEAP) authentication protocol. This is due to IAS including support for wireless access points, so that users can be authenticated and authorized.
- Network Access Quarantine Control: Authentication is only the means to verify the identity of the user. Authentication cannot verify that the computer of the user contains no malicious software such as viruses, worms, and so forth. Network Access Quarantine Control is the feature that delays normal remote access to the private internal network until the remote access computer being used can be verified to security policies through a script. With Network Access Quarantine Control, the user is authenticated and the remote access computer receives an IP address. Until a script that can validate the computer is run, the computer is placed in quarantine mode. Only after the remote access computer is validated, is quarantine mode removed, and the remote access computer receives standard remote access.
- IAS includes SQL database support which results in more effective logging of user auditing information.
Understanding IAS Authentication Methods
IAS support a number of authentication methods, with the default supported authentication methods being:
-
Point-to-Point Protocol (PPP) based authentication methods, including:
- Password Authentication Protocol (PAP): A network and dialup authentication method that uses plain text passwords and no encryption. PAP should only be used when none of the other authentication methods are supported by your remote access clients.
- Shiva Password Authentication Protocol (SPAP): This method uses a non-complicated password authentication protocol. SPAP should be used when Shiva Remote Access servers are being used for network access servers. You cannot use SPAP if you require strong encryption methods for remote access connections. Both SPAP and PAP offer low levels of security.
- Challenge Handshake Authentication Protocol (CHAP): This is a challenge-response authentication protocol used for PPP connections. CHAP provides a medium level of security for remote access connections. CHAP should be used when your remote access clients use Microsoft operating systems (OSs) and other OSs. Remember that CHAP requires passwords to be stored in reversible encrypted format on your domain controllers.
-
Microsoft Challenge Handshake Authentication Protocol (MS-CHAP): MS-CHAP is the Microsoft extension of CHAP that provides increased security. MS-CHAP should be used when the following statements are true:
- Your remote access clients use Microsoft operating systems (OSs).
- You do want to store passwords in reversible encrypted format on domain controllers.
- Data needs to be encrypted between the remote access client and the network access server.
-
Microsoft Challenge Handshake Authentication Protocol Version 2 (MS-CHAPv2): Provides mutual authentication and is used for network and dialup authentication. MS-CHAPv2 should be selected over MS-CHAPv1. MS-CHAPv2 is included with all the current versions of Windows. MS-CHAPv2 provides a high level of protection for remote access connections, and should be used when the following statements are true:
- Mutual authentication is required for the remote access client and the network access server.
- Data needs to be encrypted between the remote access client and the network access server.
- Windows 95 clients and Windows 98 clients are only being utilized for VPN authentication.
- Windows NT 4.0 clients and Windows 2000 clients are utilized for dial-up authentication and VPN authentication.
-
Extensible Authentication Protocol (EAP) based authentication methods, including:
- EAP-MD5: Enables EAP authorization through a name and password combination.
-
EAP-TLS: Uses mutual authentication together with smart card certificates. EAP-TLS should be used when the following statements are true:
- Mutual authentication is required for the remote access client and the network access server.
- Data needs to be encrypted between the remote access client and the network access server.
- Operating systems that support third-party authentication mechanisms, such as smart cards, are being used.
You can also add additional authentication methods which are not supported by the default implementation of IAS. After the user is authenticated, IAS next has to authorize the user to verify that the resources attempting to be accessed by the particular user can indeed be accessed by that user.
Understanding IAS Authorization Methods
IAS supports a number of authorization methods, including the following:
The Grant or Deny setting of a specific policy determines whether the user is allowed or denied access. Remote access policies can be used to specify which authentication protocol clients must utilize and specify which encryption methods clients must utilize. You can also use remote access policies to configure further restrictions once the connection attempt is authorized.
Connections can be restricted through remote access policies, based on the following elements:
-
Remote access policies: Remote access policies can be used to restrict user access, based on:
- User
- Group membership
- Time of day
- Idle timeout time
- Maximum session time
- Encryption strength
- IP packet filters
- Advanced restrictions – IP addresses for PPP connections.
Automatic Number Identification (ANI) and Calling Line Identification (CLI): The criterion used to authorize the user is the number which the specific user is calling from. IAS is capable of authorizing connections according to either Automatic Number Identification (ANI) or Calling Line Identification (CLI).
Dialed Number Identification Service (DNIS): DNIS is a phone company service that makes it possible to identify the number being called. The criterion used to authorize the user is based on the phone number which the user is utilizing.
Guest authorization: With guest authorization, access is allowed for unauthorized users with no username and password credentials being provided. Guest authorization is disabled by default, and it is not the recommended choice for an authorization method.
Designing a RADIUS (IAS) Strategy
A number of factors should be considered when you plan to implement a RADIUS solution:
-
You have to examine your existing networking infrastructure with reference to the following:
- Locations of your remote access users.
- The WAN connection type technology being used.
- Number of remote access users at these locations.
- Determine how the RADIUS solution is going to be secured.
- Determine the level of availability of RADIUS that is required for your remote access users.
- Determine the placement of RADIUS servers and RADIUS clients.
- Determine methods of enhancing RADIUS performance.
The following connection points have to be secured to protect the resources on the private network from remote access users who have access to the private network.
- The connection between the RADIUS client and the RADIUS server must be secured.
- The connection between the remote access client and the RADIUS client. A RADIUS client can be either of the following types of servers: Dial-up server, VPN server, or Wireless Access Point (WAP).
The mechanisms that can be used to secure your RADIUS strategy are listed here:
- You can apply remote access policies on the RADIUS server that must be applied to each remote access user attempting to establish a connection. When RADIUS clients use remote access policies applied on the RADIUS server, then all policies on the actual RADIUS clients are overlooked. The remote access policies on the RADIUS server are used instead.
- Authentication protocols such as CHAP, EAP-TLS, and MS-CHAPv1 and MS-CHAPv2 can also be used to increase security.
- Encryption algorithms are also supported by RADIUS clients for remote access clients. This includes MPPE over PPTP, and IPSec
Ensuring the availability of your RADIUS strategy is another important issue that should be included when you plan your RADIUS design. Having multiple RADIUS clients and multiple IAS servers configured as RADIUS servers assist in ensuring that you remote access users can establish connections.
If you are considering implementing two or more RADIUS servers, consider the following important factors:
- The cost of implementing two IAS servers configured as RADIUS servers should be justified by the degree of availability required within the specific organization.
- You should consider configuring the RADIUS clients as RADIUS proxies to allow for load balancing. Recall that a RADIUS proxy can forward remote access connection requests between two RADIUS servers.
- To ensure that each IAS server performs the identical authentication, authorization, and accounting functions for RADIUS clients; consider copying the configuration settings of the one IAS server to the other IAS server.
When determining the placement of your RADIUS servers and RADIUS clients, consider the following points:
- The placement of your RADIUS servers and RADIUS clients should result is the most security for the private network.
- The placement of your RADIUS servers and RADIUS clients should also minimize network traffic over the networking environment.
-
If you have one RADIUS server and one RADIUS client, it is recommended that you place the RADIUS client close to the remote access users. This placement strategy results in the following advantages:
- You can better manage the security between the RADIUS client and the private internal network.
- Reduced traffic over WAN links.
- Reduced dial-up costs.
- The server providing authentication and the RADIUS server should be placed on the private internal network.
- It is recommended that you place the RADIUS server close to the domain controller used for providing authentication services to the remote access clients.
Installing IAS
How to install IAS
- Open Control Panel
- Double-click Add/Remove Programs, and then click Add/Remove Windows Components.
- The Windows Components Wizard starts.
- Click Networking Services, and then click Details.
- In the Networking Services dialog box, select the checkbox for Internet Authentication Service in the list.
- Click OK. Click Next. Click Finish.
Managing and Monitoring IAS
You can use the Internet Authentication Service management console to manage the configuration of your IAS implementation.
To access the Internet Authentication Service management console,
- Click Start, Administrative Tools, and then click Internet Authentication Service.
The left pane of the Internet Authentication Service management console contains the following nodes, or RADIUS components:
Through this node, you can manage your RADIUS clients. You can add or remove RADIUS clients as necessary.
-
RADIUS Clients: Contains the RRAS servers which are configured for your IAS implementation. A RADIUS client can be either of the following types of servers:
- Dial-up server
- VPN server
- Wireless Access Point (WAP)
- Remote Access Logging: Enables you to configure logging options.
- Remote Access Policies: Contains all currently configured remote access policies. You can add new Remote access policies to restrict user access based on User, Group membership and Time of day. You can add and remove remote access policies using the Remote Access Policies node of the IAS console.
- Connection Request Processing: Used to configure settings so that connection requests can be forwarded to other RADIUS servers. With IAS, authentication requests can be forwarded to one or multiple external RADIUS servers that are running a RFC compliant RADIUS installation.
The IAS Software Development Kit (SDK) can be used for the following purposes:
- Create customized authentication methods. The EAP development tools are included so that you can create new authentication types.
- Create customized authorization methods.
- Create customized behaviors for IAS.
- Control how many network sessions can be used by users.
You can use the Event Viewer tool and the System Monitor utility to monitor your IAS server performance. Event Viewer stores events that are logged in the system log, application log, and security log. The system log contains events that are associated with the operating system. The application log stores events that pertain to applications running on the computer. Events that are associated with auditing activities are logged in the security log.
The System Monitor utility is the main tool for monitoring system performance. System Monitor can track various processes on the Windows system in real time. System Monitor uses objects, counters and instances to monitor the system. An object is a collection of counters which are associated with a system resource or service. As the object executes a function, its associated counters are updated. A number of IAS objects are automatically added to System Monitor when IAS is installed. A counter represents data for a particular component of the system or service. Each object has a set of counters. An instance refers to the incident of multiple performance objects of the identical type on a computer. An object can have one or multiple instances. You can specify specific elements or components that should be tracked on the local computer and remote computers. You can determine resource usage by monitoring trends. System Monitor can be displayed in a graph, histogram, or report format.
You have to be a member of one of these groups to use System Monitor: Administrators group, Server Operators group, Performance Log Users group, or Performance Monitor Users group.
The objects most commonly used to monitor network activity are:
- Browser object, monitors the Browser service for the domain or the workgroup
- Cache object, monitors disk cache usage
- Memory object, monitors physical and virtual memory performance
- Objects object, monitors the events, processes and threads on the computer as data is collected.
- Paging File object, monitors page file usage
- Physical Disk object, monitors the hard disks
- Process object, monitors the processes running on the computer
- Processor object, monitors the processors on the system.
- Server object, monitors items such as bytes, sessions, pool paged usage, and pool non-paged usage.
- System object, monitors counters associated with system hardware and software
- Thread object. monitors threads running in the system
How to enable IAS authentication
- Click Start, Administrative Tools, and then click Routing And Remote Access to open the Routing And Remote Access management console.
- In the console tree, right-click the server that you want to configure and then select Properties from the shortcut menu.
- Switch to the Security tab.
- From the Authentication Provider drop down list, select the RADIUS Authentication option.
- Click Configure.
- Click Add to include a RADIUS server in the list.
- When the Add RADIUS Server dialog box opens, provide the name of the RADIUS server and click OK. Click OK again to close the Properties dialog box.
- Click OK to acknowledge that the RRAS service has to be restarted.
- In the Routing and Remote Access management console, right-click the server and select All Tasks, and then select Restart from the shortcut menu.
How to enable EAP authentication on the IAS server
- Click Start, Administrative Tools, and then click Internet Authentication Service to open the Internet Authentication Service management console.
- In the left pane, select Remote Access Policies.
- In the right pane, click Connections to Microsoft Routing and Remote Access Server.
- From the Action menu, click Properties.
- Click Edit Profile to navigate to the Edit Dial-in Profile dialog box.
- Switch to the Authentication tab.
- This is where you can specify the order in which EAP types are negotiated, and enable/disable non-EAP authentication methods.
- Click the EAP Methods button to add, remove, or view existing EAP types.
- Click OK.
How to configure IAS on a domain controller
- Open Control panel.
- Double-click Add/Remove Programs, and then click Add/Remove Windows Components.
- The Windows Components Wizard starts.
- Click Networking Services, and then click Details.
- In the Networking Services dialog box, select the checkbox for Internet Authentication Service in the list.
- Click OK. Click Next. Click Finish.
- To register the IAS server in Active Directory so that IAS can access the user account dial-in properties information in your Active Directory domain, navigate to the Internet Authentication Service management console.
- Click Start, Administrative Tools, and then click Internet Authentication Service to open the Internet Authentication Service management console.
- In the left pane, right-click Internet Authentication Service, and then click Register Server in Active Directory from the shortcut menu.
- Click OK to the message that appears, requiring verification that you want to authorize the computer.
How to create a new remote access policy
- Click Start, Administrative Tools, and then click Internet Authentication Service to open the Internet Authentication Service management console.
- In the left pane, right-click the Remote Access Policies node and then select New Remote Access Policy from the shortcut menu.
- The New Remote Access Policy Wizard initiates
- Click Next on the New Remote Access Policy Wizard welcome screen.
- On the Policy Configuration Method page, click the Use the wizard to set up a typical policy for a common scenario option. Click Next.
-
On the Access Method page, choose one the methods listed here:
- VPN access
- Dialup access
- Wireless access
- Ethernet
- Configure how remote access should be granted. Click Next
- On the Authentication Methods page, select the authentication methods which the new remote access policy will use. Click Next.
- Select which level of encryption that should be used. Click Next.
- Click Finish.
Click Next.
How to configure IAS for wireless security
Wireless clients can authenticate to IAS through:
- Smart cards
- Certificates
- Username and password credentials.
The process that occurs when a client attempts to connect to a wireless network that uses the 802.1X authentication is explained next:
- The client attempts to connect to the SSID of the wireless access point (WAP).
- The client has to authenticate to the WAP if shared network authentication is enabled. The network key is used to authenticate the client.
- The WAP sends an authentication challenge to the client.
- The WAP next creates a channel to enable the client to communicate directly with the RADIUS service.
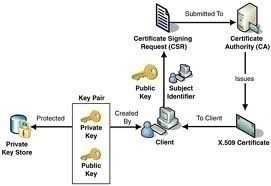
- When the client initially interacts with the RADIUS server, it first needs to verify that the RADIUS server is in fact who it is. To verify the identity the RADIUS server, the client checks the public key certificate of the RADIUS server.
- Once the client has verified the identity the RADIUS server, the client has to use 802.1X authentication to authenticate to the RADIUS service.
- If the RADIUS service and the client are set up to use EAP-TLS authentication, public key certificates are used to authenticate the client to the RADIUS service.
- If the RADIUS service and the client are set up to use Protected EAP (PEAP) authentication, then a Transport Layer Security (TLS) session is established between the client and the RADIUS service. Once the Transport Layer Security (TLS) session is established, the client starts sending its security credentials to the RADIUS service.
- When the RADIUS service receives the credentials of the client, it verifies the received credentials to its directory.
-
Access is granted to the client when the following occurs:
- The RADIUS service is able to authenticate the credentials of the client through its authentication database.
- The access policy allows the client to establish a connection.
- At this stage, the RADIUS service sends the dynamic shared secret to the WAP, and informs the WAP that access was granted for the client.
- The shared secret is used to encrypt and decrypt communication transmitted between the client and WAP.
1
The main configuration settings that you have to specify when you configure your wireless access points (WAPs), so that wireless clients can access the network are listed below:
- Configure a remote access policy that allows wireless connections.
- Set the encryption method as WEP encryption or WPA encryption.
- Specify the level of encryption.
- Set 802.1X authentication.
- Set the authentication method.
- Configure the IAS RADIUS servers' IP address.
- Configure the WAPs on the IAS server as RADIUS clients
- Set the shared key that matches to the shared secret that was defined when IAS was configured.
The remote access policy that you configure for wireless users must include the information listed here:
- Access method set as wireless access.
- User or Group set as the user/group for your wireless users.
- Authentication method set as smart card/certificate.
- Policy encryption level should be set to the strongest encryption level.
- Permission set to grant remote access permission.
How to configure IAS for the wireless access point
- Click Start, Administrative Tools, and then click Internet Authentication Service to open the Internet Authentication Service console.
- In the console, right-click RADIUS Clients and then select New RADIUS Client from the shortcut menu.
- The New RADIUS Client Wizard starts.
- Add client information for the wireless access point and add the wireless clients as RADIUS Clients. Click Next.
- On the New RADIUS Client screen, select the RADIUS Standard option from the Client-Vendor drop-down list box.
- Specify the shared secret password.
- Click Finish.
How to configure a remote access policy for IAS clients
- Click Start, Administrative Tools, and then click Internet Authentication Service to open the Internet Authentication Service console.
- In the console tree, expand Internet Authentication Service.
- Select Remote Access Policies.
- In the right pane, select and double-click the policy which you need to configure.
- Click the Edit Profile button.
- Click EAP Methods on the Authentication tab.
- Click Add in Select EAP providers, select Protected EAP (PEAP), and then click OK.
- Now, click Protected EAP (PEAP) in Select EAP providers, and then click the Edit button.
- The Protected EAP Properties dialog box opens.
- Using the Certificate Issued drop-down list box, select the certificate which the server will utilize for clients to identify it.
- Check the Enable Fast Reconnect checkbox.
- In the EAP Type box, select Secure password (EAP-MSCHAPv2)
- Click OK.
1
1
1
How to configure a RRAS server for RADIUS accounting
- Click Start, Administrative Tools, and then click Routing And Remote Access to open the Routing And Remote Access management console.
- In the console tree, right-click the server that you want to configure and then select Properties from the shortcut menu.
- Switch to the Security tab.
- From the Accounting Provider drop down list, select the RADIUS Accounting option.
- Click the Configure button.
- Provide the IP address of the IAS server, or alternatively, provide the host name of the IAS server.
- Ensure that RRAS and IAS have a common shared secret.
- Click OK.
How to configure IAS logging
You can configure IAS to log:
- Authentication requests
- Accounting requests
To configure IAS to track user connection attempts
- Click Start, Administrative Tools, and then click Internet Authentication Service to open the Internet Authentication Service management console.
- In the left pane of the console, click the Remote Access Logging node.
- In the right pane of the management console, right-click Local File and then select Properties from the shortcut menu.
- The Local File Properties dialog box opens.
-
To enable IAS logging, select the following options:
- Authentication Requests
- Account Requests
- Periodic Status
- Click OK.

Follow Us!