192.168.0.1 is a private IP address that is commonly used by Netgear and D-Link routers. The Netgear and D-Link brands are competitors to the Linksys division of Cisco, Incorporated and make a large number of the Internet routers used world-wide. The network address is not granted to the Netgear and D-Link companies exclusively; however, as other major router manufacturers are free to choose to use same default address if desired. If there is another router installed on a local network that uses the same default IP, it may be changed through accessing the network router’s administrator console. In addition to being used for the router’s initial setup; 192.168.0.1 is also used to identify network connectivity problems with D-Link and Netgear products.
How Do IP Addresses Work?
Internet Protocol (IP) addresses are 32 bit numbers that are assigned to devices capable of connecting to a network implementing the protocol. These include but are not limited to computer(s), printers, routers, and mobile devices. The IP address is used for network identification and addressing. Of the 32 bits that make up an IP address, the numbers are referred to as “octets” since they each have 8 positions in binary form that have 32 bits. Each of these “bits” can be a 1 or 0, or on/off. This gives a total of 256 numbers per octet with a total address space of just below 4.3 billion. Of these total numbers of addresses, there are sets that are “restricted” for use as an external IP address. These include 127.0.0.1 which is the loopback address, 255.255.255.255 for network broadcast, and private addresses such as 192.168.0.1.
How Do Private IP Addresses Work?
192.168.0.1 is a private address as defined by the Internet Assigned Numbers Authority. The IANA defines predetermined ranges of IP addresses that are reserved for private use and are normally used on a local network or individual machine for specified tasks. If a networked device attempts to use a private IP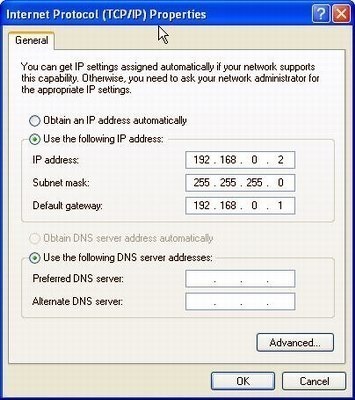 address as its identifier, it will not be able to connect to the Internet. Additionally, a networked device located outside of the network will not be able to connect to a computer or networked device using a private IP address directly. These types of connections are forced to go through a device or router than implements Network Address Translation (NAT) that offers another layer of security for the local network.
Private IP address ranges:
10.0.0.0 through 10.255.255.255
169.254.0.0 through 169.254.255.255
172.16.0.0 through 172.31.255.255
192.168.0.0 through 192.168.255.255
192.168.0.1 as a Default IP Address
192.168.0.1 is most commonly used as the Netgear or D-Link default IP address for local router configuration. The other commonly used default IP addresses for routers include 192.168.2.1 and 192.168.1.1 which are also in the reserved range by the IANA for private use. The primary use of the default Netgear and D-Link IP address is to allow an end-user or network administrator to connect to the network router to configure the Internet connection, security settings, or generally conduct network administrator functions.
How Do You Access the Netgear Router Setup?
192.168.0.1 is used to access the Netgear router setup page. The most common reasons that home or end-users will access this page is to change or set the wireless security mode, set or change the SSID (network name) and to set or change the network security key(s). *Note, on some versions of Netgear routers it is reported the company has switched the default IP address for router configuration to 192.168.1.1. If 192.168.0.1 throws an error or otherwise does not work, try using the alternative default IP address for accessing the Netgear configuration screen.
Step 1 – Power up or turn on the Netgear router.
Step 2 – Connect the computer to the router using an Ethernet cable. Routers will not allow the end-user to change configuration using a wireless connection at the time of this writing and require the hard-wired connection.
Step 3 – Open your computer’s web browser and enter “192.168.0.1” in the browser address bar. Then, click or press the “Enter” or “Return” key based on your model of computer.
Step 4 – Input the username and password that you have previously setup for the Netgear router. If you have not changed the default login and password, you can use “admin” for the login and “password” for the password followed by clicking the “Ok” menu button. Other alternative passwords for different models of Netgrear passwords include “1234”, “Password” (capital P), or “admin”.
Step 5 – After you are logged into the router, the web browser will display the main configuration page for the Netgear router. Select the “Wireless Settings” menu option on the left-hand side of the page to view and/or modify the wireless encryption type, password/passphrase, and SSID for your network. When complete with entering or changing the router settings, click the “Apply” menu button.
How Do You Reset the Netgear Router?
Besides the initial configuration of the Netgear router using the default IP address 192.168.0.1, another use is to reset the router to the default settings. This need will typically come up when a consumer forgets the network or router login(s)/ password(s) or generally has problems with the device. When a Netgear router is rest all of the networking information previously entered by hand will be lost. Ensure items such as the ISP username, ISP password, ISP addresses, ports, services, etc are recorded before resetting the device or you may lose all connectivity in your home or apartment as a result of the reset process.
Step 1 – If there is a reset button on the rear panel of the Netgear router, then it can be reset without downloading the current firmware for the router. If you have not already written down the required ISP information for re-establishing a connection do so now.
Step 2 – Press and hold the reset button located on the rear of the router until the router test light blinks. For new or “newish” Netgear routers this will take approximately 10 seconds and require the use of a pen or paperclip to access the button.
*Note – to restore the DGN2000 and DG834Gv5 routers the equivalent of pressing the “Reset Button” is to press both the WPS and Wireless button located on the side of the router for five seconds.
**Note 2 – The Netgear R314, FR318, and FV318 routers require reloading the router firmware to recover a lost password before proceeding with the reset steps.
Step 3 – Release the rest button and wait for the Netgear router to reboot.
Step 4 – Login to the router using the default username of “admin” and password of either “password” or “1234”.
Step 5 – If the configuration was not reset, then unplug the router’s power and press and hold the reset button. Then, with the button pressed reconnect the power and wait for 20 seconds (with the button pressed).
Step 6 – Wait for the router to reboot and login with the default user name and password.
How to Access the D-Link Router Setup?
Step 1 – Turn on the D-Link router. Then, connect your computer to the router using an Ethernet cable. On older versions of Microsoft Windows, you may have to restart the computer after connecting to the router for Windows to recognize the connection.
Step 2 – Launch or open the web browser on your computer. Then, enter “192.168.0.1” in the web browser address bar followed by pressing the “return” or “enter” key.
Step 3 – Enter “admin” for the user name and leave the password field blank if you have not configured a different login and password for the D-Link router.
Step 4 – After successfully logging in to the router, you can choose the “Run the Wizard” menu option to guide you through the router configuration or choose the “Wireless” link located on the left-hand menu to manually configure the routers configuration and security settings.
Step 5 – Enter the SSID, connection channel, and Key in the subsequently displayed menu for your network. Newer D-Link routers support up to four keys to be entered at one time in the router; however, only one key will be active for the network at a time.
How to Reset the D-Link Router?
Before resetting the D-Link router ensure that you note the specific ISP, wireless, and other network settings that are required to establish a successful network connection. Once the router is reset, you will not be able to recover the information that has been stored in the router.
Step 1 – Locate the reset button on the router. It will be recessed and located near the connection for the power adapter for the device.
Step 2 – Press and hold the reset button on the router for 10 seconds. A small object such as a paper clip can be used to hold the button down. Ensure the router is not powered off while the reset process is ongoing.
Step 3 – Wait for the D-Link router to restart or rebook. Once the visual WLAN light stops blinking, the router will be reset.
Step 4 – Connect the computer to the router using an Ethernet cable and enter “192.168.0.1” in the web browser’s address bar followed by clicking the “enter” or “return” key on your computer.
Step 5 – Enter “admin” as the default username and leave the password field blank.
Step 6 – Proceed to configure the router’s security and other network settings as required.
How to Enhance Wireless Home Security
Using the 192.168.0.1 default Netgear and D-Link IP address is the first measure that home network or business administrators can take to ensure a proper degree of network security. Many times, consumers will avoid creating a unique SSID, choosing an encryption standard, or entering a wireless password to get online faster. As a result, the network is left unsecure. Even with many of the newer wireless routers coming with security features enabled as a default, many consumers will actually take the time to remove the basic security measures to make it easier for both themselves and potentially rogue actors to access their network without permission.
Step 1 – Access your D-Link or Netgear router using the default IP address, 192.168.0.1, and change the default router login and password. Just because the router is located in your home, apartment, or other “secure” area does not mean that at some point it can’t be accessed by someone with the “know how” to use the default login and password to access the device putting the consumer at risk.
Step 2 – Create a unique SSID or network name for the home or local network. The Netgear and D-Link routers will ship with a default SSID that is broadcast to others within range of the device. The SSID can be changed on the wireless settings or equivalent setup page and should not be the name of your organization, company, or family (if for the home). The option to broadcast the SSID should be de-selected.
Step 3 – Enable wireless security on the router. The strongest security standard that all of the wireless devices used in the home support is the preferred option. For new equipment all-around, WPA is the current standard of choice. WEP is the default if there is a mix of older and newer devices expected to use the network. Each security type then lets the administrator set the network password or passphrase. When choosing the phrase, ensure that you make the password long and use a mix of numbers, letters, and if permitted symbols to make it harder to crack by a hacker.
Step 4 – A number of consumers will enable MAC address filtering as an added layer of security. When this option is selected, the physical MAC address of each device that is going to connect to the network is required to be entered in the router security configuration. MAC filtering takes additional time to collect the addresses and add to the network configuration, but gives some network administrators a greater sense of comfort. It should always be combined with wireless encryption; however, as even MAC filtering by itself can be spoofed or have vulnerabilities if not combined with encryption.
Step 5 – Enable the firewall on the Netgear or D-link router as well as all client computers on the network. This will help ensure that the network and clients are better protected against network intrusions at multiple levels.
Follow Us!