Active Directory security is determined by the following components:
* Security groups: A security group is a made up of a set of users, and is created to assign permissions to access resources, and to assign user rights to group members. Permissions control access to resources, while user rights define what actions users can perform. Security groups are considered security principal accounts because they can contain user accounts. It is the security principal accounts that are used in authentication and access control. The security settings of a security principal account controls whether the user, group, or computers are authorized to access the following:
- Active Directory
- Domain controllers
- Member servers
- Client computers
- Applications
- Printer and file system objects
- Other network components
* Access Control: While authentication verifies the identity of a user or computer, access control determines what resource the user can use in Active Directory, and it defines the manner in which the user can use a resource. The elements that determine what permissions a particular user has to an object in Active Directory are listed below:
- Security descriptors: Active Directory objects use security descriptors to hold information on permissions that is found in access control lists (ACLs). Security descriptors control a user’s access permissions to an Active Directory object, and define what tasks a user can perform with an object.
- Object Inheritance: Object inheritance deals with whether the permissions of a parent object are inherited by child objects.
- Authentication: Authentication is used to check and verify the logon credentials provided by a user.
Access control and authentication are extremely important components in Active Directory security. The components that are used in access control are:
- Access Control Entry (ACE): An ACE stores the access permissions for an Active Directory object.
- Access Control List (ACL): An ACL contains ACEs and controls access to objects. The ACL of an Active Directory object determines which users are allowed to access the object, and what type of actions they are permitted to perform on the object. The two types of ACLs are Discretionary Access Control Lists and System Access Control Lists.
- Discretionary Access Control Lists (DACLs): DACLs contains ACEs for users and groups, and controls whether the user/group has access to specific resources, such as files. It is the DACL that defines the users/groups that are allowed to access an object in Active Directory.
- System Access Control Lists (SACLs): SACLs determine whether user or group access to an object should be tracked. The ACE in the SACL also lists the activities that should be audited.
- Security Identifier (SID): A SID represents a security principal.
- Access Token: An access token contains a SID and other necessary security information on a user that is needed to determine whether the user is permitted access to the object.
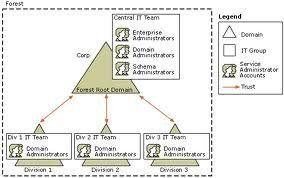
* Delegation of control: As an administrator, you can delegate administrative control of domains, organizational units (OUs) and containers in Active Directory to other administrators, users, or even groups.
* Group Policy: Active Directory security is controlled by security settings, software restriction policies, and audit policy in Group Policy. This is discussed in greater detail throughout the remainder of this Article.
In Active Directory, you can apply standard permissions or special permissions to Active Directory objects. The standard permissions which are typically applied to Active Directory objects are listed below. Special permissions provide an additional level of access that can be assigned to users.
* Full Control, Read, Write, Create All Child Objects, and Delete All Child Objects
Security Settings in Group Policy
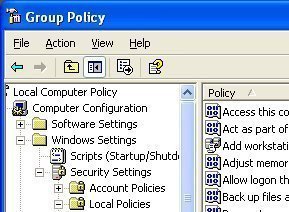
In Active Directory, group policy information is held in Group Policy Objects (GPOs). You can set security permissions on GPOs which would determine those users who should access group policy settings contained in the GPO. Security settings essentially define how the system behaves in the context of security. The Group Policy Object Editor console is the MMC that contains security settings for both user configuration and computer configuration. Computer configuration security settings provide additional control over objects in Active Directory.
You can configure the following security settings using the Security Settings extension of the Group Policy Object Editor console:
* Account Policies: Contains attributes for password policy, account lockout policy and Kerberos policy. Password policy determines settings for passwords for domain user accounts, and local user accounts. Account lockout policy determines when a domain user account or a local user account is locked, and prevented from accessing the network.
* Local Policies: Local Policies settings relate to the local security settings of any computer accounts that the GPO is applied to. Local Policies contain attributes for audit policy settings, user right assignment settings, and security options settings. Audit policy determines those events that should be tracked and logged in the computer’s security log. User right assignment determines whether a user or group has user rights on the computer, and security options either enables or disables security setting such as the digital signing of data for the computer.
* Event Log: Settings for application, system and security event logs are located here.
* Restricted Groups: Restricted Groups contains groups for specific security restrictions. You can configure Restricted Groups to ensure that group memberships remain defined as it was specified.
* System Services: System Services contains security settings that control startup settings for system services running on the computer. The startup settings that can be set are Automatic, Manual and Disabled.
* Registry: Registry contains registry keys and is used to configure security on these keys.
* File System: File System contains files and folders, and is the location where you can specify security for files/folders, such as access control, auditing, and file/folder ownership.
* Wireless Network Policies: Wireless Network Policy contains polices that control wireless network connections. The Wireless Network Policy Wizard is used to configure properties such as name, description, Wireless network key (WEP) settings, and IEEE 802.1x settings for these polices.
* Public Key Policies: Public Key Policies contains the following security settings: Encrypting File System (for adding data recovery agents, and for editing existing data recovery agents security settings); Automatic Certificate Request Settings (for specifying that a computer can automatically forward a certificate request to an enterprise certification authority, and also install a certificate once it is issued); Trusted Root Certification Authorities (for creating trust in a root certification authority that is outside to the organization); Enterprise Trust (for creating/sending a certificate trust list); Autoenrollment Settings (for enabling/disabling automatic enrollment of computer certificates and user certificates via Group Policy).
* Software Restriction Policies: Software Restriction Policies contains settings that restrict access to software that you do not want to be run on your computers or domain.
* IP Security Policies: Software Restriction Policies contains settings for configuring network Internet Protocol (IP) security.
An Overview of Software Restriction Policies
Through the use of software restriction policies in a GPO, you can specify settings that prevent untrusted code from running on the computer, domain, organizational unit (OU) , or site. By using a set of rules, you can identify and specify the applications that are allowed to run within your environment, or that are prevented from being executed. Soft ware Restriction settings reside in the Security Settings area of Group Policy. You can implement software restriction policies that apply to users, by configuring security setti ngs in User Configuration; or you can implement software restriction policies that apply to computers, by configuring security settings in Computer Configuration.
When software needs to be executed on the computer, it is the software restriction policies that have to identify the software, and ascertain whether the software is allowed to be executed. Software can be identified by the following components:
* A hash
* A certificate
* A path
* An Internet zone
A few security benefits realized by software restriction policies are listed below:
* You can configure settings that control which applications are allowed to be executed within your environment.
* You can set controls that can prevent files from being executed on the local computer, domain, organizational unit, or site.
* If you have multiple users on computers, you can set software restriction policies that only allow users to execute predetermined files on these computers.
* You can also specify whether the software restriction policies’ settings should be enforced for all users, or for only a set of users.
* You can control which users are permitted to add trusted publishers to a computer.
Software restriction policies have a security level set to either Unrestricted or Disallowed. These security levels are used to either allow or disallow software from executi ng after it has been identified:
* Unrestricted: This security level enables software to execute based on the rights of the user currently logged on to the computer. You can set rules that prevent ce rtain software from executing. When a GPO is created, Unrestricted is the default security level.
* Disallowed: This is the security level that basically prevents software from running on the computer. The rights of the user currently logged on to the computer are ignored. You have to explicitly define rules for the software that are allowed to run. For a computer to execute a logon script, you have to specify a path rule that permits the logon script to run. Because some programs actually launch other programs, you need to define a path rule for those programs as well.
When the security level is set to Disallowed, the registry path rules listed below are automatically created. These registry path rules basically act as a preventative that assis ts in preventing Administrators and users from being locked out of the system.
- %HKEY_LOCAL_MACHINESOFTWAREMicrosoftWindows NTCurrentVersion Systemroot%
- %HKEY_LOCAL_MACHINESOFTWAREMicrosoftWindows NTCurrentVersion Systemroot%*.exe
- %HKEY_LOCAL_MACHINESOFTWAREMicrosoftWindows NTCurrentVersion Systemroot%System32*.exe
- %HKEY_LOCAL_MACHINESOFTWAREMicrosoftWindowsCurrentVersion Programfilesdir%
There are four types of software policy rules that include security settings (Unrestricted, Disallowed); which can be used to identify those applications that policy should be applied to.
* Hash Rule: A hash is a set of bytes, calculated by a hash algorithm that identifies an application or file. The system creates the hash for the file when you create a hash rule. The security level set in the hash rule would define whether users are allowed or disallowed to run the file. The system computes a hash on each file that a user ac cesses. When the hash performed on the file corresponds to the hash in the hash rule, the hash rule is applied. When files are moved to a different location, the hash rule for th e file remains intact.
* Certificate Rule: When you want to identify software through certificates, you would create a certificate rule. The certificate rule contains those files which you specified as being signed by certificates. When a file is being accessed, the system determines whether the file’s certificate settings correspond with the certificate specified in the rule. The certificate rule is implemented when a match occurs.
* Path Rule: A path rule identifies software according to the location of the software’s file path. When creating these rules, you can specify the path to a folder, o r a path to a file, or a path to a set of files as defined by a wildcard. Registry path rules can also be created. Path rules become invalid when programs are moved to different locations.
* Internet Zone Rule: An Internet zone rule identifies software through a zone (Internet, Local Computer, Local Intranet, Restricted Sites, and Trusted Sites) which i s defined in Internet Explorer. These rules can only be created and applied to Windows Installer packages.
Because you can create and apply more than one software policy rule to the same software, an order of precedence is applied. A rule that has a higher precedence supersedes an other rule which has a lower precedence. The order of precedence (highest to lowest) employed to apply software policy rules are listed below:
1. Hash rule
2. Certificate rule
3. Path rule
4. Internet Zone rule
Implementing and Configuring Software Restriction Policies
The Security Settings area of Group Policy contains the security settings for Software Restriction. Because software restriction policies are generally not enabled by default , you would possibly need to enable it. Once Software Restriction is enabled, the Security Settings area contains the following settings:
* Enforcement policy: These settings specify whether software policies should be enforced for all files, or whether software policies should exclude library (.dll) fi les; and whether is should be applied to all users, or whether it should exclude Administrators.
* Designated file types policy: For specifying those file types to which software restriction policies should be applied. File types are specified by file extension.< /li>
* Trusted Publishers policy: These settings are used to set the user level that is permitted to enable trust for software publishers.
* Additional Rules: Any software policy rules which you create are located in this folder.
Implementing software restriction policies involves the following tasks:
* Configuring the default security level
* Creating and configuring software policy rules
* Specifying the designated file types for computer policies and user policies
How to configure the default security level
1. Open the Group Policy Object Editor console for the GPO.
2. Click Computer Configuration, and expand Windows Settings, Security Settings, and then expand Software Restriction Policies.
3. Double-click Security Levels in the details pane.
4. Right-click one of the security levels listed below, and then select Properties from the shortcut menu:
* Disallowed
* Unrestricted
5. When the dialog box opens, select Set As Default.
How to create a hash rule
1. Open the Group Policy Object Editor console for the GPO.
2. Select Computer Configuration, and expand Windows Settings, Security Settings, and then expand Software Restriction Policies.
3. Right-click Additional Rules, and then select New Hash Rule from the shortcut menu.
4. When the New Hash Rule dialog box opens, click the Browse button to browse to the appropriate file. You can alternatively paste an already calculated hash in the File Hash b ox.
5. In the Security Level drop down list box, select one of the following options: Disallowed, or Unrestricted
6. In the Description box, enter a description for the new hash rule
7. Click OK
How to create a certificate rule
1. Open the Group Policy Object Editor console for the GPO.
2. Select Computer Configuration, and expand Windows Settings, Security Settings, and then expand Software Restriction Policies.
3. Right-click Additional Rules, and then select New Certificate Rule from the shortcut menu.
4. When the New Certificate Rule dialog box opens, click the Browse button to browse to the appropriate certificate.
5. In the Security Level drop down box, select one of the following options: Disallowed, or Unrestricted.
6. In the Description box, enter a description for the new certificate rule.
7. Click OK.
How to create a path rule
1. Open the Group Policy Object Editor console for the GPO.
2. Select Computer Configuration, and expand Windows Settings, Security Settings, and then expand Software Restriction Policies.
3. Right-click Additional Rules, and then select New Path Rule from the shortcut menu.
4. When the New Path Rule dialog box opens, click the Browse button to browse to the folder or path. If you know the path, simply enter it in the Path box.
5. In the Security Level drop down box, select one of the following options: Disallowed, or Unrestricted.
6. In the Description box, enter a description for the new path rule.
7. Click OK.
How to create a registry path rule
1. Click Start, Run, and enter regedit in the Run dialog box. Click OK
2. The Registry Editor opens.
3. Locate and right-click the registry key that you want to create a new registry path rule for, and select Copy Key Name from the shortcut menu.
4. Record the Value name that is listed in the details pane, and close the Registry Editor.
5. Open the Group Policy Object Editor console for the GPO.
6. Select Computer Configuration, and expand Windows Settings, Security Settings, and then expand Software Restriction Policies.
7. Right-click Additional Rules, and then select New Path Rule from the shortcut menu.
8. When the New Path Rule dialog box opens, enter the registry path in the Path box. The path that you enter should be wrapped in percent signs – %.
9. In the Security Level drop down box, select one of the following options: Disallowed, or Unrestricted.
10. In the Description box, enter a description for the new registry path rule.
11. Click OK.
How to create a internet zone rule
1. Open the Group Policy Object Editor console for the GPO.
2. Select Computer Configuration, and expand Windows Settings, Security Settings, and then expand Software Restriction Policies.
3. Right-click Additional Rules, and then select New Internet Zone Rule from the shortcut menu.
4. When the New Internet Zone Rule dialog box opens, choose a zone in the Internet Zone list box.
5. In the Security Level list box, select one of the following options: Disallowed, or Unrestricted.
6. In the Description box, enter a description for the new Internet zone rule.
7. Click OK.
How to configure designated file types
1. Open the Group Policy Object Editor console for the GPO.
2. Select Computer Configuration, and expand Windows Settings, Security Settings, and then expand Software Restriction Policies.
3. Double-click Designated File Types in the details pane.
4. When the Designated File Types dialog box opens, enter the filename extension in the File Extension box.
5. Click Add.
6. Click OK.
How to delete a designated file type
1. Open the Group Policy Object Editor console for the GPO.
2. Select Computer Configuration, and expand Windows Settings, Security Settings, and then expand Software Restriction Policies.
3. Double-click Designated File Types in the details pane.
4. When the Designated File Types dialog box opens, click the file type that you want to delete in the Designated File Types list box.
5. Click Delete.
6. Click OK.
How to prevent software restriction policies from being applied to Administrators
1. Open the Group Policy Object Editor console for the GPO.
2. Select Computer Configuration, and expand Windows Settings, Security Settings, and then expand Software Restriction Policies.
3. Double-click Enforcement in the details pane.
4. When the Enforcement Properties dialog box opens, select the All Users Except Local Administrators option
5. Click OK.
How to configure trusted publisher settings
1. Open the Group Policy Object Editor console for the GPO.
2. Select Computer Configuration, and expand Windows Settings, Security Settings, and then expand Software Restriction Policies.
3. Double-click Trusted Publishers in the details pane.
4. When the Trusted Publishers Properties dialog box opens, select the users that should be permitted to select trusted publishers. The options are: End Users, Local Computer A dministrators, and Enterprise Administrators.
5. Click OK.
An Overview of Audit Policies
Auditing is the procedure of monitoring and tracking system and user activities on the computer in order to detect any likely instances where network resources are being misu sed. Through auditing, you can identify security violations. When discussing auditing, the terminology used to describe user and computer activities that are being tracked is eve nts. You can define that information on an event be logged in a security event log. You can view this information by using the Event Viewer console.
The information recorded on an event in a security event log is listed below:
* The type of event logged: Error, Warning, or Information, and Success Audit or Failure Audit.
* The date on which the event occurred.
* The software or program that logged or recorded the event.
* The user that performed the action which resulted in an event being logged.
* The computer name on which this action was performed.
* The event identity number.
* The event description.
Before you can implement auditing for Active Directory objects, you have to first enable the Audit Directory Service Access option. The events that should be audited have to be included in an audit policy in a Group Policy Object (GPO). The audit policy specifies the categories of events to audit. The events are written to the security log on a compu ter. Event categories are specified in the Audit Policy extension in a GPO. You can define audit polices for the local computer, domain controller, domain or an organizational un it (OU).
The event categories that can be tracked for success or failure are listed below:
* Audit account logon events, Audit account management. Audit directory service access, Audit logon events, Audit object access, Audit policy change, Audit privilege use, Audi t process tracking, and Audit system events.
Implementing and Configuring Audit Policies
The tasks that need to be performed to implement an audit policy are noted below:
* Enable the categories of events to audit
* Specify which objects should be audited
* Specify which actions should be logged in the audit log
* Set the size and storage settings for the audit log
How to specify the event categories to audit for the local computer
1. Click Start, Administrative Tools, and then click Local Security Policy.
2. In the left pane, in Security Settings, expand Local Polices, and then click Audit Policy.
3. In the details pane, right-click the particular event category which you want to audit; and then select Properties from the shortcut menu.
4. When the Properties dialog box of the event category opens, select one or both of the following options: Success, Failure.
5. Click OK.
How to specify the event categories to audit for domain controller while logged on to a domain controller
1. Click Start, Administrative Tools, and then click Active Directory Users And Computers.
2. In the left console pane, right-click the Domain Controllers OU, and then select Properties from the shortcut menu.
3. You can add a new policy, or choose an existing policy on the Group Policy tab. Click Edit.
4. In the Group Policy Object Editor console, in the left console tree, expand Computer Configuration, Windows Settings, Security Settings, Local Policies and then expand Audit Policy.
5. In the details pane, right-click the particular event category which you want to audit; and then select Properties from the shortcut menu.
6. When the Properties dialog box of the event category opens, select one or both of the following options: Success, Failure.
7. Click OK.
How to specify the event categories to audit for a site, domain, or OU while logged on to a domain controller
1. Click Start, Administrative Tools, and then click Active Directory Users And Computers.
2. In the left console pane, right-click the site, domain, or OU; and then select Properties from the shortcut menu.
3. Click the Group Policy tab, add a new policy, and click Edit.
4. In the Group Policy Object Editor console, in the left console tree, expand Computer Configuration, Windows Settings, Security Settings, Local Policies and then expand Audit Policy
5. In the details pane, right-click the particular event category which you want to audit; and then select Properties from the shortcut menu.
6. When the Properties dialog box of the event category opens, select one or both of the following options: Success, Failure.
7. Click OK.
How to configure Active Directory objects for auditing
User access to objects in Active Directory can be audited. You have to though select the Audit directory service access event category in the Audit Policy extension in the GP O.
Use the steps below to configure auditing for Active Directory objects.
1. Open the Active Directory Users And Computers console.
2. Ensure that Advanced Features are enabled. You can verify this on the View menu.
3. Select the Active Directory object which you want to configure auditing for, and then select Properties on Action menu.
4. When the Properties dialog box of the object opens, click the Security tab.
5. Click Advanced to move to the Advanced Security Settings For dialog box for the Active Directory object.
6. Click the Auditing tab.
7. Click Add, and then specify the users or groups for which you want to audit object access.
8. Click OK.
9. When the Auditing Entry For dialog box for the object appears, choose the event(s) that you want to audit by choosing either one of, or both of the following options: Succes sful, Failed; alongside the particular event(s).
10. Use the Apply Onto list box to set where the auditing should take place. The default setting is This Object And All Child Objects.
11. Click OK.
How to configure files and folders for auditing
1. Open Windows Explorer.
2. Right-click the file or folder which you want to configure auditing for, and then select Properties from the shortcut menu.
3. On the Security tab, click Advanced.
4. Click the Auditing tab on the Advanced Security Settings For dialog box of the file or folder.
5. Click Add, and then choose the users/groups for which you want to audit file or folder access. Click OK.
6. In the Auditing Entry For dialog box for the file/folder, select the events that you want to audit by checking either the Successful option, Failed option, or both of these options alongside the particular event(s).
7. Use the Apply Onto list box to specify the location where auditing should occur. The default setting is This Folder, Subfolders And Files.
8. Click OK.
How to configure printers for auditing
1. Click Start, and then select Printers And Faxes.
2. When the Printers And Faxes system folder opens, right-click the printer which you want to configure auditing for, and then select Properties from the shortcut menu.
3. On the Security tab, click Advanced.
4. Click the Auditing tab on the Advanced Security Settings For dialog box of the printer.
5. Click Add, and then choose the users/groups for which you want to audit printer access. Click OK.
6. In the Auditing Entry For dialog box for the printer, select the events that you want to audit by checking either the Successful option, Failed option, or both of these opti ons alongside the particular event(s).
7. Use the Apply Onto list box to specify the location where auditing should occur.
8. Click OK.
Managing Audit Policy Events Logged in the Security Event Log
How to view information in the security log
1. Open Event Viewer.
2. In the console tree in the left pane, click Security.
3. The details pane is populated with all events that exist in the security log, together with summary information such as Date, Time, Category, Event ID, and User; on each ent ry. A key icon is displayed alongside successful audit events, and a lock icon is displayed alongside unsuccessful audit events. You can double-click on an event entry to view it s properties.
How to set the size for the security event log
1. Open Event Viewer.
2. In the console tree in the left pane, right-click Security and then select Properties on the shortcut menu.
3. When the Security Properties dialog box opens, on the General tab, enter the maximum log file size. The default setting is 512 KB. You can set the maximum log file size to a ny size from 64 KB to 4,194,240 KB.
4. Choose one of the following options listed beneath the When Maximum Log File Size Is Reached section of the dialog box:
* Overwrite Events As Needed: When selected, the oldest events in the security log are replaced when new events need to be logged.
* Overwrite Events Older Than _ Days: Enter the number of days after which the system can overwrite an event.
* Do Not Overwrite Events (Clear Log Manually): When selected, you have chosen to manually clear the security log. The system does not overwrite or replace any events in the s ecurity log when the maximum log file size is reached. If the security log is not manually cleared, all new events are dropped, and are therefore not recorded in the security log.
How to manually clear the security log
1. Open Event Viewer.
2. In the console tree in the left pane, right-click Security and then select Clear All Events on the shortcut menu.
3. When the Event Viewer message box appears, click Yes to archive the existing entries in the security log prior to it being cleared; or click No to simply delete the existing entries in the log.
4. If you chose to archive the entries in the security log, enter a name and a file format for the log file.
5. Click Save.
How to archive a security log
1. Open Event Viewer.
2. In the console tree in the left pane, right-click Security and then select Save Log File on the shortcut menu.
3. Enter a name for the file and then enter a file format for the file.
4. Click Save.
How to locate specific events in the security log
1. Open Event Viewer.
2. In the console tree in the left pane, click Security
3. On the View menu, click the Find option.
4. The Find In dialog box for the security log opens. This is where you specify the search criteria that you want to use to locate a specific event(s) in the security log.
5. In the Event Types section of the Find In dialog box, specify the types of the event which you want to find.
6. In the Event Source list, choose the source that logged the event(s) which you want to find.
7. In the Category list, choose the event category.
8. In the Event ID box, enter the event identity number.
9. In the User box, enter the user name.
10. In the Computer box, enter the computer name.
11. In the Description box, enter an event description.
12. In the Search Direction section of the Find In dialog box, set whether the security log should be searched from bottom to top, or vice versa.
13. Click the Find Next button to start searching the security log based on your search criteria.
14. When an event is found, it is highlighted. You can click Find Next again to continue searching the security log for events which match your search criteria.
15. Click the Close button to stop the search.
How to filter events in the security log
When events are filtered, only those particular events that match the filter criteria are displayed in Event Viewer.
1. Open Event Viewer.
2. In the console tree in the left pane, click Security.
3. On the View menu, click the Filter option.
4. On the Filter tab, specify the filter criteria that you want to use to display a specific event(s) in the security log.
5. In the Event Types section of the dialog box, specify the types of events that you want to display in the security log.
6. In the Event Source list, choose the source that logged the event(s) which you want to display.
7. In the Category list, choose the event category.
8. In the Event ID box, enter the event identity number
9. In the User box, enter the user name.
10. In the Computer box, enter the computer name.
11. Use the From list boxes to enter the start parameters for the events which should be filtered.
12. Use To list boxes to enter the end parameters for the events which should be filtered.
13. Click OK to display the filtered events in the security log.
14. Clicking the Restore Defaults button on the Filter tab removes the security log filter.
Using the Security Configuration and Analysis Feature
Security Configuration and Analysis feature, initially introduced in Windows 2000, enables you to create, modify and apply security settings in the Registry through the use o f security templates. The tool is useful for scanning, analyzing, and setting local system security. A security template makes it possible for you to configure security settings and store these settings in a file. You can apply security templates which were created in the Security Templates console to the local computer by importing them into a GPO. The tool is also capable of comparing a security template(s) to the existing security settings of a local computer so that you can identify any potential security discrepancies. Once the analysis is complete, you are shown all detected discrepancies.
The common process for using the Security Configuration and Analysis tool is listed below:
1. Create, or open an existing security configuration and analysis database. This is the database that the Security Configuration And Analysis feature would compare the current security settings of the local computer to.
2. Analyze the system security of the local computer.
3. Examine the results of the security analysis, and resolve any reported discrepancies.
4. Export the security database settings to a security template.
How to access, and save the Security Configuration And Analysis console under the Administrative Tools menu.
1. Click Start, Run, and enter mmc in the Run dialog box. Click OK.
2. In the Console menu, click Add/Remove Snap-In, and click Add.
3. Click Security Configuration And Analysis, and then click Add
4. Click Close, click OK.
5. In the Console menu, click Save.
6. Enter a name for the console, and then click Save.
7. You can now access the Security Configuration And Analysis console from the Administrative Tools menu.
How to create a security configuration and analysis database
1. Open the Security Configuration And Analysis console.
2. Right-click Security Configuration And Analysis, and select Open Database on the shortcut menu.
3. To use an existing database, select the database, and click Open.
4. To create a new database, enter the name of the file in File Name, and click Open.
5. When the Import Template dialog box opens, choose the security template that should be imported into the new database. Click Open.
How to analyze the security settings of the local computer
1. Open the Security Configuration And Analysis console.
2. Right-click Security Configuration And Analysis and then select Analyze Computer Now on the shortcut menu.
3. When the Perform Analysis dialog box opens, verify that the path specified for the log file is correct. If not, enter the proper path for the log file.
4. Click OK to start the analysis of the computer.
5. You can view the contents of the log file by right-clicking the Security Configuration And Analysis, and then clicking View Log File on the shortcut menu.
1. Open the Security Configuration And Analysis console.
2. Expand Security Configuration And Analysis, expand the appropriate security policies node such as Account Polices or Local Policies, and then select the policy whose results you want to examine.
3. The analysis results are displayed in the details pane of the Security Configuration And Analysis console.
How to configure system security for the local computer so that it matches the security settings of the security configuration and analysis database
1. Open the Security Configuration And Analysis console.
2. Right-click Security Configuration And Analysis and then select Configure Computer Now on the shortcut menu.
3. Accept, or change the path for the log file.
4. Click OK.
How export the security database settings to a security template
1. Open the Security Configuration And Analysis console
2. Right-click Security Configuration And Analysis and then select Export Template on the shortcut menu.
3. Enter a name for the file in the File Name box; and in the Save In box, enter the path wherein the template should be saved.
4. Click Save.
Active Directory Security Best Practices
A few best practices for applying Group Policy (Security Settings) are summarized below:
* It is recommended to implement a small number of user policies and computer polices within your environment. Having a large number of user polices increases logon delays exp erienced by users because these policies run when the user logs on to the system. Having a large number of computer polices increases the time it takes for the computer to boot.< /li>
* You should generally refrain from implementing conflicting policies.
* Because OUs that only store user objects obtain account policy from the domain, it is only necessary to configure account polices for an OU when it includes computer objects .
* To ensure that the processing time of policies is as efficient as possible, ensure that only the relevant policy settings are processed.
* For simplicity, use unique GPO names.
* You should steer clear of linking the same GPO to a container multiple times. You should also avoid linking containers to a GPO that is located in a different domain.
* It is recommended to only use Restricted Groups for security to specify local groups on workstation or member servers.
* Configure any unused services so that it only starts manually.
* Ensure that the security event log size is suitable for the security requirements of the organization.
# To ensure that the processing time of policies is as efficient as possible, ensure that only the relevant policy settings are processed.
# For simplicity, use unique GPO names.
# You should steer clear of linking the same GPO to a container multiple times. You should also avoid linking containers to a GPO that is located in a different domain.
# It is recommended to only use Restricted Groups for security to specify local groups on workstation or member servers.
# Configure any unused services so that it only starts manually.
# Ensure that the security event log size is suitable for the security requirements of the organization.
A few best practices for implementing software restriction policies are summarized below:
* Always create a distinct GPO for software restriction policies. This allows you to disable software restriction policies in isolation to any other security settings.
* To ensure a thorough software restriction strategy, it is recommended to use software restriction policies in combination with access control settings.
* You should only implement a software restriction policy after you have thoroughly tested it. Bear in mind that setting restrictions on certain files can indeed have a negati ve impact on the operation of the computer or network. You should definitely perform exhaustive testing when using the Disallow option as the default security level.
* Because software restriction polices are not applied when the computer is started in Safe mode, use this mode when problems which relate to implemented software restriction polices occur.
* Never implement software restriction polices as a substitute to using anti-virus software. Both should be used.
A few best practices for implementing audit policies are summarized below:
* Before implementing any audit polices, define an audit plan that details what you want to audit, together with the resources that are accessible for auditing purposes.
* Configure an appropriate value (setting) for the maximum size of the security log. You should regularly archive security logs.
* To monitor when users log on to a domain or off from a domain, you should audit success events in the Account Logon Events category.
* To monitor when users log on to a computer or off a computer, you should audit success events in the Logon Events event category.
* To monitor when account and group properties are modified, audit success events in the Account Management event category.
* To monitor when the Local Security Authority (LSA) security policy settings are changed, audit success events in the Policy Change event category on your domain controllers.
* Most importantly, you should audit both success events and failure events in the System Events category, so that you can detect any system activity that could be indicative of unauthorized access attempts.
Raghu
1) Denying domain admins from creating as follows.
a) User creation & Deletion
b) group creation & deletion
c) OU creation & deletion
d) Dchp scope creation & deletion
e) DNS records creation & deletion
f) Group policy creation & deletion.
Diane Tobin Gee
ive got an exam tomorrow on adds im not very confident have u got any simple easy sets for me to follow, i can see that its all relatively straight forward but it looks so complicated?