An organizational unit (OU) is a container that logically organizes and groups Active Directory objects within domains. OUs are not part of the DNS namespace. They organize Active Directory objects into logical administrative groups. OUs therefore serve as containers in which users can create and manage Active Directory objects. OUs are considered the smallest unit to which an Administrator can assign permissions to resources within Active Directory.
An OU enables users to apply security policies, deploy applications, delegate administrative control for Active Directory objects, and run scripts. An important thing to understand is that OUs are not security principals. The user accounts, group accounts, and computer accounts within the OUs are security principals.
The Active Directory object types that can be located in OUs are listed below:
- User, group, and computer objects; shared folders, printers, applications, and other OUs from the same domain.

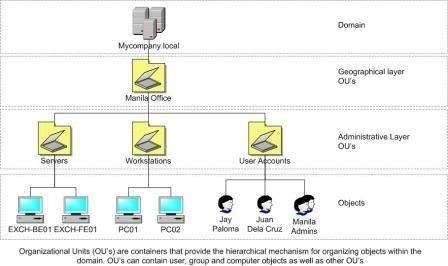
User objects are the main security principals used in Active Directory. A user object consists of the user name, password, group membership details, and other information that define the user. A group object prevents Administrators from setting individual user permissions. A set of users can be grouped then assigned the appropriate permission to Active Directory objects. A computer object contains information on a computer that is a member of the domain. Because OUs can contain other OUs, an Administrator can hierarchically group resources and other Active Directory objects to reflect the organization’s structure. The process of adding OUs to other OUs in a hierarchical manner is referred to as nesting OUs.
A few benefits of OUs are summarized below:
- OUs can be nested to support different hierarchy levels
- Each domain in the Active Directory environment can have its own OU structure. One domain’s OU structure is independent of another domain’s OU structure.
- It is fairly simple to change an OU structure. OU structures are much more flexible than domain structures.
- Objects in child OUs can inherit OU configuration settings.
- Group Policy settings can also be applied to OUs
- Users can delegate administrative control of Active Directory objects through OUs
OUs typically delegate administrative control for Active Directory objects to hide Active Directory objects and to administer Group Policy. When a user delegates administrative control over an OU, he/she enables other users or groups to administer the OU. Higher level administrators usually delegate administrative control. Delegation of control over OUs enables users to transfer management tasks to various users within the organization.
The administrative tasks that are usually delegated are listed below:
- Create, delete, and manage user accounts
- Create, delete, and manage groups
- Reset passwords on user accounts
- Read all user information
- Modify group membership
- Manage Group Policy links
Administrators that are responsible for domain management activities have full control over all Active Directory objects within the domain. This is the default configuration setting. These Administrators therefore create domain controllers, domains, and the OU for the domain. If there are units within the organization that need to manage and define their own OU structure, users can delegate the Full Control permission for an OU to these individuals. This would enable those individuals to perform all the previously mentioned management activities for the particular OU. In other instances, users might need to only delegate control for specific object classes for an OU.
As mentioned before, OU can also hide sensitive domain objects from particular users. This is done by creating an OU for those domain objects that will be hidden or that the user does not want everyone to view, then assigning only those users that should be allowed to give these objects the necessary permissions. After the appropriate permissions are configured for the OU, move the sensitive Active Directory objects to the OU.
Group policies can be defined as a collection of permissions that users can apply to Active Directory objects. Group policy settings can be linked to sites, domains, and OUs, and can apply to user accounts, computer accounts, and group accounts. Group policy settings are applied to OUs in the form of Group Policy Objects (GPOs). The GPO contains the Group policy settings that can be applied to users and computers in an OU.
Group policy is applied in the following order:
- Local computer policy
- Site policy
- Domain policy
- OU policy, commencing with the parent OU
However, Active Directory includes a No Override and Block Inheritance setting that can be used to control how policies are applied. The No Override setting can be enabled to stop a child OU’s policy setting from overwriting the parent OU policy setting. The Block Inheritance setting can be enabled to prevent a child OU and any objects that it contains from inheriting group policy settings from its parent OU.
Planning an OU Structure
When planning an OU structure, identify and define the following:
- The manner in which the enterprise is managed
- The OU structure for each domain
- The OUs that need to be created
- The manner in which group policy needs to be applied.
- The OUs for which administrative control will be delegated and the users that control will be delegated to.
- The sensitive Active Directory objects to be hidden from users.
The following strategy is generally recommended for an OU structure: Create an OU with the end result being that one group administrates the Active Directory objects within the OU. This enables users to grant the particular group the identical rights to all Active Directory objects in the particular OU and to the OU itself. Avoid an OU structure that results in the same group needing to manage objects over many different OUs. This would mean that the appropriate rights would need to be individually granted in each OU.
It is also good practice to assign an owner to each OU. The OU’s owner would be responsible for performing the following management tasks:
- Create, delete, and manage child OUs
- Apply group policy
- Delegate administrative control over objects in the OU
Also, separate service admin objects from the remainder of domain objects. Hiding service admin objects prevents all domain users from viewing its properties and attributes and it also enables users to effectively apply group policy so that only service admin users are able to perform certain administrative tasks.
Creating and Managing OUs
The Active Directory Users and Computers console in the Administrative Tools Menu is used to create OUs. When users create an OU, they are basically adding it to a particular domain first, then adding Active Directory objects to it, delegating administrative control for the OU or applying a GPO.
The OU’s Properties dialog box has a few tabs that manage the properties of the particular OU:
- General tab: Specify a description, street address, city, state or province, ZIP code or postal code, and country or region information for the OU on this tab.
- Managed By tab: This is the tab used to administer the settings of the OU’s owner. Enter the following information for the OU’s owner: name, office location, street address, city, state or province, country or region, telephone number, and fax number. The tab also contains the following buttons:
- Change: Click the Change button to set the user account that will be responsible for managing the OU.
- View: To view or change the properties of the user account currently managing the OU, click the View button.
- Remove: To remove a user account, click the Remove button.
- Group Policy tab: This tab contains the following buttons:
- New: To create a new GPO for the OU, click this button.
- Edit: To change the existing GPO settings, click the Edit button. The settings that can be specified for a GPO are categorized into Computer Configuration settings and User Configuration settings. Each of these is separated into the following categories: Software, Windows, and Administrative Templates.
- Add: To link a GPO to the OU, click this button to create the new GPO link.
- Options: To disable the GPO or ensure that the child OU’s GPO does not override the parent OU’s GPO, click this button. The options available are the Disable and the No Override options.
- Delete: To delete a GPO, click this button.
- Properties: To manage GPO properties, click this button. The GPO’s properties dialog box has a General, Links, and Security tab. The General tab has a Summary and Disable pane. Users can view information such as the GPO name and create a last modified date in the Summary pane. They can disable Computer Configuration settings and User Configuration settings in the Disable pane. The Link tab lists each site, domain, and OU to which the particular GPO is applied. The Security tab is where users set permissions for the GPO: Full Control, Read, Write, Create Child Objects, Delete Child Objects, and Apply Group Policy.
How to Create an OU
- Open the Active Directory Users and Computers console
- In the console tree, locate and right-click the appropriate domain, click New, then click Organizational Unit from the shortcut menu.
- In the New Organizational Unit dialog box, enter a unique name for the OU in the Name box.
- Click OK.
- Right click the new OU and select Properties from the shortcut menu.
- When the OU’s Properties dialog box opens, enter a description for the OU on the General tab.
- Click the Managed by tab to specify an owner for the OU.
- Click the Change button and choose the desired user account from the Users and Groups list box.
- Click the Group Policy tab.
- Click the New button to create a new GPO for the OU.
- Enter a name for the GPO.
- Configure all appropriate GPO settings for the OU with the remainder of the available buttons on the tab.
How to Create an OU Structure to Hide Sensitive Active Directory Objects
- Open the Active Directory Users and Computers console.
- In the console tree, locate and right-click the appropriate domain, then click New and Organizational Unit from the shortcut menu.
- In the New Organizational Unit dialog box, enter a unique name for the OU in the Name box.
- Click OK.
- Right-click the new OU and select Properties from the shortcut menu.
- When the Properties dialog box for the OU opens, click the Security tab.
- Remove any existing permissions for the OU.
- Click the Advanced button.
- When the OU’s Advanced Security Settings dialog box opens, uncheck the Allow Inheritable Permissions From The Parent To Propagate To This Object And All Child Objects checkbox. Click OK.
- In the Security tab, select and grant the appropriate group the Full Control permission. Grant the Read permission to those groups that should be able to read the OU’s contents.
- Click OK.
- Move the sensitive Active Directory objects to this particular OU.
How to Delete an OU
- Open the Active Directory Users and Computers console
- In the console tree, locate and expand the domain, then right-click the OU to be deleted and click Delete from the shortcut menu.
- Click Yes in the message box to verify that this particular OU should be deleted.
- Click Yes if another message box is displayed, prompting the user to verify that all objects located in the OU should be deleted.
How to Change OU Properties
- Open the Active Directory Users and Computers console
- In the console tree, locate and expand the domain, right-click the OU that properties will be configured for, and click Properties from the shortcut menu.
- Change the OU properties on the General tab, Managed By tab, and Group Policy tab.
- Users can also change the GPO that is linked to the OU or the existing GPO’s settings from the Group Policy tab.
How to Rename an OU
- Open the Active Directory Users and Computers console.
- In the console tree, locate and expand the domain, then right-click the OU to be renamed, and click Rename from the shortcut menu.
- Enter the OU’s new name.
How to Move an OU to a New Location
- Open the Active Directory Users and Computers console
- In the console tree, locate and expand the domain that contains the OU to be moved to a different location.
- Click the OU and drag it to its new location.
- Drop the OU in the new location.
How to Move Active Directory Objects between OUs with Drag and Drop
- Open the Active Directory Users and Computers console
- In the console tree, locate and expand the domain that contains the OU that holds the object to be moved to a different OU.
- Expand the OU.
- Click the object to be moved and drag the object to the other OU.
- Drop the object in the new OU location.
How to Move Active Directory Objects between OUs with ADUC Move Option
- Open the Active Directory Users and Computers console.
- In the console tree, locate and expand the domain that contains the OU that holds the object to be moved to a different OU.
- Expand the OU, right-click the object, then click Move on the shortcut menu.
- When the Move dialog box opens, choose the new OU location for the object.
- Click OK.
How to Move Active Directory Objects between OUs with the Dsmove Command-line Tool
Use the Dsmove command-line tool to move Active Directory objects between OUs and to rename an Active Directory object.
To use the Dsmove command-line tool to move Active Directory objects from one OU location to a different OU location:
- Click Start and Command Prompt.
- Enter dsmove with the proper parameters at the command prompt.
The command’s syntax is:
dsmove ObjectDN [-newname NewName] [-newparent ParentDN] [{-s Server | -d Domain}]
[-u UserName] [-p {Password|*}] [-q] {-uc | -uco | -uci}
- ObjectDN – the name of the Active Directory object to be moved to a different U.
- -newname NewName – to rename the Active Directory object
- -newparent ParentDN – for setting the new location to which the Active Directory object will be moved.
- {-s Server | -d Domain} – for connecting to a remote server or domain.
- -u UserName – the user name that the user utilizes to access the remote server.
- [-p {Password|*} – the password of the above specified user name.
- -q – sets output to quiet mode.
- -uc, uco, -uci – for setting the unicode format
How to Delegate Administrative Control of an OU
- Open the Active Directory Users and Computers console.
- In the console tree, locate and right-click the OU and choose Delegate Control from the shortcut menu.
- The Delegation Of Control Wizard launches.
- Click Next on the Welcome To The Delegation Of Control Wizard page.
- Click Add on the Users Or Groups page.
- When the Select Users, Computers, Or Groups dialog box opens, in the Enter The Object Names To Select list box, enter the user/group to which control will be delegated. Click OK then Next.
- When the Tasks To Delegate page opens, do one of the following:
- Select the Delegate The Following Common Tasks option, then choose the tasks to be delegated. Click Next. The Completing The Delegation Of Control Wizard page will be displayed. The tasks typically delegated are listed below:
- Create, Delete, and Manage user accounts
- Reset Passwords on User Accounts
- Read All User Information
- Create, Delete, and Manage Groups
- Modify the Membership of a Group
- Manage Group Policy Links
- Select the Create A Custom Task To Delegate option and click Next.
- Select the Delegate The Following Common Tasks option, then choose the tasks to be delegated. Click Next. The Completing The Delegation Of Control Wizard page will be displayed. The tasks typically delegated are listed below:
- When the Active Directory Object Type page opens, perform one of the actions listed below:
- Select the This Folder, Existing Objects In This Folder, And Creation Of New Objects In This Folder option to delegate administrative control for the OU, including all current objects in the OU, and to delegate administrative control for all new objects that will be created in the OU.
- Select the Only The Following Objects In The Folder option to delegate control for certain objects in the OU. Choose these objects.
- Limit the user/group to creating the selected objects in the OU by enabling the Create Selected Objects In This Folder checkbox.
- Also, limit the user/group to deleting the selected objects in the OU by enabling the Delete Selected Objects In This Folder checkbox. Click Next.
- When the Permissions page opens, enable one of the following checkboxes to display information in the Permissions: box:
- General – to list general permissions in the Permissions: box
- Property-Specific – to list property specific permissions in the Permissions: box
- Creation/Deletion Of Specific Child Objects – to list all permission that apply to the object in the Permissions: box
- After populating the Permissions: box, set the permissions for the user/group for the OU in the Permissions: box. Click Next.
- Verify that the correct settings were selected on the Completing The Delegation Of Control Wizard page.
- Click Finish.
Troubleshooting an OU Structure
The common problems that occur with OU structures are noted below:
- When users that should not be allowed to perform administrative tasks on OUs perform administrative tasks, verify that administrative control for the OU was delegated to the correct user or group. Verify the user or group specified for administrative control for each OU within the domain.
- If an OU contains objects that have a set of permissions applied when none was defined for the particular OU, verify that the OU is not inheriting permission settings from a parent OU. The default configuration is that a child OU and any objects that the child OU contains automatically inherits Group policy and other permission settings from its associated parent OU.


Gaby
Excellent information!!!
Thanks for sharing it!!
I have a question:
If I move a user from one OU to another, Has the user the same permissions that has in the first OU?
I hope you can help me.
Thank you!