When Active Directory was launched in Windows 2000, one of its key design features was to ease the process of deploying software within an organization. To this end, Microsoft included the ability to deploy and distribute software with Group Policy. IntelliMirror technologies include Group Policy software installation to simplify the management necessary for large quantities of users and computers. The Software Installation and Maintenance component of the IntelliMirror technologies can be used to publish applications over the network. Publishing is the terminology used to make applications available for installation from over the network. The Software Installation and Maintenance component can also automatically install applications based on certain predefined criteria on computers. For instance, applications can be automatically installed on computers based on specific users or groups or it can be automatically installed on specified computers. The Software Installation and Maintenance component can also be used to uninstall applications. To make these capabilities available, the Software Installation and Maintenance component of the IntelliMirror technologies interrelates with Group Policy and the Active Directory directory service.
In order to deploy software with Group Policy, the following conditions apply:
- The organization must be running a Windows 2000 or Windows Server 2003 Active Directory domain.
- Client computers must be running Windows 2000 Professional or later.
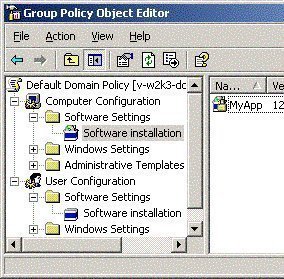
When using Group Policy to deploy software in an Active Directory domain, users basically need to edit an existing Group Policy Object (GPO) or create a new GPO. The GPO needs to be linked to a site, domain, or organizational unit (OU). A GPO that is linked to one these components has a Software Installation node located under the Computer Configuration node and a software installation node located under the User Configuration node. Users can access a GPO linked to a site, domain, or OU through the Group Policy Editor console. The Software Installation node in the Group Policy Object Editor console can be considered the main tool used to deploy software. The Software Installation node also enables the centralized management of the initial deployment of software and the removal of software. Users can also centrally manage software upgrades, hotfixes, and patches from this location.
Deploying software through Group Policy encompasses two types of software deployment:
- Assigning applications: the user should assign applications if certain users should have the applications available, irrespective of the actual computer the user is logged on to. Applications that are assigned are advertised to the user on the Start menu and are installed on initial use. Users can specify that the application be installed when someone next logs on to the workstation. Advertising is the process by which the application is prepared for installation. When Group Policy is used to deploy software and the software is included in the GPO linked to a site, domain, or OU, the software is referred to as being advertised to the user and computer. If assigning the application to a user, use the Software Installation node under User Configuration node, Software Settings. If assigning the application to a computer, use the Software Installation node under Computer Configuration, Software Settings.
The process for assigning applications is listed below:- When the user logs on to the client computer, the WinLogon process advertises the application(s) on the Start menu or on the user’s desktop.
- The user selects the application from either one of these locations.
- The Windows Installer service obtains the Windows Installer package for the selected application.
- The request for the software is next passed on to the software distribution point (SDP).
- The Windows Installer service initiates then installs the Windows Installer package for the requested software.
- The Windows Installer service opens the application for the user.
- Publishing applications: When an application is published in Active Directory, the application is advertised to users in Control Panel, in the Add/Remove Programs applet. What this means is that the application is not automatically installed for the user and the user actually controls whether and when the application is installed. The user also controls the uninstallation of the application.
The process for publishing applications is listed below:
- The user logs onto the client computer and opens the Add Or Remove applet in Control Panel.
- The Add Or Remove applet gets its information on which software is available for installation from Active Directory.
- The user proceeds to select which application to install.
- The Add Or Remove applet obtains the software’s location from Active Directory.
- The request for the software is passed on to the software distribution point (SDP).
- The Windows Installer service initiates then installs the Windows Installer package for the requested software.
- The user is now able to access the installed application.
In Group Policy, Software Installation utilizes the Windows Installer service to maintain and manage the state of software installation. The service runs in the background and enables the operating system (OS) to manage software installation based on information stored in the Windows Installer package.
Group Policy Software Installation Components
The components involved in deploying software through Group Policy are discussed next.
- Windows Installer package: This is a file with an .msi file extension that holds the instructions for installing, configuring, and removing software. The types of Windows installer packages are:
- Native Windows Installer package files: This type of Windows installer package is developed as a software component. The Windows Installer service can be fully utilized. The Native Windows Installer package files include one product that has numerous features that can be installed individually.
- Repackaged application files: The difference between the two packages is that repackaged application files include one product that is installed as one feature.
- Transforms: Another term used for transforms is modifications. A transform is basically a record of changes that were made to the original package file. Transforms enable users to customize Windows Installer packages and the installation features when they publish or assign the application. Through transforms, users can include and exclude features for the installation. The types of customization files that can be configured are listed below. Transform files have a .mst file extension:
- Transform files: Transform files enable users to customize the installation of the application.
- Patch Files: These files have a .msp file extension, are used to update existing Windows Installer packages with additional information, and are used for the following purposes:
- Software patches
- Service Packs
- Software Updates
- Application files: These are text files with a .zap file extension that include instructions on how to publish an application. Because .zap files do not support Windows Installer features, they deploy and install applications using its original Setup.exe or Install.exe program.
Planning for Deploying Software using Group Policy
When planning to deploy software through Group Policy, include the following:
- Encompass the organization’s software requirements into the strategy. Assess the organizational structure in Active Directory and identify the available GPOs.
- Define the manner in which the applications are going to be deployed to users or computers. Are the applications going to be published in Active Directory or assigned to users and computers?
- Test the manner in which the applications are going to be assigned to be published.
A few best practices and strategies to consider are listed below:
- Software can be deployed at the site level, domain level, or organizational unit level in Active Directory. It is recommended that users deploy software as high in the Active Directory hierarchy or tree as possible. Software should be deployed close to the root in the Active Directory tree because it allows users to use one GPO to deploy software to multiple users.
- Deploy multiple applications with a single GPO because it is easier to administer multiple applications from the same GPO than to manage multiple GPOs. User logon time is also accelerated because less GPOs need to be processed.
- If there are different users and computers that need different applications deployed, create OUs according to these software management requirements, place the necessary users or computers in the OU, then apply the GPO containing the software that should be deployed.
The Process for Deploying Software through Group Policy
The general process necessary to deploy software through Group Policy is summarized below:
- Create software distribution points (SDPs): One of the steps in deploying software is to ensure that users are able to access the necessary files. SDPs are the shared folders on the network that contain the files needed to install the deployed applications. Each user that will need to deploy software should be able to access the SDP. The NTFS permissions should be Read and Execute for the SDP and the necessary subfolders, so that users have permissions to access the folder that contains the software installation package.
- Create a GPO for software deployment and a GPO console for software deployment: When deploying software through Group Policy, the Group Policy Object Editor is used for the following tasks:
- Configure software deployment installation options.
- Assign applications
- Publish applications
- Upgrade applications
- Remove managed applications.
- Configure the software deployment installation properties for the GPO: The Software Installation Properties dialog box contains four tabs that are used to set configuration options for the software that should be deployed:
- General tab: This is where users set the default location of all packages, set the default value for publishing or assigning, and set installation user interface options.
- Advanced tab: This tab includes options such as automatically uninstalling applications when the GPO no longer applies to the user or computer, storing Object Linking and Embedding (OLE) information in Active Directory, and enabling 64-bit Windows clients to install 32-bit Windows Installer applications.
- File Extensions tab: Users configure which file extensions should be accessed by applications on the File Extensions tab.
- Categories tab: Applications categories serve a useful purpose when an organization has a large quantity of published applications. The Categories tab allows users to create and organize applications by categories so users are able to easily locate the applications in the Add/Remove Programs applet of Control Panel.
- Add the installation packages to the GPO: In this step, add the installation packages to the GPO and specify whether the application is to be assigned or published to users and computers.
- Configuring Windows Installer package properties: Once a WindowsInstaller package is added to a GPO, users can change the properties of the package to modify the category of the application, whether the application is assigned or published, configures security settings, and adds or removes transforms (modifications). The Properties dialog box for the Windows Installer package is where users configure Windows Installer package properties with the tabs listed below.
- General tab: This is where users change the package’s default name. Users can also select a support URL to direct users to a support Web page. Users can choose the support URL from the Add Or Remove Programs applet.
- Deployment tab: On the Deployment tab, select settings for the following:
- Deployment type
- Deployment options
- Installation user interface options
- Upgrades tab: The Upgrades tab is not available for packages that were created from application files or .zap files. The tab is used to install upgrades. The first step is to create a Windows Installer package that contains the upgrade. The second step is to configure settings for the upgrade in the Upgrades tab.
- Categories tab: This is where application categories are set so that users can easily locate the application in the Add Or Remove Programs applet in Control Panel.
- Modifications tab: This is where users customize an installation package by adding or removing transforms.
- Security tab: configure the users or groups that should be able to access the application on the Security tab.
How to Create a Software Distribution Point (SDP)
- Log on to the file server to be used as an SDP.
- Create the network share and the necessary folders for the software.
- The permissions that should be configured are listed below:
- Administrators: Full Control
- Everyone or Authenticated Users: Read
- Domain Computers: Read
- Copy the software, including all necessary files and components, to the SDP.
How to Create or Open a GPO and a GPO Console for Software Deployment
To create a new GPO:
- Open the Active Directory Sites And Services. To create and link a GPO to a domain or OU, open the Active Directory Users and Computers console.
- Right click the site, domain, or OU then click Properties on the shortcut menu.
- When the Properties dialog box of the site, domain, or OU opens, click the Group Policy tab.
- Click New and enter a name for the GPO.
- Click Close. The GPO is by default linked to the site, domain, or OU in which it was created.
To open an existing domain level GPO or OU level GPO:
- Open the Active Directory Users and Computers console.
- Right click the domain or OU in the left console pane and click Properties on the shortcut menu.
- Click the Group Policy tab.
- In the Group Policy Object Links list, select the GPO and click Edit.
- The GPO is opened in the Group Policy Object Editor console.
To open an existing site level GPO:
- Open the Active Directory Sites and Services console.
- Expand the Sites node.
- Right click the site in the details pane and click Properties on the shortcut menu.
- Click the Group Policy tab.
- In the Group Policy Object Links list, select the GPO and click Edit.
- The GPO is opened in the Group Policy Object Editor console.
To create an MMC for a GPO:
- Click Start, Run, enter mmc in the Run dialog box, and click OK.
- On the File menu, click Add/Remove Snap-In.
- Click Add in the Add/Remove Snap-In dialog box to access the Add/Remove Snap-In dialog box. Click Add.
- Select Group Policy Object Editor and click Add.
- Click Browse to find the GPO.
- Click the All tab in the Browse For A Group Policy Object dialog box.
- Select the GPO. Click OK.
- Close all open dialog boxes then click Save As in the MMC on the File menu.
- Provide a name in the File Name box. Click Save.
- The Group Policy Object Editor for the GPO can now be accessed under the Administrative Tools menu.
How to Open the Software Installation Snap-in
The Software Installation snap-in is a Group Policy Object Editor component.
- Open either the Active Directory Users and Computers console or the Active Directory Sites and Services console.
- Right click the site, domain, or OU then click Properties from the shortcut menu.
- Click the Group Policy tab.
- Either create a new GPO or edit an existing GPO.
- Click the Properties button then click the Security tab. Set the appropriate permissions for the GPO. Click OK.
- Choose the GPO and click Edit.
- In the console tree, choose Computer Configuration to assign applications to computers or choose User Configuration to assign or publish applications to users.
How to Configure Software Deployment Installation Properties for the GPO
Using Group Policy to deploy software allows users to configure numerous settings and options to control the manner in which software packages are deployed and administered within an organization. To perform one of the administrative tasks listed below, use the configuration steps detailed after the listed administrative task:
- Modify the default location for the installation packages.
- Configure the default action that should be performed when new packages are added to the GPO.
- Define how much installation information is displayed to users during the installation process.
- Modify the quantity of control that users have over installing applications.
- Configure the automatic uninstallation of applications when the GPO no longer applies to users and computers.
- Open the appropriate GPO for the software deployment.
- In the console tree, proceed to expand either the User Configuration node or the Computer Configuration node.
- Right click the Software Installation node and click Properties on the shortcut menu.
- When the Software Installation Properties dialog box opens, in the Default Package Location box of the General tab, enter the Uniform Naming Convention (UNC) path to the SDP for the Windows Installer packages.
- Configure the default action that should be performed on new packages in the New Packages section of the General tab. Choose one of the options listed below:
- Display The Deploy Software Dialog Box: This is the default configuration setting. The Deploy Software dialog box will be displayed when new packages are added to the GPO. On this dialog box, choose whether to assign or publish the application or configure the properties of the package.
- Publish: Remember that applications can only be published to users, not computers. Therefore, this setting is only available for User Configuration. When the option is selected, the application is automatically published with the default package properties or settings.
- Assign: When the Assign option is selected, any new software installation packages added to the GPO are automatically assigned with the default package properties or settings
- Advanced: When a new software installation package is added to the GPO, the package’s properties dialog box is displayed. Configure the properties for the installation package.
- In the Installation User Interface Options section of the General tab, choose one of the following options:
- Basic: When selected, users are shown limited information on the installation process.
- Maximum: When selected, users are shown all the installation messages and screens on the installation process.
- Click the Advanced tab.
- Select the Uninstall The Applications When They Fall Out Of The Scope Of Management checkbox to automatically remove the application if the GPO no longer applies to users or computers.
- Select the Include OLE Information When Deploying Applications checkbox if information on Component Object Model (COM) components should be included with the package.
- Select the Make 32-Bit X86 Windows Installer Applications Available To Win64 Machines checkbox to enable 64-bit Windows client computers to install 32-bit Windows Installer applications.
- Select the Make 32-Bit X86 Down-Level (ZAP) Applications Available To Win64 Machines checkbox to enable 64-bit client computers to install applications published using a .zap file (application files).
How to Configure the Default Application for the Specified File Extension
A user would normally need to associate a file extension with an application when he/she has multiple applications that can use a specified file format.
- Open the appropriate GPO console.
- In the console tree, expand either the User Configuration node or the Computer Configuration node.
- Right click the Software Installation node and click Properties on the shortcut menu.
- When the Software Installation Properties dialog box opens, click the File Extensions tab.
- Use the Select File Extension list to check which applications are associated with the file extension.
- Use the Up or Down buttons of the Application Precedence list box to move an application that should be the default application for the particular extension to the top of the list.
- Click OK.
How to Create Application Categories for Applications that are Published
- Open the appropriate GPO console.
- In the console tree, expand either the User Configuration node or the Computer Configuration node.
- Right click the Software Installation node and click Properties on the shortcut menu.
- When the Software Installation Properties dialog box opens, click the Categories tab.
- Click Add to add a new application category.
- In the Enter New Category dialog box, specify a name for the new category in the Category box. Click OK.
- To remove an existing application category, select the category in the Categories tab then click Remove.
- To change the name of an existing application category, select the category in the Categories tab then click Modify.
- Click OK.
How to Change the Default Software Installation Behavior Over Slow Network Links
Group Policy considers all network connections that are slower than 500 Kbps as slow links (default). At this point, the policies listed below are disabled:
- Disk Quotas
- Folder Redirection
- Scripts
- Software Installation And Maintenance
However, users can change the speed that Group Policy considers slow to change the default software installation behavior over slow network links. In addition to this, enable or disable the processing of policies listed below over a slow link:
- Disk Quota, EFS Recovery, Folder Redirection, Internet Explorer Maintenance, IP Security, Scripts, Software Installation, and Security.
To change the default speed that Group Policy considers slow:
- Open the GPO console.
- In the console tree, expand either the User Configuration node or the Computer Configuration node then expand Administrative Templates, System, and Group Policy.
- Double-click Group Policy Slow Link Detection in the details pane.
- When the Group Policy Slow Link Detection Properties dialog box opens, select Enabled and enter the speed that should be used to define whether a connection is slow. Entering a value of 0 disables slow link detection.
- Click OK.
How to Add the Windows Installer Packages to the GPO
- Open the GPO console.
- In the console tree, expand either the User or Computer Configuration node then expand the Software Installation node.
- Right click the Software Installation node and click New then Package on the shortcut menu.
- In the Files Of Type list, choose Windows Installer Package or choose ZAW Down-Level Application Packages (.ZAP).
- Choose the package that should be deployed. Click Open.
- In the Deploy Software dialog box, specify how the package should be deployed. Choose one of the following options:
- Published: The Windows Installer package is published to users in Active Directory with the default settings.
- Assigned: The Windows Installer package is assigned to users or computers with the default settings.
- Advanced: The option allows users to configure properties for the Windows Installer package.
- Click OK.
How to Configure Windows Installer Package Properties
Change the Windows Installer package properties after the package is added to the GPO. To change the category of the application, the deployment type, and security settings:
- Open the GPO console.
- In the console tree, expand either the User or Computer Configuration node then expand the Software Installation node.
- In the details pane, right click the software package to be modified and select Properties on the shortcut menu.
- On the General tab, enter a new name for the package in the Name box and enter a support URL for users in the URL box.
- Click the Deployment tab in order to change the existing manner in which the package is deployed.
- In the Deployment Type section of the Deployment tab, select the Published or Assigned option.
- In the Deployment Options section of the Deployment tab, select the following checkboxes:
- Auto-Install This Application By File Extension Activation: The application is automatically installed when a user opens a file that is associated with the application.
- Uninstall This Application When It Falls Out Of The Scope Of Management: The application is uninstalled when the associated GPO is no longer applicable for the user or computer.
- Do Not Display This Package In The Add/Remove Programs Control Panel: The application is not displayed in the Add/Remove Programs applet in Control Panel.
- Install This Application At Logon: The application is installed when the user next logs on to the computer.
- In the Installation User Interface Options section of the Deployment tab, choose either the Basic option or the Maximum option.
- Click the Advanced button on the Deployment tab to open the Advanced Deployment Options dialog box.
- Set the options listed below under Advanced Deployment Options:
- Ignore Language When Deploying This Package: Deploys the package even when the language in the package is in a different language. The option basically ignores the language settings when the package is deployed.
- Make This 32-Bit X86 Application Available To Win64 Machines: Enables 64-bit Windows client computers to install 32-bit Windows Installer applications.
- Include OLE Class And Product Information: Information on Component Object Model (COM) components is included with the package.
- Click OK.
- Click the Categories tab to assign the application to an application category.
- Click the Security tab to configure the users or groups that should be able to access the application.
- Click OK.
How to Deploy Package Upgrades
- Open the GPO console.
- In the console tree, expand either the User or the Computer Configuration node then expand the Software Installation node.
- In the details pane, right click the upgrade package then select Properties on the shortcut menu.
- Click the Upgrades tab.
- Click Add.
- In the Add Upgrade Package dialog box, select whether a package from the current GPO or from a specific GPO will be chosen.
- Choose the package that should be upgraded from the Package To Upgrade list.
- If the existing application should be removed before the new application is installed, click the Uninstall The Existing Package then Install The Upgrade Package option.
- If the new package should upgrade the existing package, click the Package Can Upgrade Over The Existing Package option. This option does not overwrite the user’s existing settings.
- Click OK on the Add Upgrade Package dialog box.
- Use the Add button and Remove button on the Upgrade tab to specify the packages that the new package should upgrade.
- Enable the Required Upgrade For Existing Packages checkbox to force users to upgrade to the new package.
- Click OK.
How to Apply Package Modifications
- Open the GPO console.
- In the console tree, expand either the User or Computer Configuration node then expand the Software Installation node.
- Right click the Software Installation node and select New then Package from the shortcut menu.
- Choose the base package for the application that should be deployed. Click Open.
- Use the My Network Places icon to locate this package.
- Choose either Published or Assigned in the Deploy Software dialog box. Click OK.
- Click the Modifications tab.
- Click Add and choose the Windows Installer transform package that should be added in the Open dialog box. Click Open. Users can add multiple modifications.
- Use the Move Up and Down buttons on the Modifications tab to place the packages in the appropriate order. Use the Add and Remove buttons to add or remove transforms.
- Click OK.
How to Remove Applications Deployed with Group Policy
- Open the GPO console.
- In the console tree, expand either the User or Computer Configuration node then expand the Software Installation node.
- Right click the package to be removed in the details pane, select All Tasks, then Remove from the shortcut menu.
- When the Remove Software dialog box opens, select one of the options listed below:
- Immediately Uninstall The Software From Users And Computers to immediately remove the software when the computer is restarted or the next time when the user logs on to the computer.
- Allow Users To Continue To Use The Software, But Prevent New Installations: This option prevents new instances of the application from being installed, while still permitting users who have already installed the application to continue using it.
- Click OK.
Best Practices for Deploying Software Through Group Policy
A few best practices specific to deploying software through Group Policy are listed below:
- Test all software installation packages before deploying them.
- Use and enforce standard configurations for applications if possible.
- It is recommended that users deploy software as high in the Active Directory hierarchy or tree as they can. Software should be deployed close to the root in the Active Directory tree because it allows users to use one GPO to deploy software to multiple users.
- A Windows Installer package should be assigned/published only once in the identical GPO.
- Create application categories when there is a large quantity of published applications within an organization. This makes it easier for users to find applications in Add Or Remove Programs in Control Panel.


Ravi
I have few servers where we will be installing patches all the time manually.
Can we make as if i install patches in one server,
same patches should be replicated in others servrs instantly or automatically, without any human interface,
JWanner
Do you have to create groups and GP’s based on the group to be able to differentiate between 64 bit and 32 bit install packages?
Ina
What is the file size limit of the package (MSI installer)? I am deploying a package with a size of 2MB. I noticed that on the first attempt, partially the package is being downloaded but it not completed and so the installation aborted. After a several reboot or login, the installation continued.
E
How do i use group policy to allow non admin users to update installed software such as Adobe, QuickTime and Java.
E
More info:
Using Windows Server 2003 and Windows 7 desktops.
The Cat
I’d like to know how publishing works with a Windows 7 client. I’m stuck in academia, do not have the machines available to test this myself at the moment.
A published package is supposed to show up in Control Panel – Add/Remove Software. However, Windows 7 does not say “Add”, it simply says Change or Remove Programs. Do published packages still show up here?
Thanks,
Steven Causey
I humbly offer my services to most….I have many, many years of experience, trial and error, scripting to repair screw-ups, bad MSI’s I had to modify, etc….
IT guy
Very informative walk through. However, I have an issue with my GPO’s.
I have created and configured two GPO’s. One for Mozilla 5.0 and one for my company’s symantec anti-virus. I have successfully added the msi. packages under the software installation on both computer and user configurations.
At boot up, the clients log in dialog displays that these packages are being installed. But when I check, the Mozilla version is not 5 but 3.6. Also the Symantec did seem to install its self on most clients. Strange thing is it gives errors “Failed to load” ect but still shows up in taskbar.
After all my clients picked up the Symanted, I removed the GPO. Now every time a client logs in they get the “Failed to install package, package is a network resource that is unavailiable”. Im stumped.
How can I prevent my clients form receving these error messeges? after the GPO has been removed and the software installed.
Why is mozilla not updating itself and one last question, is it suppose to show the “package is installing” at login dialog, every time the user logs in regardless if the package has been installed.
Help?
Rick B
What do I do if we removed an application from the GPO and accidentally chose “Allow Users To Continue To Use The Software, But Prevent New Installations” when we should’ve chosen “Immediately Uninstall The Software From Users And Computers”?
Steven Causey
Simply find the the uninstall command line, or MSI installer code, and uninstall using a login script……its no big deal….
Use CPAU.exe, EXESCRIPT, and MOLEBOX PRO to convert your created batch, or vbs into an encrypted EXE with built-in credentials…simple man! Ill help if you need it…
stvncaus @ hotmail. com (dont spam me bro)
Gary Sacco
What’s an example of a software package you’d want to publish to users, and an example of a software package you’d want to assign to users.
Steven Causey
An example of published; software no one ever much uses. Example of assigned; FLASH, Adobe Reader, etc…..the essentials…..make category’s with your published and assigned…….easier deployment.