Folder Redirection is a Group Policy feature that enables users to redirect the system folders containing the profile of a user on the network, through the use of the Folder Redirection node in the Group Policy Object Editor console. This basically makes folder redirection a user configuration option. Through the use of the Folder Redirection feature, users can configure that the system folders’ contents on the user remains the same, irrespective of the particular computer used to log onto the system. The system folders that users can configure for folder redirection are listed below:
- Application Data: This folder contains user configuration files, user specific data that applications utilize, and Public Key Infrastructure files.
- Desktop: This folder holds the shortcuts and files that appear on the user’s desktop.
- My Documents: This folder holds the user’s files and pictures.
- Start Menu: This folder holds the shortcuts and files that appear on the Start menu.
Folder redirection settings are stored in the User Configuration node of the Group Policy Object Editor. The Offline Files feature can be configured to enable users to access redirected folders when no network connection exists. Users can use the Offline Folder node in Group Policy to configure this feature.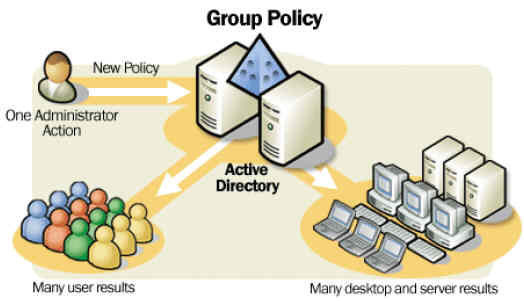
Folder redirection provides the benefits listed below:
- Redirecting the My Documents folder ensures that users can access their data from any computer. This applies to all other redirected folders as well.
- Because redirected folder data is stored on a network server, the user can back up the data to an offline storage media.
- The disk quotas feature specifies the amount of space that each user’s redirected folders are allowed to use.
- By configuring the Offline files feature, users can ensure that they have access to the My Documents folder when the network connection is lost. This capability is useful to individuals that use laptop computers.
- When roaming profiles are utilized for users, the network path to My Documents is included in the roaming user profile. The folder is not included in the profile.
The situations in which users should enable folder redirection for the different types of system folders are summarized below:
- Redirect the My Documents folder to allow access to the same documents from any computer on the network.
- Redirect the Application Data folder when applications should operate in the same manner for a user whenever the user utilizes a new system. When the Application Data folder is redirected, the user does not need to be configured again when he/she changes systems.
- Redirect the Desktop folder when users save files that contain data to the desktop.
- Redirect the Start Menu folder in the following situations:
- When a user saves files containing data to icons located on the Start menu.
- When there are consistent software installations through the network.
- When a user needs to access the Favorites and Printers and Faxes folders
If an organization already has home folders, Windows Server 2003 includes an option that allows users to redirect My Documents to the user’s home folder. One requirement though is that the user’s home folder needs a Windows XP Professional client. Windows XP Home Edition, Microsoft Windows 2000, and Windows NT client cannot be utilized.
The manners in which users can configure folder redirection are listed below:
- Users can redirect folders to a location based on the security group’s membership.
- Users can redirect folders to a single location for all users in a site, domain, or OU.
When specifying the location for the redirected folders, the following options exist:
- Create a folder for the user beneath the root path
- Redirect the folders to a specified location.
- Redirect the folders to the user’s local profile
- Redirect the folders to the user’s home folder
How to Redirect Folders to a Location Based on Security Group Membership
Windows Server 2003 includes additional options for redirecting folders that the Windows 2000 Server does not offer. With Windows 2000 Server, users could only specify the location for the target folder location in the one provided text box. Windows Server 2003 offers more options in the Target Folder Location list.
Use the steps below to redirect folders to a location based on security group membership:
- Open the GPO linked to the site, domain, or OU that holds the users for which folder redirection should be enabled.
- Expand the User Configuration node, expand the Windows Settings node, and then expand the Folder Redirection node.
- Right-click the folder that should be redirected and then select Properties from the shortcut menu.
- When the Properties dialog box for the folder selected for redirection opens, in the Setting list of the Target tab, choose the Advanced-Specify Locations For Various User Groups option.
- When the Specify Group And Location dialog box opens, click the Browse button in the Security Group Membership area.
- When the Select Group dialog box opens, specify the name of the security group for whom the folder should be redirected. Click OK.
- In the Specify Group And Location dialog box, choose the location for the redirected folder. Choose one of the options listed below:
- Create A Folder For Each User Under The Root Path – a folder with the user’s name is created under the root path. The option is not available if the user selected to redirect the Start Menu folder.
- Redirect To The Following Location – the folder is redirected to a location specified.
- Redirect To The Local Userprofile Location – the folder is redirected to the default folder location.
- Redirect To The User’s Home Folder – the folder is redirected to the user’s home directory. The option is available when the My Documents folder is redirected.
- Enter the path to which the folder should be redirected if the Create A Folder For Each User Under The Root Path option was selected or the Redirect To The Following Location option in Step 7. Enter the UNC path or a path on the user’s local computer.
- Click OK.
- Click the Settings tab.
- The Grant The User Exclusive Rights To Redirected Folder checkbox is enabled by default. It is recommended to leave this option unchanged.
- The Move The Contents Of User’s Current Folder To The New Location checkbox is enabled by default. It is recommended to also leave this option unchanged.
- In the Policy Removal box of the Settings tab, it is recommended to leave the Leave The Folder In The New Location When Policy Is Removed option selected.
- In the My Pictures Preferences box of the Settings tab, it is recommended to leave the Make My Pictures A Subfolder Of My Documents option enabled. This is the default configuration setting.
- Click OK.
How to Redirect Folders to a Single Location for All Users in a Site, Domain, or OU
- Open the GPO linked to the site, domain, or OU that holds the users for whom the folder redirection should be enabled.
- Expand the User Configuration node, expand the Windows Settings node, and then expand the Folder Redirection node.
- Right-click the folder that should be redirected and then select Properties from the shortcut menu.
- When the Properties dialog box for the folder selected for redirection opens, in the Setting list of the Target tab, choose the Basic-Redirect Everyone’s Folder To The Same Location option.
- Select one of the following options from the Target Folder Location list:
-
- Create A Folder For Each User Under The Root Path – a folder with the user’s name is created in the root path.
- Redirect To The Following Location – the folder is redirected to a specified location.
- Redirect To The Local Userprofile Location – the folder is redirected to the default folder location.
- Redirect To The User’s Home Folder – the folder is redirected to the user’s home directory.
- Enter the path to which the folder should be redirected if the Create A Folder For Each User Under The Root Path option was selected or the Redirect To The Following Location option in the previous step.
- Click the Settings tab.
- It is recommended to leave The Grant The User Exclusive Rights To Redirected Folder checkbox and Move The Contents Of User’s Current Folder To The New Location checkbox enabled or selected. This is the default setting for those two checkboxes.
- In the Policy Removal box of the Settings tab, it is recommended to leave the Leave The Folder In The New Location When Policy Is Removed option enabled.
- In the My Pictures Preferences box of the Settings tab, leave the Make My Pictures A Subfolder Of My Documents option enabled. This is the default configuration setting.
- Click OK.
How to set up the network share for offline files and folders
As mentioned earlier, the user can configure the Offline Files feature so that others can still access redirected folders when the network connection is lost. When configured, the Offline Files feature stores any files that are accessed via folder redirection on the local computer’s hard drive. The file is updated locally when the user accesses a file of a redirected folder. When the user logs off the computer, the file is moved to the server and stored.
Configuring the network share for offline files and folders is the initial step in the configuration of the Offline Files feature.
- Navigate to and right-click the shared folder that includes the offline files, then select Sharing And Security on the shortcut menu.
- Click Offline Settings on the Sharing tab.
- When the Offline Settings dialog box opens, select one of the options listed below:
- Only The Files And Programs That Users Specify Will Be Available Offline – allows users to specify files for offline availability.
- All Files And Programs That Users Open From The Share Will Be Automatically Available Offline – all files that users access are available offline.
- Files Or Programs From The Share Will Not Be Available Offline – no files will be available offline.
- Click OK.
How to Set Up the Offline Files Feature for Computers and Servers
- Open My Computer.
- Click Folder Options on the Tools menu.
- When the Folder Options dialog box opens, select the Offline Files tab
- Check the Enable Offline Files checkbox.
- The options that can be selected for a full synchronization of Offline Files are listed below:
- Synchronize All Offline Files When Logging On checkbox – for a full synchronization of Offline Files when the user logs on
- Synchronize All Offline Files Before Logging Off checkbox – for a full synchronization of Offline Files when the user logs off.
- Users can enable the Display A Reminder Every checkbox so that reminder balloons are displayed when the computer goes offline. The reminder balloons are displayed on the desktop’s notification area. Specify how frequently the reminders should be displayed.
- To display a shortcut to the Offline Files folder on the desktop, select the Create An Offline Files Shortcut On The Desktop checkbox.
- To encrypt offline files, select the Encrypt Offline Files To Secure Data checkbox.
- Set the amount of disk space to use for temporary offline files by using the slider.
- Click the Advanced Button.
- When the Offline Files-Advanced Settings dialog box opens, choose one of the options listed below:
- Notify Me And Begin Working Offline – enables the user to continue to access files when the network connection is unavailable.
- Never Allow My Computer To Go Offline – prevents the user from accessing files when the network connection is unavailable.
- Click Add to access the Offline Files-Add Custom Action dialog box. This is where users can configure a specific action for a computer so that it is treated differently when another computer loses a network connection.
- Enter the name of the computer in the Computer text box.
- Specify how the computer should be treated by selecting an option in the When A Network Connection Is Lost area of the dialog box.
- Click OK.
- Click OK in the Offline Files-Advanced Settings dialog box.
- Click OK in the Folder Options dialog box.
How to Configure Synchronization of Offline Files and Folders
- Click Start, All Programs, Accessories, and click Synchronize.
- Click Setup on the Items To Synchronize dialog box.
- The Synchronization Settings dialog box opens.
- On the Logon/Logoff tab of the dialog box, in the When I Am Using This Network Connection list, select the connection to be utilized.
- In the Synchronize The Following Checked Items list, choose the items that should be synchronized.
- Enable the When I Log On To My Computer checkbox to allow synchronization to occur when the user logs on to the computer.
- Enable the When I Log Off My Computer checkbox to allow synchronization to occur when the user logs off the computer.
- In order to display a message, asking for permission to perform synchronization, enable the Ask Me Before Synchronizing The Items checkbox.
- Click OK.
Best Practices for Implementing Folder Redirection
A few best practices for implementing folder redirection using Group Policy are summarized below:
- It is recommended to accept the default folder redirection settings on the Settings tab when configuring folder redirection.
- It is always best to allow the system to create the folders.
- Because users typically need to access the contents of redirected folders when the network connection is lost, enable the Offline Files feature for redirected folders.
- The My Pictures folder should exist within the My Documents folder.
- When specifying the location for redirected folders, use fully qualified UNC paths.
- Only redirect the My Documents folder to the user’s home folder if there is an existing home folder environment.
- The Application Data folder should not be redirected if using the Encrypting File System (EFS).
Hans Hinnekint
OK, but how do you handle with 1 policy 1000 users that each might have 20GB of storage, and have a practical limit of 2TB per Physical Drive?
Karsten
Is it not possible to use folder redirection on a local WindowsXP policy? There are just the subnodes Scripts and Security Settings in User Configuration/Windows Settings.