Recipient Objects Overview
Active Directory objects such as user accounts, contacts and groups become recipient objects when e-mail address information is added to the object. The public folder is another type of recipient object. A public folder does not however usually have its own an email address.
Exchange Server 2003 supports the following types of recipient objects:
-
User recipient objects: This recipient object type is created and managed using the Active Directory Users And Computers management console. User recipient objects are associated with the user accounts in the Active Directory domain.
-
Contact recipient objects: This recipient object type is created and managed using the Active Directory Users And Computers management console.
-
Group recipient objects: This recipient object type is created and managed using the Active Directory Users And Computers management console.
-
Public folder recipient objects: This recipient object type is created and managed using the Outlook Client.
Mailbox enabled recipient objects are typically user account objects with associated mailbox information such as e-mail addresses. Mailbox enabled recipient objects can be used to send and receive messages in the Exchange organization. A mail enabled object contains an email address. Email addresses can be assigned to user account objects, contacts and groups. A mail enabled object is not associated with a mailbox.
The following settings can be configured when managing Mailbox Enabled Recipients
-
E-Mail Addresses: For examining, and adding e mail addresses for the account object.
-
Exchange Features: For enabling/disabling certain advanced features
-
Exchange Advanced settings: Used for configuring custom attributes, protocol and Internet Locator Service (ILS) settings, and mailbox permissions
-
Exchange General settings: For configuring delivery options and restriction settings, and storage limits.
The following settings can be configured through the Exchange Advanced tab when managing Mail Enabled Groups:
-
Simply Display Name: For configuring a simple display name.
-
Expansion Server: For setting a computer in the organization as accountable for the distribution list expansion process.
-
Hide Group From Exchange Address Lists: It is recommended to set the Do Not Send Delivery Reports option.
-
Send Out-Of-Office Messages To Originator: For conveying out-of-office notifications to the message originator.
-
Send Delivery Reports To Group Owner: For enabling the mail-enabled group's owner to receive delivery and non-delivery reports
-
Send Delivery Reports To Message Originator: For enabling the message originator to obtain delivery and non-delivery reports straight from distribution list members
-
Do Not Send Delivery Reports: For blocking the sending of delivery reports and non-delivery reports.
-
Custom Attributes: This feature can be utilized to add additional information to the group to that provided by the default attributes.
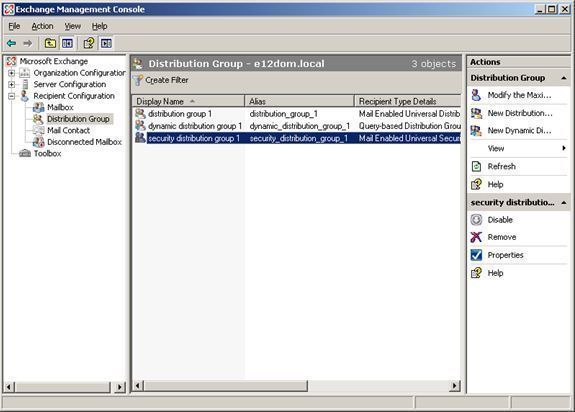
Creating Distribution Groups
A distribution group is not created for security purposes. Distribution groups are created to share information with a group of users through e-mail messages, and are also usually used to distribute bulk e-mail to users. Distribution groups enable the same message to be simultaneously sent to its group members – messages do not need to be individually sent to each user. Exchange and Active Directory integration makes it possible for distribution groups to be used to send bulk e-mail to groups of users.
When you install Exchange Server 2003, Active Directory security and distribution groups are extended to support e-mail addresses. This means that a group can be utilized as a mail recipient. Here, the message will be passed to all members of the particular group.
When you create a distribution group, you can define either of the following scopes for the distribution group:
-
Local Distribution Group: Domain local groups can have user accounts, computer accounts, global groups, and universal groups. You can only use domain local groups for assigning permissions to local resources, or to resources that reside in the domain in which the domain local group was created
-
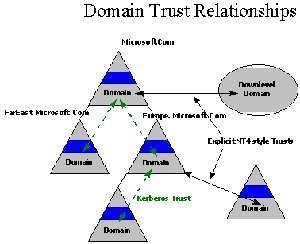
Global Distribution Group: Global groups are containers for user accounts and computers accounts in the domain. A global group can only have members from the domain in which it is created. What this means is that a global group cannot include user accounts, computer accounts, and global groups from other domains.
-
Universal Distribution Group: Universal groups can have user accounts, computer accounts, global groups, and other universal groups, from any domain in the tree or forest as members. You can add members from any domain in the forest to a universal group
How to create a distribution group
-
Click Start, Administrative Tools and then click Active Directory Users and Computers.
-
The Active Directory Users and Computers management console opens.
-
Navigate to the Organizational Unit that should contain the new distribution group.
-
Click the Action menu and select New and then Group.
-
Specify the scope for the distribution group.
-
Select the Distribution group type.
-
In the Create In tab, specify the email address for the distribution group.
-
Enable the Create an Exchange Email address checkbox.
-
Change the alias name for the distribution group.
-
Specify the Administrative Group to which this distribution group should be associated.
-
Click Next and then click Finish.
How to add members to a distribution group
-
Open the Active Directory Users and Computers console.
-
Navigate to and expand the Organizational Unit that contains the distribution group.
-
Select the distribution group that you want to define membership for.
-
Click the Action menu and select Properties.
-
Click the Members tab.
-
Click Add.
-
Specify the Active Directory accounts that should be added to the distribution group.
-
If you want to display all accounts in the domain, click the Advanced tab. Then, specify the domain that contains the account and click Find Now.
-
Add the accounts to the distribution group.
-
Click OK.
Query-based distribution groups
A query-based distribution group works much like a standard distribution group. The difference being that the query-based Distribution Groups assign group membership based on LDAP queries. Query-based distribution groups are only supported when running in Exchange Server 2003 Native Mode. The main advantage of creating a query-based distribution group is that administrators can dynamically assign members to the group – you do not have to manually add/remove accounts from the query-based distribution group.
You can use the Filter option to define group membership for the query-based distribution group. Then, when new account objects are created, these objects too are added to the group when they defined as being mail-enabled in Active Directory.
The different Filter options for defining a query-based distribution group are listed here:
-
Users with Exchange Mailboxes
-
Users with External Mail Addresses
-
Mail-Enabled Groups
-
Contacts with External Email Addresses
-
Mail-Enabled Public Folders
-
Customer Filters
How to create a query-based distribution group
-
Open the Active Directory Users and Computers console.
-
Click the View menu and enable the Advanced Features option.
-
Navigate to and expand the Organizational Unit that should contain the query-based distribution group.
-
Click the Action menu and select New and then Query-Based Distribution Group.
-
Provide a name for the query-based distribution group
-
Click Change, and then select the domain and organizational unit. The filter will be applied to all users in the organizational unit.
-
Select the Users with Exchange Mailbox option.
-
Click Next and then click Finish.
How to mail-enable a group in Exchange Server 2003
-
Open the Active Directory Users and Computers console.
-
Navigate to and expand the Organizational Unit that contains the distribution group.
-
Select the distribution group that you want to mail-enable.
-
Click the Action menu and select Exchange Task.
-
Click Next on the Welcome to Exchange Task screen.
-
When the Available Task screen is displayed, select Establish Email Address on Groups and then click Next.
-
Verify the mail alias for the group. Click Next.
-
Click Finish.
Managing Exchange Server 2003 Administrative Groups
When you install an Exchange Server 2003 organization, the new Exchange Server 2003 organization operates in Mixed Mode. This is the default configuration.
The main characteristics of Mixed Mode are listed here:
-
Any Exchange 5.5 sites are mapped to Administrative Groups.
-
Administrative Groups features are not supported when running in Mixed Mode.
-
You cannot move Exchange mailboxes between Administrative Groups.
-
Routing Groups contain only the server installed in the Administrative Group.
Exchange Server 2003 Native Mode has the characteristics listed here:
-
You can move Exchange mailboxes between Administrative Groups.
-
You can also move servers between Routing Groups.
-
Routing Groups can contain servers from different Administrative Groups.
-
The default enabled routing protocol is SMTP.
You can delegate control over an Administrative Group through the Exchange Administration Delegation Wizard. The different permissions which you can define to delegate control over an Administrative Group are:
-
Exchange View Only Administrator; allows the viewing of Exchange objects but not the modification of Exchange objects.
-
Exchange Full Administrator; enables the individual to fully administer Exchange system objects and Exchange permissions.
-
Exchange Administrator; enables the individual to only fully administer Exchange system information.
How to enable viewing of Administrative Groups
-
Click Start, All Programs, Microsoft Exchange, and then select Exchange System Manager.
-
Exchange System Manager opens next.
-
Right-click the Exchange organization and the select Properties from the shortcut menu.
-
When the Exchange organization Properties dialog box opens, select the Display routing groups checkbox on the General tab.
-
Click OK.
How to create Administrative Groups
-
Click Start, All Programs, Microsoft Exchange, and then select Exchange System Manager.
-
Exchange System Manager opens.
-
In the left pane, right-click the Administrative Groups and select New and then Administrative Group from the shortcut menu.
-
Provide a name for the Administrative Group.
-
Click OK.
How to delegate control over Administrative Groups
-
Open the Exchange Systems Manager.
-
Navigate to the Administrative Group.
-
Click the Action menu and select Delegate Control options.
-
The Exchange Administration Delegation Wizard launches.
-
Click Next on the Welcome to the Exchange Administration Delegation Wizard screen.
-
Click Add.
-
Provide the details of the Active Directory user account or group that you are delegating control over the Administrative Group to.
-
Select the Exchange role which should be assigned. Click OK.
-
Click Next and then click Finish.
Managing Exchange Server 2003 Routing Groups
If you plan to create additional routing groups, you have to connect each routing group using either of the following Exchange Server 2003 connection types:
-
Routing Group Connector: The Routing Group Connector (RGC) can be used to connect one or multiple Exchange bridgehead servers for the load balancing of message traffic. This is the default Exchange connector type. The Routing Group Connector provides a high level of fault tolerance, and is more robust than the other connector types. The Routing Group Connector can support multiple source and destination bridgehead servers. Therefore, messages continue to be delivered when a server is unavailable. The RGC is also the easier to install connector. All of these features make the RGC the favored connector. The RGC can only supply a message path between routing groups within the same organization.The RGC can attempt each SMTP virtual server in the local or remote routing group with no message rerouting. Messages are only rerouted to a different connector when each configured remote bridgehead is unavailable. When this takes place, the RGC is considered down.
-
SMTP Connector; The Simple Mail Transport Protocol (SMTP) is use to connect to:
-
Routing Groups
-
Internet mail host
-
Mon-Exchange mail systems
-
The SMTP Connector connects an Exchange organization to a foreign SMTP system. The SMTP Connector can be utilized to provide messaging connectivity between routing groups in an Exchange Server environment. In this case, a Routing Group Connector does not need to be utilized. While the Routing Group Connector is easier to maintain, the SMTP Connector provides better control over routing configuration.
In the instances described below, implementing an SMTP Connector instead of a RGC connector is recommended.
-
-
When needing to queue email messages for remote triggered delivery.
-
When needing to connect to another Exchange organization.
-
When needing to connect to a foreign SMTP host.
-
When outbound security has to be implemented for data encryption and IPSec is not being utilized.
-
The SMTP Connector can look up external DNS servers for mail exchanger (MX) records that match to Internet domain names indicated in the recipient addresses. In cases where the ISPs supply smart hosts that relays outgoing messages on behalf of the SMTP host of a customer, the SMTP Connector should send outgoing messages to the smart host.
-
X.400 Mail Connector; used for connectivity between Exchange Server 2003 and X.400 mail systems. It is recommended to utilize X.400 Connectors to connect Exchange Server to foreign X.400 systems. The RGC and SMTP Connector should be used for message transfer between routing groups. X.400 Connectors are the most complex connectors.
How to create Routing Groups
-
Click Start, All Programs, Microsoft Exchange, and then select Exchange System Manager.
-
Exchange System Manager opens.
-
In the left pane, expand the Administrative Groups node.
-
Expand the specific administrative group.
-
Right-click Routing Groups, and select New, and then select Routing Groups from the shortcut menu.
-
Provide a name for the routing group.
-
Click OK.
Managing Recipient Policies
Exchange System Manager is utilized for configuring default policy settings. Proceed to expand the Recipients container, and select Recipients Policies. The Default Policy object is displayed in the details pane. The policy is relevant for all recipients.
In cases, when creating new recipient objects, and changing existing e-mail addresses, there may be a delay before the addresses are being displayed in the proper manner. The Recipient Update Service is the SA process that performs the updating. It too updates address lists in Active Directory. Opening the Recipients container via Exchange System Manager, and selecting Recipient Update Services; displays update service objects. An update policy exists for updating information in the naming context (NC) of the domain. Another update policy exists for the configuration NC of Active Directory. Most of Exchange Server's information is contained in the configuration NC. Recipient objects are however stored the domain. The configuration parameters of an update service object can be changed. Simply right click the object, and then select Properties.
An update service object has to be configured for each domain in the organization that contains recipient objects. This is because a Recipient Update Service deals with ensuring that only a specific domain is posted. The necessary objects are created automatically if one Exchange server is installed in each domain. This has to be performed manually when an Exchange server does not exist in the domain.
You can use filters to define recipient policy membership. A recipient policy can then be applied to Exchange mail-enabled objects.
You can define recipient policy membership at the following areas:
-
Users with Exchange Mailboxes
-
Users with External Mail Addresses
-
Mail-Enabled Groups
-
Contacts with External Email Addresses
-
Mail-Enabled Public Folders
-
Query-Based Distribution Groups
How to create a recipient policy
-
Open Exchange System Manager.
-
Click the Action menu and select New and then Recipient Policy.
-
The New Policy dialog box opens.
-
Enable the Email Address options and click OK.
-
Provide a name for the recipient policy.
-
Click the Modify button under the Filter Rules area to specify membership for the new recipient policy.
-
Users with Exchange Mailboxes should be the selected option. Click OK.
-
Click OK to the message dialog box that is displayed.
-
Click the Email Addresses (Policy) tab. This is where you configure the email address and naming convention.
-
The Address Types dialog box contains the default domain name and X.400 address. To add an SMTP address, click New.
-
Specify the SMTP Address option and click OK.
-
On the SMTP Address Properties page, specify the appropriate information, click Apply and then click OK.
-
To define the new address as the primary SMTP address, enable the checkbox alongside the address and select Set As Primary.
-
Click OK.
-
Click Yes to apply the configuration.
Managing Recipient Update Services (RUS)
The Exchange Server 2003 Recipient Update Services (RUS) provides SMTP domain e-mail functionality in the domain where the Exchange server is installed and beyond the default domain where the Exchange server is installed. The Recipient Update Services (RUS) also provides detailed address list information to other domains in the Active Directory forest. It can also replicate this information.
An each Exchange organization is installed with a default RUS that manages mail addresses and lists at the enterprise level and at the domain level.
How to configure Recipient Update Services (RUS) to support a domain that does not have Exchange Server 2003 installed
-
On the domain controller that you want to configure, place the Exchange Server 2003 CD-ROM into the CD-ROM drive.
-
You have to run Domaiprep in the domain before you can create RUS. Domainprep prepares the Windows 2000 domain or Windows Server 2003 domain. To run Domainprep, you must be a member of the Domain Admins group in the specific domain. DomainPrep creates the necessary Active Directory groups and permissions that Exchange Server 2003 will change.
-
Click Start, Run, and enter D:I386Setup.exe /domainprep. Here, D is the drive letter of the CD-ROM drive.
-
Open Exchange System Manager.
-
Select the RUS container.
-
Click the Action menu and select New and then Recipient Update Service.
-
The New Object Recipient Update Service dialog box opens.
-
Click Browse.
-
Specify the domain for RUS. Click OK.
-
Specify the Exchange server for the domain.
-
Click Browse to select the Exchange server providing the service. Click OK. Click Next.
-
Click Finish.
How to manually force a recipient update
-
Open the Exchange System Manager.
-
Select the RUS.
-
Click the Action menu and select Update Now.
How to modify the default replication schedule
-
Open the Exchange System Manager.
-
Select the RUS.
-
Click the Action menu and select Properties.
-
If you want to modify an existing schedule, select the schedule from the Update Interval drop-down list.
-
If you want to create a custom schedule, click Customize.
-
Proceed to configure the replication schedule.
-
Click Apply.
Creating and Configuring Address Lists
Address lists are single directory objects with a global scope that can be configured through Exchange System Manager. They are located under Recipients – Address Lists, All Global Address Lists and Offline Address Lists. No recipient objects are stored in Default Global Address List object. A filter rule in LDAP Search Filter syntax does though exist.
A few preconfigured address lists are located in the All Address Lists container by Exchange Server. These include All Contacts, All Groups, All Users and Public Folders. It is possible to create your own address list structure.
When you install Exchange Server 2003 and create the Exchange organization; the following default address lists are also created:
-
All Address Lists:
-
All Contacts
-
All Groups
-
All Users
-
Public Folders
-
-
All Global Address Lists:
-
Default Global Address List
-
-
Offline Address Lists:
-
Default Offline Address List
-
The Default Offline Address List object is located within the Offline Address Lists container. The Default Offline Address List object provides remote users with Default Global Address Lists information. When needing to compose new messages in offline intervals, utilize Outlook to download the Offline Address Lists from the server. Prior to utilizing Outlook to download the Offline Address Lists, the information has to be generated on the server
How to create an address list in the All Address Lists container
-
Open the Exchange System Manager.
-
Expand the Recipients container.
-
Select the All Address Lists container.
-
Right-click All Address Lists and select New and then Address List from the shortcut menu.
-
Specify the name of the new address list.
-
Click Filter Rules.
-
The Find Exchange Recipients dialog box opens.
-
The default configuration is that all Exchange recipients are included in the filter. To change this, click the Advanced tab.
-
Click the Field menu and select the appropriate recipient type.
-
Specify the attribute which you want to filter.
-
Specify the appropriate value for the attribute.
-
Click Add.
-
The attribute will now appear in the Condition list.
-
Click OK.
-
Click Finish to create the new address list.
How to configure permissions for an address list
-
Open the Exchange System Manager.
-
Expand the Recipients container.
-
Expand the All Address Lists container.
-
Right-click the address list which you want to set permissions for and then select Properties from the shortcut menu.
-
The address list's Properties dialog box opens.
-
Click the Security tab.
-
Proceed to add the users and groups and set the appropriate level of permissions.
-
Click OK.
How to change an address list
-
Open the Exchange System Manager.
-
Expand the Recipients container.
-
Expand the All Address Lists container.
-
Right-click the address list which you want to modify and then select Properties from the shortcut menu.
-
The address list's Properties dialog box opens.
-
Click the Modify button on the General tab.
-
The Find Exchange Recipients dialog box opens.
-
Perform the necessary modifications to the address list.
-
Click OK.
How to manually update an address list change
-
Open the Exchange System Manager.
-
Expand the Recipients container.
-
Select the Recipient Update Services container.
-
The enterprise Recipient Update Service updates system objects for the enterprise and the domain Recipient Update Service updates recipient objects.
-
Right-click the domain Recipient Update Service and then select Update Now from the shortcut menu.
-
Any address list changes are replicated.
How to create an offline address list
-
Open the Exchange System Manager.
-
Expand the Recipients container.
-
Select the Offline Address Lists container.
-
Right-click Offline Address Lists and select New and then Offline Address List from the shortcut menu.
-
Specify the name of the new offline address list.
-
Specify the server where the offline address list should be stored. Click Next.
-
Add the necessary address lists to the new offline address list. The Default Global Address List is added by default. Click Next.
-
Click Next and then click Finish.
How to apply an offline address list to a mailbox store
-
Open Exchange System Manager.
-
Right-click the mailbox store and select Properties from the shortcut menu.
-
Click Browse alongside the Offline Address List field.
-
Provide the name of the offline address.
-
Click OK.
Best Practices for Managing Recipient Objects, Address Lists, and Distribution and Administrative Groups
A few best practices for managing recipient objects, address lists, Distribution Groups, Routing Groups, and Administrative Groups are summarized here:
-
You should grant the Exchange Administrators permission to most of the Exchange Server 2003 administrators.
-
You should grant the Exchange Full Administrator permission to only a selected administrator(s).
-
Exchange View Only Administrators should be granted to individuals that only need to view the status of Exchange operations – not change it.
-
You should enable auditing so that all administrative changes made to Exchange operations can be tracked.
-
Create distribution lists to provide internal mailing lists. The best approach would be to create a security group and then mail-enable the group. This approach eliminates the need of having to create separate security groups and distribution groups.
-
Create query-based distribution groups to dynamically create a distribution list based on an Active Directory user's Object Properties.
-
Create Routing Groups for the following purposes:
-
Maage communication between locations over slow unreliable connections.
-
Provide redundancy between sites
-
-
Create Administrative Groups for the following purposes:
-
Define administrative boundaries in an organization
-
Follow Us!