Active Directory or directory service management is a vital component of any administration process if Active Directory is implemented in the networking environment. The two types of management or administration methods that can be utilized to manage the directory service are:
- Administrative tools that utilize a graphical user interface (GUI).
- Command-line tools.
Windows Server 2003 includes a number of new command-line tools that manage Active Directory objects as well as the various Active Directory directory parts. The Administrative tools that utilize a GUI can be accessed via the Administrative Tools menu.
The main management tool utilized to manage Active Directory is the Microsoft Management Console (MMC). The MMC is not an actual management tool but provides the MMC interface to load Active Directory snap-ins. Snap-ins provide specific administrative functionality. The MMC interface allows users to create custom console tools and to load multiple snap-ins into a single console.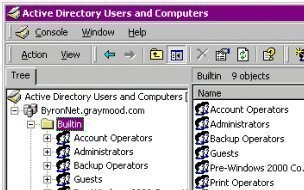
The following MMC snap-ins provide specific Active Directory administrative functionality:
- Active Directory Domains and Trusts : Used to manage domains, domain trust relationships, domain trees and forests, and to change the domain mode. Active Directory Domains and Trusts are also used to configure user principal name (UPN) suffixes.
- Active Directory Users and Computers : Used to create, configure, and manage objects in Active Directory such as users, groups, computers, and organizational units (OUs).
- Active Directory Sites And Services : Used to create, configure, and manage sites and subnets. Active Directory Sites And Services is also used to manage domain controller replication.
- Active Directory Schema : Unlike the previously mentioned MMC snap-ins, the Active Directory Schema snap-in is not available on the Administrative Tools menu. Users have to manually install Active Directory Schema and create an MMC for it as well. The Active Directory Schema is used to view and change the Active Directory schema.
A few improvements introduced in Windows Server 2003 for the Active Directory management tools include the following capabilities:
- Users can choose or select multiple resources or objects individually by holding down the Ctrl key then individually selecting the objects or resources to be worked with.
- Users can also select a range of objects simultaneously by pressing down the Shift key, clicking the first object, then clicking the last object.
- Users can change and set the properties of multiple resources or objects.
- Users can drag resources or objects to new locations.
In addition to the above mentioned MMC snap-ins, users can also use the Resultant Set Of Policy to view current user policy on a system. Policy changes can also be planned with Resultant Set Of Policy.
The Active Directory Installation Wizard creates domain controllers, new domains, domain trees, and forests. Windows Server 2003 includes links to the Active Directory Installation Wizard on the Manage Your Server Wizard. This is the wizard that is displayed after the operating system is installed. The Windows Support Tools also contain additional Active Directory specific management tools.
How to add the three commonly utilized Active Directory snap-ins to the MMC:
- Click Start and Run and enter mmc in the Run dialog box. Click OK.
- Select Add/Remove Snap-in under the File menu.
- The Add/Remove Snap-in dialog box is displayed next.
- Click the Standalone tab. Click Add.
- The Add Standalone Snap-in dialog box is where the Active Directory snap-ins that should be displayed in the Microsoft Management Console are added.
- Click Active Directory Domains and Trusts from the available list and click Add.
- Click Active Directory Sites and Services from the available list and click Add.
- Click Active Directory Users and Computers from the available list and click Add.
- Click Close.
- The snap-ins that have been selected should be displayed in the Add/Remove Snap-in dialog box.
- Click OK.
- The MMC console tree should now contain nodes for each Active Directory snap-in.
The Active Directory Installation Wizard
The Active Directory Installation Wizard is the main tool used to install Active Directory and domain controllers, and create new domains and domain trees. The Active Directory Installation Wizard can be directly initiated with Dcpromo.exe. The Active Directory Installation Wizard prompts for the following information as it guides the user through its set of configuration pages/screens:
- The domain controller type: The wizard shows the Domain Controller Type page when the computer being worked with is not a domain controller. The options that can be chosen from are:
- Domain Controller For A New Domain: This option installs Active Directory on a server and defines it as the first domain controller for a new domain. When this option is selected, the Active Directory Installation Wizard installs Active Directory support files, creates the new domain, and then registers it with DNS.
- Additional Domain Controller For An Existing Domain: This option installs Active Directory on a server then replicates directory information from an existing domain.
- The domain type: If the user chose to create a new domain, the wizard displays the Create New Domain page. One of the following options can be selected from this page:
- Domain In A New Forest.
- Child Domain In An Existing Domain Tree.
- Domain Tree In An Existing Forest.
- Set domain names: In the New Domain Name page, a DNS name for the domain as well as a NetBIOS name for the domain must be specified. Clients who do not support Active Directory will use the NetBIOS name for the domain.
- Active Directory database and log folder location: The wizard prompts the user to enter the Active Directory database’s location and the log files folder on the Database And Log Folders page. The location that is entered has to be on an NTFS volume.
- Shared system volume folder location: The location of the shared system volume on the Shared System Volume page has to be entered.
- Default permissions for user and group objects: The Permissions Compatible Only With Windows 2000 and Windows Server 2003 Operating Systems option should be selected.
- Directory services restore mode Administrator account password: The password for the server’s restore mode Administrator account has to be entered here. This password is typically needed to use the Recovery Console.
How to use the Active Directory Installation Wizard to install Active Directory for a new domain
- Click Start and Run then enter dcpromo in the Run dialog box. Click OK.
- This action launches the Active Directory Installation Wizard.
- When the Welcome To The Active Directory Installation Wizard page opens, click Next.
- Click Next on the Operating System Compatibility page.
- Select the Domain Controller For A New Domain option on the Domain Controller Type page. Click Next.
- When the wizard displays the Create New Domain page, verify that the Domain In A New Forest option is selected and Click Next.
- The Active Directory Installation Wizard now shows the New Domain Name page. This is where the DNS name of the domain in the Full DNS Name For New Domain box is entered. Click Next.
- Accept the default NetBIOS name displayed on the NetBIOS Domain Name page. Click Next.
- Enter the proper locations in the Database Folder and Log Folder boxes on the Database and Log Folders page. Click Next.
- When the Shared System Volume page displays, enter the location of the shared system volume folder in the Folder Location box. Click Next.
- On the DNS Registration Diagnostics page, select the appropriate option. Click Next.
- When the wizard displays the Permissions page, select the Permissions Compatible Only With Windows 2000 and Windows Server 2003 Operating Systems option. Click Next.
- On the Directory Services Restore Mode Administrator Password page, enter the required password. Click Next.
- The Active Directory Installation Wizard now displays the Summary page. All the configuration options selected while navigating through the pages of the wizard are summarized on this page. Click Next to continue with the installation.
- When the Completing The Active Directory Installation Wizard page is displayed, click Finish then Restart Now.
- When the This Server Is Now A Domain Controller page is displayed, click Finish.
The Active Directory Domains and Trusts Console
The Active Directory Domains and Trusts console is used to manage domains and trust relationships between domains and forests, change the domain mode, and set user principal name (UPN) suffixes for the forest. With the installation of Windows Server 2003, the Active Directory Domains and Trusts console is added to the Start menu by default. The MMC snap-in file, Domain.msc, can be used to start Active Directory Domains and Trusts from the Run dialog box. The console can also be started from Administrative Tools. The administrative tasks that Active Directory Domains and Trusts enable can be accessed from the Action menus displayed by selecting a domain name or the root object. Users can also perform management tasks on a domain’s Properties dialog box.
The administrative tasks that the Active Directory Domains And Trusts MMC snap-in can be used for are summarized below:
- View a console tree listing all the domains in a forest.
- Change the domain mode from Windows 2000 mixed mode to Windows 2000 native mode or Windows Server 2003 functional level. The domain mode is now known as the domain functional level.
- Configure interoperability with domains in other Windows Server 2003 forests and pre-Microsoft Windows 2000 domains through specifying trust relationships between the domains.
- Transfer the domain naming operations master role from one domain controller to a different domain controller.
- Add, delete, and change user principal name (UPN) suffixes.
Domain functional levels allow users to enable Active Directory features and functionality in the domain and forest for their network. Windows Server 2003 adds additional functionality based on the forest’s mode. When a new domain is created in a new forest, the domain’s functionality level is Windows 2000 mixed mode and the new forest’s functionality level is Windows 2000 mode. When the domain controllers in a forest are upgraded, the functionality level can be improved to support further Active Directory features and functionality.
The following domain functionality levels exist:
- Windows NT 4, Windows 2000, and Windows Server 2003 domain controllers support the Windows 2000 Mixed domain functionality level.
- Windows 2000 and Windows Server 2003 domain controllers support the Windows 2000 Native domain functionality level.
- Windows NT 4 and Windows Server 2003 domain controllers support the Windows Server 2003 Interim domain functionality level.
- Windows Server 2003 domain controllers support the Windows Server 2003 domain functionality level.
The following Forest functionality levels exist:
- Windows NT 4, Windows 2000, and Windows Server 2003 domain controllers support the Windows 2000 forest functionality level.
- Windows NT 4 and Windows Server 2003 domain controllers support the Windows Server 2003 Interim forest fnctionality level.
- Windows Server 2003 domain controllers support the Windows Server 2003 forest functionality level.
The Active Directory Domains and Trusts console can be used to create the following types of trusts between domains and forests:
- Tree-root trust
- Parent-child trust
- Shortcut trust
- Forest trust
- Realm trust
- External trust
How to Change the Domain Functionality Level with Active Directory Domains and Trusts
- Click Start, Administrative Tools, and Active Directory Domains And Trusts.
- Right-click the domain to be upgraded and click Raise Domain Functional Level from the shortcut menu.
- When the Raise Domain Functional Level dialog box opens, use the Select An Available Domain Functional Level drop-down list to choose the domain functionality level to be used. The drop-down list only displays the levels that can be specified for the particular domain.
- Click Raise.
- When the Raise Domain Functional Level message box appears, click OK.
How to Change the Forest Functionality Level with Active Directory Domains and Trusts
- Click Start, Administrative Tools, and Active Directory Domains And Trusts.
- Right-click the domain to be upgraded and click Raise Forest Functional Level from the shortcut menu.
- When the Raise Forest Functional Level dialog box opens, use the Select An Available Forest Functional Level drop-down list to choose the forest functionality level to be used. The drop-down list only displays those levels that can be specified for the particular forest.
- Click Raise.
- When the Raise Forest Functional Level message box appears, click OK.
How to Add or Remove UPN Suffixes
- Click Start, Administrative Tools, and Active Directory Domains And Trusts.
- Right-click the Active Directory Domains And Trusts node and select Properties from the shortcut menu.
- When the Active Directory Domains And Trusts dialog box appears, click the UPN Suffixes tab.
- To add a UPN suffix, use the Alternative UPN Suffixes box to enter an alternative UPN suffix. Click Add.
- To remove a UPN suffix, use the Alternative UPN Suffixes box to indicate the UPN suffix that should be removed. Click Remove.
- Click Yes to verify the configurations and click OK.
How to Configure Different Types of Trusts between Domains and Forests with Active Directory Domains and Trusts
Use the steps below to create a shortcut trust between two domains in a forest:
- Click Start, Administrative Tools, and Active Directory Domains And Trusts.
- Right-click the domain node for the domain that shortcut trust will be configured for with the console tree then select Properties from the shortcut menu.
- When the Properties dialog box appears, click the Trusts tab. This is the tab utilized to create new trust relationships between domains.
- Click New Trust to start the New Trust Wizard.
- Click Next on the Welcome To The New Trust Wizard page.
- When the Trust Name page appears, enter the name of the domain to be used to create trust in the Name box. Click Next.
- Select one of the following options on the Direction Of Trust page:
- Two-Way.
- One-Way: Incoming.
- One-Way: Outgoing.
- Click Next. When the Sides Of Trust page displays, choose between the following options:
- This Domain Only for the trust relationship to be created in the local domain.
- Both This Domain And The Specified Domain for the trust relationship to be created in both domains.
- Click Next. The wizard now uses the options selected in this step and the previous step to display the appropriate pages.
- The Outgoing Trust Authentication Level page is displayed if the following have been previously selected: Two-Way or One-Way: Outgoing and This Domain Only.
- Either select the Domain Wide Authentication option or the Selective Authentication to specify user authentication. Click Next.
- The Trust Password page is displayed if the following was previously selected: One-Way: Incoming and This Domain Only.
- A password must be entered in the Trust Password box and Confirm Trust Password box. Click Next.
- The User Name And Password page is displayed if Both This Domain And The Specified Domain were previously selected.
- “You have to enter a user name and password of an account that has administrative privileges in the domain in the User Name and Password boxes. Click Next.
- The wizard displays the Trust Selections Complete page. This page contains a list of all the configuration options specified. Click Next.
- When the Trust Creation Complete page appears, click Next.
- When the Confirm Outgoing Trust page appears, choose either: Yes, Confirm The Outgoing Trust or No, Do Not Confirm The Outgoing Trust.
- Click Next.
- When the Confirm Incoming Trust page appears, choose between the following options:
- Yes, Confirm The Incoming Trust.
- No, Do Not Confirm The Incoming Trust.
- Click Next.
- When the Completing The New Trust Wizard page is displayed, click Finish.
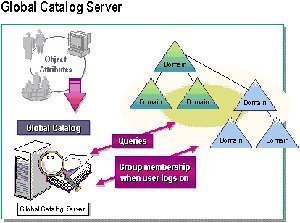
The Active Directory Sites and Services Console
To create and perform administrative tasks on sites, use the Active Directory Sites and Services console. Because Active Directory utilizes sites during authentication and replication, site management in Active Directory is important and can be quite complicated. Through Active Directory Sites and Services use, the manner in which a directory is replicated within and between sites can be controlled. Active Directory Sites and Services allow users to configure connections between sites then specify how replication should occur. When the Active Directory Sites and Services console is opened, the user is presented with containers that can be used to create new sites and manage the sites in the user’s network environment.
The first site object, Default-First-Site-Name , is created when the first domain controller in the network is installed. This site is connected to the server that was promoted to domain controller. Rename the site object to a name that has some significance in the organization.
The Inter-Site Transports container contains site links. This container is used to create connections among sites. When a connection is created beneath the IP container, the connection utilizes the IP transport protocol. Similarly, when a link is created beneath the SMTP container, those links utilize Simple Mail Transfer Protocol (SMTP), not IP.
The Subnets container contains information on the subnets in the network. This container is used to group different subnets to form a site.
How to Rename the First Site Object with Active Directory Sites and Services
- Open Active Directory Sites and Services.
- Right-click Default-First-Site-Name and select Rename from the shortcut menu.
- Set a meaningful name for the site.
How to Create a New Site Object with Active Directory Sites and Services
- Open Active Directory Sites and Services.
- Right-click the Sites object then click New Site from the shortcut menu.
- The New Object – (Site) dialog box appears next.
- Enter a name for the site in the Name box.
- Enter a site link object for the site in the Link Name box.
- Click OK.
How to Move a Server to a New Site with Active Directory Sites and Services
- Open Active Directory Sites and Services.
- Expand the Sites node in the console tree and click the site that contains the server to be moved.
- Right-click the server then select Move from the shortcut menu.
- When the Move Server windows appear, specify a new site for the server.
- Click OK.
The Active Directory User and Computers Console
Active Directory Users and Computers is used to view and manage user account, groups, computer accounts, OUs, and many other Active Directory objects. Through the Active Directory Users and Computers console, users can view, create, set permissions, change, delete, and move objects stored in Active Directory. After the domain controller is created, the containers created by default are summarized below. However, additional containers can be created.
- Built-in container : In Windows Server 2003, this container stores groups that Windows Server 2003 created. These groups can be used to manage access for users that are permitted to perform specific functions.
- Computers container : Computer objects are stored in this container. Accounts that applications utilize to access Active Directory are also stored in the Computers container.
- Domain Controller container : Objects that signify domain controllers within the domain are stored in the Domain Controller container.
- Users container : User accounts and groups are located in the Users container.
When Advanced Features are activated, additional containers are shown along with the just mentioned containers:
- LostAndFound container: Objects whose containers have since been deleted or moved to a location that could not be found are stored in this container.
- System container: This container stores system settings for Active Directory containers and objects.
How to Add a New Domain User Account with Active Directory Users and Computers
- Open Active Directory Users and Computers.
- Click the domain, right-click the OU where the domain user account should be stored, and select New then User from the shortcut menu.
- When the New Object-User dialog box appears, enter the appropriate information in the following boxes:
- First Name: Enter the user’s first name.
- Initials: Enter the user’s initials.
- Last Name: Insert the user’s last name.
- Full Name: This information is automatically populated using the information entered in the prior three boxes. Full Name is the name that would be displayed in the OU that stores the user account.
- User Logon Name: Enter the user’s unique logon name.
- User Logon Name (Pre-Windows 2000): This information is automatically populated.
- Click Next.
- In the second New Object-User dialog box that is displayed, password settings for the new domain user account must be entered.
- Password: Enter the password that would be utilized to authenticate the user.
- Confirm Password: Re-enter the password.
- The following checkboxes for the new user account can also be enabled:
- User Must Change Password At Next Logon: When enabled, the user has to change the password when he/she next logs on.
- User Cannot Change Password: This option is typically enabled for the Guest account.
- Password Never Expires: This option is generally enabled for accounts that Windows services or programs utilize.
- Account Is Disabled: When enabled, the user account can no longer be utilized.
- Click Next.
- Verify that the full name and user logon name details for the new user account are correct.
- Click Finish.
How to Change a Domain User Accounts’ Properties with Active Directory Users and Computers
- Open Active Directory Users and Computers.
- Click the domain then select the OU that holds the domain user account.
- Locate and right-click the domain user account that property settings will be changed for and choose Properties from the shortcut menu.
- Click the tab that contains the settings to be changed.
- After changing the necessary settings, click OK.
The Active Directory Schema Snap-In
The schema in Active Directory defines the kinds of objects that can be stored in the database. It also defines those objects’ attributes. To view the schema and change it, the Active Directory Schema snap-in must be used. The Active Directory Schema snap-in is not displayed on the Administrative Tools menu by default. Because of this, the user would have to install the snap-in and then create an MMC for it as well.
How to Install the Active Directory Schema Snap-in and Create an MMC for It
- Click Start then click Command Prompt.
- Enter regsvr32 schmmgmt.dll.
- Click Start and Run then enter mmc in the Run dialog box. Click OK.
- Select Add/Remove Snap-in under the File menu.
- The Add/Remove Snap-in dialog box is displayed next.
- Click the Standalone tab. Click Add.
- The Add Standalone Snap-in dialog box is where Active Directory snap-ins are added. Double-click Active Directory Schema. Click Close.
- Click OK in the Add/Remove Snap-in dialog box.
- Click Save from the File menu.
- When the Save As dialog box is displayed, verify that the Save In box contains Administrative Tools.
- In the File Name box, enter Active Directory Schema. Click Save.
- The Active Directory Schema snap-in will now be displayed on the Administrative Tools menu.
How to Create a New Attribute Object with the Active Directory Schema Snap-in
- Open the Active Directory Schema.
- In the console tree, right-click Attributes and select Create Attribute from the shortcut menu.
- When the Create New Attribute dialog box appears, enter a name for the new attribute object in the box’s Identification section.
- In the Common Name box, enter the name that will be used when the attribute appears in dialog boxes.
- In the LDAP Display Name box, enter the name for the object associated with the LDAP directory.
- In the Unique X.500 Object ID box, enter a unique ID that identifies the attribute object in X.500 namespace.
- In the Description box, enter an object description.
- Using the Syntax and Range section of the Create New Attribute dialog box, specify what type of data can be stored in the particular attribute.
- Click OK to create the attribute object.
The Active Directory Windows Support Tools
Many Active Directory specific support tools are found in the Windows Support Tools toolkit. These tools can be used to configure, manage, and troubleshoot Active Directory. The Windows Support Tools can be found on the Windows Server 2003 CD in Tools folder. Before being able to use these tools, they have to be installed from the Windows Server 2003 CD. The Active Directory specific support tools are summarized in the next section:
- Acldiag.exe: Used to determine whether a user has been granted or denied access to an object in Active Directory.
- Adsiedit.msc: Used to add, move, and delete objects and to change or delete object attributes.
- Dcdiag.exe: Used to determine the state of domain controllers in the forest/enterprise.
- Dfsutil.exe: Used to manage the Distributed File System (DFS) and to view DFS information.
- Dsacls.exe: Used to manage ACLs for Active Directory objects.
- Dsastat.exe: For comparing the naming contexts on the domain controllers.
- Ldifde: Used to create, delete, and change objects on computers running Windows XP Professional and Windows Server 2003.
- Ldp.exe: Used to carry out Lightweight Directory Access Protocol (LDAP) functions on Active Directory.
- Movetree.exe: Used to move objects from one domain to another.
- Netdom.exe: Can be used to manage domains and trust relationships.
- Nltest.exe: Can be used to view information on primary domain controllers, trusts, and replication.
- Repadmin.exe: Used to monitor, diagnose, and manage replication issues.
- Replmon.exe: Used to monitor and manage replication through a graphical user interface (GUI).
- Sdcheck.exe: Displays the security descriptor for Active Directory objects and can be used to check ACL propagation and replication and whether the ACLs are being inherited correctly.
- Setspn.exe: Used to view, change, or delete the Service Principal Names (SPN) directory property for a service account in Active Directory.
- Sidwalker.exe: Used to configure ACLs on objects that belonged to either moved or deleted accounts.
Active Directory Command-Line Tools
A number of command-line tools can also be used to manage Active Directory. Windows Server 2003 introduced a set of DS command-line tools that can be used to administer Active Directory. The command-line tools available for Active Directory management functions are summarized below:
- Cacls: Used to view and change user and group permissions to resources. Through Cacls, users can change the discretionary access control lists (DACLs) on files. The syntax for Cacls is: Cacls filename. The switches for the command are:
- /t – modifies the DACLs on files in the directory and sub-directories.
- /e – edits the DACL.
- /r username – revokes the user’s rights.
- /c – errors that occurred when changing the DACL are ignored.
- /g username:permission – grants rights (f – Full Control, r – Read, w – Write, c – Change, n -None) to a user.
- /p username:permission – replaces a user’s rights.
- /d username – denies access for the particular user.
- Cmdkey: Used to view, create, edit, and delete usernames, passwords, and credentials. A few switches for the command are listed below:
- /add:targetname – adds a username/password to the list and Indicates the domain/computer for the entry.
- /user:username – username that the entry is related to.
- /generic – adds generic credentials.
- /smartcard – credentials are obtained from a smart card.
- /pass:password – password to be stored for the entry.
- Csvde: tool used to import and export data from Active Directory.
- Dcgpofix: Used to return GPOs to their original state, that is, the state that they were in when first installed.
- Dsget: Used to view a specified object’s properties in Active Directory. The commands that can be utilized are:
- dsget user – to view a user’s properties.
- dsget group – to view a group’s properties.
- dsget computer – to view a computer’s properties.
- dsget site – to view a site’s properties.
- dsget subnet – to view a subnet’s properties.
- dsget ou – to view an organizational unit’s properties.
- dsget contact – to view a contact’s properties.
- dsget server – to view a domain controller’s properties.
- dsget partition – to view a directory partition’s properties.
- dsget quota – to view a quota’s properties.
- Dsadd: Used to create objects in Active Directory including users, groups, computers, OUs, contacts, and quota specifications. The commands that can be utilized are:
- dsadd user – used to add a user.
- dsadd group – used to add a group.
- dsadd computer – used to add a computer.
- dsadd ou – used to add an OU.
- dsadd contact – used to add a contact.
- dsadd quota – used to add a quota specification.
- Dsmod: Used to modify the attributes of an existing object in Active Directory. The commands that can be utilized are:
- dsmod user – used to modify a user’s attributes.
- dsmod group – used to modify a group’s attributes.
- dsmod computer – used to modify a computer’s properties.
- dsmod ou – used to modify an organizational unit’s attributes.
- dsmod contact – used to modify a contact.
- dsmod server – used to modify a domain controller’s properties.
- dsmod partition – used to modify a directory partition.
- dsmod quota – used to modify a quota’s properties.
- Dsmove: Used to move an Active Directory object to a new container within the domain.
- Dsrm: Used to remove an Active Directory object or container.
- Dsquery: Used to locate or find object(s) that match the defined search criteria.
- Ldifde: Used to create, delete, and modify objects from the Active Directory directory, to import or export user/group information, and to extend the Active Directory schema.
- Ntdsutil: Used to manage domains, information in the Active Directory directory, and log files. Ntdsutil can also be used when an authoritative Active Directory restore needs to be done. The tool is also used to manage SIDs and the master operation roles.
- Whoami: Used to view information on the user that is currently logged on.

kamal purohit
information provided by the website is so helpful, thanks.
Jamie
In case anyone is looking for some freeware tools, I just stumbled upon netwrix active directory change auditing tools that automate change auditing and reporting. Hope you find these helpful: http://www.netwrix.com/top_10_freeware_tools.html
masibulele
Hi
I’m busy writing essay based on AD so i just want to know what are important thing about AD that i can include in my essay.