In Routing and Remote Access Service (RRAS), NAT can be used to provide basic Internet connectivity for small offices or home offices. NAT translates IP addresses and associated TCP/UDP port numbers on the private network to public IP addresses which can be routed on the Internet. Through NAT, host computers are able to share a single publicly registered IP address to access the Internet. NAT also offers a number of security features which can be used to secure the resources on your private network.
The NAT service is integrated with the router that changes the information of the originator in packets prior to them being forwarded to the Internet. NAT can be configured through a demand-dial interface where the connection is only established when the client specifically requests the connection; or through a persistent connection which is a permanent connection that remains open all the time.
RRAS IP packet filters can be used to restrict incoming or outgoing IP address ranges based on information in the IP header. You can configure and combine multiple filters to control network traffic. With NAT, you can configure inbound IP packet filters and outbound IP packet filters. When defining criteria for the packet filters, you can use whatever combination of IP header information.
You can also map external public IP addresses and ports to private IP addresses and ports so that internal private resources can be accessed by Internet users. You use a special port to map specific Internet users to resources within the private network. You can configure a NAT address mapping for each specific private network resource that Internet users are allowed to access. The NAT address pool feature can be utilized to allow VPN users and Internet users to access resources residing in the private network. The NAT server requests for one of the public IP addresses with a specific TCP/UDP port number to resources in the private network
Planning for NAT Installation
A Windows Server 2003 server configured with either of the following services can act as the NAT server:
- Routing and Remote Access; a NAT implementation through Routing and Remote Access is the recommended approach.
- Internet Connection Sharing; should be used for very small networks only.
A few factors that should be clarified before you install, and configure NAT are listed here:
- The type of connection which will be used (a demand-dial interface, or a persistent connection). Using a persistent Internet connection would ensure that the NAT server can at all time connect to the Internet.
- The private network IP addressing scheme and the number of public IP addresses to obtain.
- The servers that will be configured as NAT servers. It is recommended to use a dedicated computer to run NAT.
- The interfaces that are to be configured with private IP addresses and the interfaces which will be configured with public IP addresses.
- The manner in which access to resources on the private network will be assigned.
- The IP packet filters that will be configured.
- The IP configuration method to use with the NAT implementation.
- The scope of the NAT server. Will the NAT server be allowed to assign IP addresses, and handle DNS resolution requests?
Installing the NAT Service
The Windows Server 2003 NAT server can support the following services or components:
- NAT address translation service/component: The computer on which NAT is installed is the network address translator server.
- DNS name resolution component: The computer that has NAT installed acts as a DNS server.
- DHCP IP addressing component: The computer that has NAT installed acts as a simplified DHCP server that assign IP address information to other client computers.
The NAT server should have the following components:
- One network adapter card configured with the internal private IP addresses connecting the internal private client computers.
- One network adapter configured with the public IP address which connects to the Internet.
NAT is included with Windows Server 2003 RRAS. While RRAS is automatically installed when you install Windows Server 2003, it is not automatically enabled as well. To enable RRAS, you can use either of the following mechanisms:
- Manage Your Server application.
- Routing and Remote Access management console.
Windows Server 2003 also provides the Routing and Remote Access Server Setup Wizard which can be used to perform both of the following functions:
- Enable Routing and Remote Access.
- Enable and configure NAT.
How to add NAT as a routing protocol
- Click Start, Administrative Tools, and then click Routing and Remote Access to open the Routing and Remote Access management console.
- In the console tree, expand Routing And Remote Access, the Server, and then expand IP Routing.
- Select, and then right-click General and next click New Routing Protocol from the shortcut menu.
- The Select Routing Protocol dialog box opens
- Select Network Address Translation.
- Click OK.
How to install the NAT service using the Routing And Remote Access Server Setup Wizard
- Click Start, Administrative Tools, and then click Routing and Remote Access to open the Routing and Remote Access management console.
- In the left console pane, select the RRAS server that you want to work with.
- From the Action menu, click Configure and Enable Routing and Remote Access.
- The Routing and Remote Access Server Setup Wizard initiates.
- Click Next on the Routing and Remote Access Server Setup Wizard welcome page.
- On the Configuration page, select the Network Address Translation (NAT) option, and then click Next.
- On the NAT Internet Connection page, you have to select the connection method which NAT will use to connect to the Internet:
- Use this public interface to connect to the Internet option.
- Create a new demand-dial interface to the Internet option.
- If you want to enable NAT security, leave the Enable security on the selected interface by setting up Basic Firewall option selected. The option is enabled by default. Click Next.
- On the Ready to Apply Selections page, click Next.
- Click Finish.
- Click Yes to start the Routing and Remote Access service.
Configuring NAT
You can use the Routing and Remote Access management console to configure a number of settings for the NAT.
To access the various configuration options for NAT,
- Click Start, Administrative Tools, and then click Routing and Remote Access to open the Routing and Remote Access management console.
- In the left console tree, expand Routing And Remote Access, the Server, and then expand IP Routing.
- Select NAT/Basic Firewall.
- Click the Action menu, and then select Properties OR, right-click NAT/Basic Firewall and select Properties from the shortcut menu
- The Properties dialog box contains four tabs which can be used to configure settings for the NAT service.
The various settings available on the different tabs within the Properties dialog box are:
- NAT /Basic Firewall tab: The configurations which you can perform on the NAT /Basic Firewall tab are:
- Enable NAT/disable NAT.
- Enable a basic firewall to prevent unauthorized users from accessing resources on the private network.
- Configure inbound filters by clicking the Inbound Filters button.
- Configure outbound filters by clicking the Outbound Filters button.
- Address Pool tab: The configurations which you can perform on the Address Pool tab are:
- Specify the Internet addresses which the NAT server will use. A minimum of one Internet address has to be specified.
- You can configure external address to internal address mappings by clicking the Reservations button.
- Services and Ports tab: The configurations which you can perform on the Services and Ports are:
- Specify services which Internet users are allowed to access.
- Configure the internal client computers which external packets are forwarded to.
- ICMP tab: On this tab, you can enable a number of diagnostic packets types which are necessary for the NAT server to recognize and respond to PING or Traceroute.
How to configure a new interface for NAT
- Click Start, Administrative Tools, and then click Routing and Remote Access to open the Routing and Remote Access management console.
- Locate NAT/Basic Firewall in the console tree.
- Right-click NAT/Basic Firewall and select New Interface from the shortcut menu.
- Specify the type of interface. Click OK.
- Next, select Public Interface Connected To The Internet, and then select Enable NAT On This Interface.
- If no firewall capabilities exist, select Enable A Basic Firewall On This Interface.
- If necessary, configure the desired inbound/outbound IP packet filters to restrict incoming or outgoing traffic.
- Add the address range obtained by the ISP in the Address Pool tab.
- Specify the services which Internet users can access.
- Accept the default settings on the ICMP tab.
- Click OK.
How to configure special ports to allow inbound connections
- Click Start, Administrative Tools, and then click Routing and Remote Access to open the Routing and Remote Access management console.
- Locate the interface that you want to configure.
- Right-click the interface and then select Properties from the shortcut menu.
- Click the Special Ports tab.
- Under Protocol, select TCP or UDP and then click the Add button.
- Enter the port number of the incoming traffic in Incoming Port.
- Select On This Address Pool Entry, and provide the public IP address of the incoming traffic.
- Enter the port number of the private network resource in Outgoing Port.
- Enter the private network resource’s private IP address in Private Address.
- Click OK.
How to configure a NAT network application
- Click Start, Administrative Tools, and then click Routing and Remote Access to open the Routing and Remote Access management console.
- In the console tree, select the NAT server that you want to configure.
- Right-click the NAT server and then select Properties from the shortcut menu.
- Click the Translation tab.
- Click the Application button.
- When the Application dialog box opens, click the Add button.
- The Add Application dialog box opens.
- Specify the desired settings for the application.
- Click OK.
How to manage the NAT server
- Click Start, Administrative Tools, and then click Routing and Remote Access to open the Routing and Remote Access management console.
- In the console tree, select the NAT server that you want to manage.
- Right-click the NAT server and then select Properties from the shortcut menu.
- Click the IP tab to manage NAT address assignment.
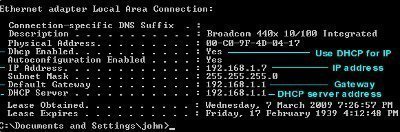
- If you want to use an existing DHCP server for IP address assignment, click the Dynamic Host Configuration Protocol (DHCP) option.
- If you want to specify the NAT server for IP address assignment, select the Static address pool option.
- Next, use the Add, Edit and Remove buttons to specify the address range which the NAT server will use to assign IP addresses to clients.
- If you do not have an existing DNS servers or WINS server that can be used for name resolution, click the Enable broadcast name resolution option at the bottom of the IP tab.
- Click OK.
Troubleshooting NAT
The typical problems experienced with NAT are usually due to not meeting a number of NAT configuration requirements:
- For NAT to work, its needs the following:
- One network adapter card configured with the internal private IP addresses connecting the internal private client computers.
- One network adapter configured with the public IP address which connects to the Internet.
The internal interface is usually created by default. The external interface has to be manually added.
After both interfaces are added, verify the following:
- The private interface should be specified as the private interface in its associated properties dialog box of the NAT/Basic Firewall node in the Routing and Remote Access console.
- The public interface should be specified as the public interface in its associated properties dialog box of the NAT/Basic Firewall node in the Routing and Remote Access console.
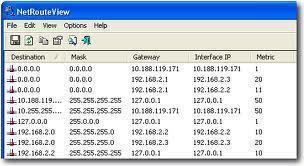
- The NAT configuration must have a default static route configured through the Routing and Remote Access console, with the following parameters:
- Interface configured as the public interface connected to the Internet.
- Destination and mask defined as 0.0.0.0.
- Gateway defined as None
- If you have configured special ports, verify that the settings specified for the public address/port, and the settings specified for the private address/port are correct.
- If you have configured an address pool for the external interface, check that the addresses and mask have been correctly configured.
- For NAT to work, the DHCP service must be configured.

Daniel
I tried to setup NAT this way things “almost” work.
The setup is like this:
External connection 83.x.x.x server private network 192.168.2.0/24
After the configuration nothing worked except for pinging the server from a client on the internal network. However I can not ping external ip such as 8.8.8.8 from either the server nor the client. And from the server I can not ping the client on the private network.
Then I added a static route to 0.0.0.0 using the external interface and metric 1, now I can access public ip 8.8.8.8 from the server and all the clients but still I can not get the server to ping the client.
Any ideas?
keith
I have an SBS 2003 machine that does RRAS to provide NAT to 6 internal workstations on ports 3390 to 3396
This has been working fine for ages but in the last month I have to keep restarting the RRAS service as inbound NAT has stopped working. Nothing has changed on the server…
Have turn on logging but nothing of interest….
Any ideas please people???
Thanks
Keith