Virtual Private Networks (VPNs) enable users to connect to a remote private network through the Internet. Virtual private networks therefore span the Internet because the user connects over the Internet to the remote VPN server. With a VPN, data is first encrypted and encapsulated before it is sent to the remote VPN server. When the VPN server obtains the data, it decrypts the packet so that is can be interpreted.
VPNs are usually implemented to:
- Enable remote access users to connect to and access the network.
- Provide connectivity between two or more private networks or LANs.
A VPN gateway (VPN router) is a connection point that connects two LANs that a nonsecure network such as the Internet connects. Therefore, a VPN gateway connects to either a single VPN gateway or to multiple VPN gateways to extend the LAN. This scenario is typically referred to as a router-to-router VPN. The corporate networks are connected through the VPN servers running Routing And Remote Access Service (RRAS). The actual medium that connects the LANs is usually the Internet. This means that the VPN gateway or router will be configured with the address on the LAN that it is connected to and a public IP address.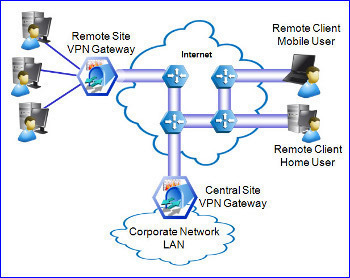
A few factors that affect VPN gateway design and implementation are:
- IP address assignment
- Name resolution
- Dynamic routing
- Auto-static routing updates
- Routing table maintenance
Clients can receive IP addresses and name resolution server information from the VPN server or from a VPN server fulfilling the role of DHCP Relay Agent.
Most VPN gateways have a hub and spoke configuration design. This configuration design’s advantage is that the corporate network can manage Internet access. Another advantage is that a simple network routing configuration can be used.
An important component of VPN gateway networks is name resolution. This is due to clients needing to query the appropriate name resolution servers to locate both local resources and remote resources. The DHCP server should provide these name resolution servers’ IP addresses for the VPN gateway networks to operate. WINS or DNS servers can provide name resolution services. These name resolution servers can be on the local LAN or clients can use the VPN connection to forward their requests to access resources to the remote access servers. With DNS, Internet DNS servers can also provide name resolution.
Routing protocols enable routers to communicate with one another and advertise available routes and their associated preference to other routers on the network. The routing protocols that can be added when using the Routing And Remote Access Service (RRAS) in Windows Server 2003 are:
- The Routing Information Protocol (RIP) dynamic routing protocol
- The Open Shortest Path First (OSPF) dynamic routing protocol
- The multicast routing protocol IGMP Router And Proxy
- The DHCP Relay Agent
Using dynamic routing protocols such as RIP and OSPF adds the advantage of simplified administration because they share routing update information between the routers and manage the routing table so that it contains current, updated information. When routers need to forward packets, they interpret the packets’ addresses then use the information in the routing tables to pass the packet on. Data packets contain both source and destination addresses in their packet headers. This is the information that is used when routing decisions need to be made. The destination address is compared with the local address to determine whether the packet should be sent up the stack on the local host, whether the packet should be sent to a different destination, or whether the packet should simply be ignored.
OSPF is the dynamic routing protocol used to exchange routing information with very large networks. While configuring OSPF is more complex than configuring and administering RIP, OSPF is more efficient than RIP and it also requires very minor network overhead. A few reasons to use OSPF rather than RIP is that OSPF scales well to large and very large internetworks, OSPF has no hop limit, OSPF calculated routes are loop-free routes, and OSPF utilizes less network bandwidth than the RIP routing protocol.
Routers that have RIP enabled advertise their entire routing tables’ content to other routers at 30 second intervals. From this, it is quite clear that RIP does incur quite a bit of network traffic. This could negatively impact demand-dial connections because of the quantity of RIP traffic generated. Auto-static routing updates can be used for networks that use RIP. With auto-static routing updates, route update advertisements can be scheduled.
A few issues that need to be clarified before creating demand-dial VPN connections are:
- Select the VPN tunnel protocol to utilize:
- Point-to-Point Tunneling Protocol (PPTP): PPTP encapsulates PPP frames into IP datagrams to transmit data over an IP internetwork. PPTP utilizes a TCP connection to create and manage the VPN tunnel to convey tunneled data. A modified version of Generic Route Encapsulation (GRE) deals with data transfer by encapsulating PPP frames for tunneled data. The encapsulated tunnel data can be encrypted and compressed. The authentication methods that PPTP supports are PAP, CHAP, MS-CHAP, and EAP. PPTP encryption can only be utilized when the authentication protocol is EAP-TLS or MS-CHAP.
- Layer 2 Tunneling Protocol (L2TP): encapsulates PPP frames and sends encapsulated data over IP, frame relay, ATM, and X.25 networks. With L2TP, the PPP and layer two end-points can exist on different devices. L2TP can also operate as a tunneling protocol over the Internet. L2TP uses UDP packets and a number of L2TP messages for tunnel maintenance. When L2TP is used with IPSec, the highest level of security is assured, including data confidentiality and integrity, data authentication, and replay protection. A Public Key Infrastructure (PKI) has to be used in order to use L2TP as the encapsulating VPN protocol.
- Persistent Internet connection requirements: Users might need to have a persistent Internet connection at each end of the VPN tunnel if a demand-dial circuit is going to be used:
- If each of the two systems connects to the Internet via a persistent connection, ascertain whether each end needs to start the demand-dial connection.
- If one system connects to the Internet via a persistent connection, configure a demand-dial VPN and a standard demand-dial connection.
How to Install Routing and Remote Access Service (RRAS)
- Click Start then Manage Your Server.
- Select the Add or remove a role option.
- The Configure Your Server Wizard starts.
- On the Preliminary Steps page, click Next.
- A message appears, informing the user that the Configure Your Server Wizard is detecting network settings and server information.
- When the Server Role page appears, select the Remote Access/VPN Server option then click Next.
- On the Summary of Selections page, click Next.
- The Welcome to the Routing and Remote Access Server Setup Wizard page is displayed.
How to Configure a VPN Server
- Click Start, Administrative Tools, and Routing And Remote Access to open the Routing And Remote Access management console.
- In the console tree, select the server to be configured.
- Right-click the server then click Configure And Enable Routing And Remote Access from the shortcut menu.
- The Routing and Remote Access Server Setup Wizard starts.
- Click Next on the Routing and Remote Access Server Setup Wizard Welcome page.
- On the Common Configuration page, select the Remote Access (Dial-Up Or VPN) option. Click Next.
- On the Remote Access page, select the VPN checkbox.
- On the VPN Connection page, choose the interface that is connected to the Internet and click Next.
- On the IP Address Assignment page, select the Automatically option to use a DHCP server for IP address assignment for remote clients or select the From A Specified Range Of Addresses option to specify one’s own address range.
- If the From A Specified Range Of Addresses option was chosen, proceed to specify the address range for remote clients. Click Next.
- On the Managing Multiple Remote Access Servers page, select the No, Use Routing And Remote Access To Authenticate Connection Requests option. Click Next.
- Click Finish on the Completing the Routing and Remote Access Server Setup Wizard page.
How to Configure PPTP/ L2TP Ports
- Click Start, Administrative Tools, and Routing And Remote Access to open the Routing And Remote Access management console.
- In the console tree, expand the node for the server to be configured.
- Right-click Ports then select Properties from the shortcut menu to open the Ports Properties dialog box.
- Select WAN Miniport (PPTP) or select WAN Miniport (L2TP).
- Click the Configure button.
- The Configure Device dialog box opens.
- In the Maximum Ports box, specify the number of connections that the port type that was selected can support. The default configuration setting when the RRAS is installed is 5 PPTP ports and 5 L2TP ports.
- To specify the public interface’s IP address to which VPN clients connect, use the Phone Number For This Device box on the Configure Device dialog box.
- To disable connections for the port type, deselect the Use the Remote Access Connections (Inbound Only) checkbox on the Configure Device dialog box.
- To prevent the specific VPN type from being used for demand-dial connections, deselect the Demand-Dial Routing Connections (Inbound And Outbound) checkbox.
- Click OK to close the Configure Device dialog box.
- Click OK to close the Ports Properties dialog box.
How to Install Computer Certificates on VPN Routers
Computer certificates have to be installed on VPN routers when they authenticate through EAP-TLS and connect using L2TP/IPSec as the encapsulating protocol.
Computer certificates can be installed via either of the following methods:
- Web browser computer certificate installation
- Auto-enrollment of computer certificates
To use a Web browser computer certificate installation:
- Connect to the CA server using Internet Explorer 5.0 or above and the credentials of the Administrator account.
- The following URL can be used: http:// <servername>/certsrv.
- Enter the appropriate user name and password if one is not automatically authenticated.
- The Web based interface for manually requesting certificates opens and the Welcome page is displayed.
- Click the Request A Certificate option.
- On the following page, click Advanced Certificate Request.
- Click the Create And Submit A Request To This CA option.
- On the Advanced Certificate Request page, in the Certificate Template list, choose Router (Offline request).
- In the Name box, enter the user account name that the calling router utilizes.
- Under Key Options, select the Mark keys as exportable checkbox and select the Store certificate in the local computer certificate store checkbox.
- Click the Submit button.
- When the Certificate Issued page appears, click Install This Certificate.
- On the Potential Scripting Violation warning dialog box, click Yes.
To install computer certificates through auto-enrollment:
- Click Start, Administrative Tools, then click Active Directory Users and Computers to open the Active Directory Users and Computers management console.
- In the console tree, expand Active Directory Users and Computers.
- Locate and right-click the domain that contains the CA, then select Properties from the shortcut menu.
- Click the Group Policy tab.
- Select Default Domain Policy then click the Edit button.
- In the console tree, right-click Automatic Certificate Request Settings then select New from the menu.
- Expand Computer Configuration, expand Windows Settings, expand Security Settings, expand Public Key Policies, expand Automatic Certificate, then click Request Settings.
- The Automatic Certificate Request Wizard starts.
- Click Next on the Automatic Certificate Request Wizard Welcome page.
- In Certificate templates, click Computer. Click Next.
- Select CA then click Next.
- Click Finish.
How to Configure a VPN Router to Enable Connectivity between LANs
- Click Start, Administrative Tools, and Routing And Remote Access to open the Routing And Remote Access management console.
- In the console tree, select the server to be configured.
- Right-click the server then click Configure And Enable Routing And Remote Access from the shortcut menu.
- The Routing and Remote Access Server Setup Wizard starts.
- Click Next on the Routing and Remote Access Server Setup Wizard Welcome page.
- On the Common Configuration page, select the Remote Access (Dial-Up Or VPN) option. Click Next.
- On the Remote Access page, select the VPN server checkbox then click Next.
- On the VPN Connection page, select the network interface for connecting the server to the Internet.
- Leave the default setting that enables security on the selected interface unchanged then click Next.
- On the Address Assignment page, select the From A Specified Range Of Addresses option and click Next.
- On the Address Range Assignment page, click New and specify an address range for the remote VPN gateway. Click Next.
- On the Managing Multiple Remote Access Servers page, select the No, Use Routing And Remote Access To Authenticate Connection Requests option. Click Next.
- Click Finish when the Completing the Routing and Remote Access Server Setup Wizard page appears.
- The user will be notified that the DHCP Relay Agent has to be configured with the DHCP server’s IP address so that DHCP relay messages can be allowed from one’s remote clients.
- Click OK to acknowledge this notification.
- To configure the demand-dial interface, select Network Interfaces in the Routing and Remote Access console’s console tree.
- In the Action menu, click New Demand-dial Interface.
- The Demand-dial Interface Wizard starts.
- Click Next on the Demand-dial Interface Wizard Welcome page.
- Enter a name for the demand-dial VPN interface then click Next.
- On the Connection Type page, choose the Connect using virtual private networking (VPN) option and click Next.
- On the VPN Type page, select the VPN protocol to be used then click Next. Users may leave the Automatic selection default option unchanged.
- On the Destination Address page, provide the IP address that corresponds with the remote gateway’s public interface then click Next.
- On the Protocols And Security Page, select the Route IP packets on this interface checkbox and click Next.
- On the Static Routes For Remote Networks page, click the Add button and enter the LAN subnet address for the remote LAN on the Static Route dialog box.
- Click OK then Next. Specify the username, password, and domain for authentication purposes and click Next.
- Click Finish on the Completing the Demand-dial Interface Wizard page.
- Configure the interface for a persistent connection.
- In the Routing and Remote Access console’s console tree, select the demand-dial interface to be configured then select the Action menu. Click the Options command on the Action menu.
- Click Persistent Connection and OK.
- In the Routing and Remote Access console’s console tree, expand the IP Routing node.
- Select Static Routes to verify that the static route to the remote LAN subnet is configured. The static route should be displayed in the Details pane.
- To configure packet filtering properties, select the demand-dial interface and select Properties from the shortcut menu.
- On the General tab, select Inbound Filters then select New.
- Specify the appropriate LAN subnet information. Click OK.
- Select the Drop all packets except those that meet the criteria below option then click OK.
- Select the demand-dial interface and Properties from the shortcut menu.
- On the General tab, select Outbound Filters then New.
- Specify the appropriate LAN subnet information. Click OK.
- Select the Drop all packets except those that meet the criteria below option then click OK.
- Click OK again.
- In the Routing and Remote Access console’s console tree, select the demand-dial circuit from Network Interfaces then select the Connect command from the Action menu.
- Examine the information in the Status column and Connection State column to verify the status and the tunnel’s state.
How to Manually Add a VPN Connection
To add a VPN connection through the Routing And Remote Access console, it must be manually added to the Network Interfaces node.
- Click Start, Administrative Tools, and Routing And Remote Access to open the Routing And Remote Access console.
- In the console tree, select the Network Interfaces node.
- Right-click the Network Interfaces node then select New Demand-Dial Interface from the shortcut menu.
- The Demand Dial Interface Wizard starts.
- Follow the Demand Dial Interface Wizard’s prompts to manually add the VPN connection.
How to Enable the DHCP Relay Agent on a Router Interface
- Click Start, Administrative Tools, and Routing and Remote Access to open the Routing And Remote Access console.
- Expand the IP Routing node in the console tree.
- Right-click the DHCP Relay Agent node then select New Interface from the shortcut menu.
- Select the interface that is on the same subnet as the DHCP clients.
- Click OK.
- In the DHCP Relay Properties dialog box, ensure that the Relay DHCP Packets checkbox is selected on the General tab.
- Change the Hop-Count Threshold and Boot Threshold values.
- Click OK.
How to Add a Static Route
- Click Start, Administrative Tools, and Routing And Remote Access to open the Routing And Remote Access management console.
- In the console tree, right-click Static Routes then select New Static Route from the shortcut menu.
- When the Static Route dialog box opens, provide the appropriate information for the following settings:
- Interface
- Destination
- Network Mask
- Gateway
- Metric parameters
- Click OK.
How to Create IP Packet Filters
Demand-dial filters and inbound/outbound packet filters can be configured to manage both inbound/outbound access to resources via the VPN tunnel. For packet filters, the rules used can be based on the following:
- Source address
- Destination address
- Source TCP port
- Destination TCP port
- Source UDP port
- Destination UDP port
- Protocol type
To configure inbound packet filters:
- Click Start, Administrative Tools, and Routing And Remote Access to open the Routing And Remote Access management console.
- In the console tree, select the server to be configured.
- Expand the IP Routing node to display the General sub-node.
- Click the General sub-node.
- In the Routing And Remote Access console’s details pane, select the demand dial interface.
- Click the Action menu then select the Properties command.
- When the demand-dial interface Properties dialog box opens, select Inbound Filters on the General tab.
- When the Inbound Filters dialog box opens, click New.
- The Add IP Filter dialog box opens.
- Specify the desired parameters for the inbound filter.
- Click OK.
Troubleshooting Router-to-Router VPNs
A few guidelines for troubleshooting problems associated with router-to-router VPNs are summarized below:
- The Router option and the LAN option should be enabled on the remote access server. Verify this through the Routing And Remote Access console by checking the configuration on the General tab of Server Properties dialog box.
- Each remote access server should be configured to handle the appropriate number of connections. Verify that each server has the sufficient number of ports specified in the Routing And Remote Access console’s Ports node.
- Each remote access server must have the Enable IP Routing option selected. Verify this by accessing the Routing And Remote Access console and checking this option’s setting on the Server Properties dialog box’s IP tab.
- Ensure that the static routes are correctly configured on the remote access server for the traffic destined for the other network to be forwarded to the proper VPN router.
- The VPN connection should have the proper permissions on the user account’s dial-in properties and in remote access policies.
- The settings specified in remote access policies should not conflict with the remote access server’s configured properties.
- The demand-dial router, answering remote access server, and remote access policy should be using at least one common authentication method. They should also be using a common encryption level or strength.
- The remote access server at each end of the connection has to be part of the RAS And IAS Servers group in the local domain.
Follow Us!