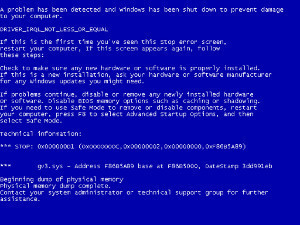
Windows error 0x0000007e is a system error message that is displayed whenever the computer’s operating system is unable to access system files, optical drives, ports, hard drives, or other installed hardware on the computer. Under normal system operation, the Windows error handler will discover the issues upon booting the device and display the error prior to an end-user logging in to the system. There are cases; however, that will result in the error being thrown that precludes the error handler from displaying the issue(s) immediately. When this occurs, error 0x0000007e will be displayed after the computer is started.
What Causes Error 0x0000007e?
Error 0x0000007e can be caused by a large number of reasons. These causes include outdated printer drivers, an outdated computer BIOS, incompatible video adapter drivers, insufficient hard drive space, and damaged device drivers. Due to the large number of potential causes of the error, it can be challenging to troubleshoot the error.
How to Fix the 0x0000007e Error?
There are a number of options to troubleshoot and repair the 0x0000007e error depending on the nature of the error.
Option 1: Verifying the computer has enough hard drive space
Windows error 0x0000007e is commonly thrown on older computers that have recently undergone a Windows operating system upgrade due to exceeding the total amount of free hard drive space on the computer.
Step 1 – If the computer is running Windows 7 or older, restart the computer normally. While the computer is restarting, press the “F8” key to launch the OS in Windows Safe Mode. In Windows 8, if the computer does not boot properly it will load a “Recovery screen.” Then, click “Advanced Repair Options” menu button followed by selecting the “Troubleshoot,” “Advanced Options,” and “Windows Startup Settings” options. Select the “Restart” menu button and the computer will provide “Safe” mode as an option on the subsequently displayed startup screen.
Step 2 – From the Windows “Recovery Console,” remove all temporary files, program backup files, Internet cache files, and any files that contain saved file fragments from Windows disk scans (these end in the .chk file extension).
Step 3 – If the hard drive does not have sufficient hard drive space after taking these steps, consider reverting the operating system installation to the previously installed version of Windows or upgrading the hard drive to one with sufficient memory to run the desired version of the OS. If freeing hard drive space did not solve the problem, proceed to the updating the computer BIOS step.
Option 2: Update the computer’s BIOS
If the computer has sufficient hard drive space to support the installed Windows OS, the computer’s BIOS may be the issue causing the error. The computer’s Basic Input/Output System (BIOS) is the first software executable loaded when the system starts. It is responsible for locating all of the computer’s hardware components and informing the OS that they are available for use. Similar to other software programs, the many computer and motherboard manufacturers will update the computer BIOS periodically. When this occurs, the manufacturer will typically upgrade the software to support new devices, fix incompatibilities, and improve overall speed. The majority of BIOS updates are available at the manufacturer’s website; however, not all computers are designed to pull these updates automatically and can result in error 0x0000007e being thrown.
Step 1 – Determine the computer’s current BIOS version.
If you can boot your computer, the easiest way to determine what version of BIOS that is running is via the System Information application in Windows. Select the “Start” menu button and enter “msinfo32” into the search text box and then select the “System Summary” menu label. If running Windows XP, then enter “msinfo32” in the run box. The BIOS version will be displayed on the right-hand side of the computer screen beneath the CPU speed. Write the version number and date if listed down.
Step 2 – Check the computer / motherboard manufacturer website for updates.
Once you know the BIOS version installed on your computer, you will need to check the manufacturer of the computer and/or motherboard’s website for the latest updates. If the website lists a newer version of the BIOS software available for your computer, download the file along with any documentation included with the application. If the computer was assembled by yourself or another private individual, the motherboard manufacturer’s website will be the primary location for finding potential updates.
Step 3 – Read the updated BIOS documentation prior to installation.
More than a few computer users have “upgraded” their machine’s BIOS only to find that they have done further harm to the computer. In many of these cases, there were clear warnings in the BIOS update documentation that would have prevented the issue. Many times, the “Read Me” file will provide relevant information on any operating system patches that should be installed prior to upgrading the BIOS file.
Step 4 – Update the computer’s BIOS.
If your computer has been purchases recently, the BIOS update procedure has been significantly simplified compared to past years. After making sure there are no other patches to download and install on the computer from the previous step, download the BIOS update executable from the manufacturer’s website to an easy to find location on the computer such as the computer’s desktop. Then, quit all programs that are running and double click the upgrade file. Accept all default menu options to update the patch and restart the computer. If upgrading a laptop, make sure the computer is plugged into a power source since a battery failure during the install can result in significant issues on your computer.
On an older computer, you may have to boot the computer from a boot disc to upgrade the BIOS. If this is the case, you will need to include the BIOS upgrade file onto the disk. Prior to booting from the disc, the boot drive order will need to be changed from the BIOS configuration options panel to look for the portable media drive first (before the computer’s hard drive). When you boot the computer from the disk, load the BIOS update once the computer has restarted. Following the BIOS upgrade, restart the computer, and 0x0000007e error will be removed if the BIOS was causing the error to be thrown.
Option 3: Updating or disabling device drivers
If the computer’s BIOS is up-to-date, or you have successfully updated the BIOS and the computer continues to throw error 0x0000007e, then the problem may lie in an outdated or incompatible device driver on your computer. If a device driver is listed by name in the Windows STOP error message, then this is likely the driver that is causing the issue with the computer.
Step 1 – Restart the computer in Windows Safe Mode.
Step 2 – Open the Windows Device Manager application. The application can be found under the Windows Control Panel menu.
Step 3 – Double-click the device type that you desire to uninstall.
Step 4 – Right click the specific device that is causing the issue. Then, click the “Uninstall’ menu option. Alternatively, you can double-click the problem device and then select the “Uninstall” menu option located on the “Driver” menu tab.
Step 5 – Under the “Confirm Device Removal” page in the application, select the “Delete” menu option for this device. This will remove the driver from the Windows Device Driver Store.
Step 6 – Select the “OK” menu button to complete the uninstall process for removing the driver.
Step 7 – Once the uninstall process is completed; the device will likely cease to function until the computer is restarted or a current device driver is installed.
Step 8 – Next, select each of the video adapter drivers installed on the computer.
Step 9 – Choose the applicable menu option to update all of the video adapter drivers.
Step 10 – Exit the Windows Device Manager application, and restart the computer.
Step 11 – If the computer continues to throw the 0x0000007e STOP code, then repeat these steps and focus on removing any recently installed drivers or services on the computer. After removing all new drivers, restart the computer normally.
Option 4: Removing all unsigned drivers on the computer.
If you have updated all video drivers and removed potential problem ones under option 3, then the issue with the computer may lie in any unsigned drivers that are installed. These drivers may not be compatible with the current version of Windows or the system BIOS that is installed on the computer. All f the drivers that have a Microsoft digital signature have been tested by the Microsoft Windows Hardware Quality Labs, or WHQL. Many builds of Windows include the File Signature Verification tool, Sigverif.exe to help the end-user confirm what drivers installed on the computer are not digitally signed. Step 1 – Select the “Start” menu button and choose the “Run” menu option on older versions of Windows. Then, enter “sigverif” in the “Open” box and click the “OK” menu button. On newer versions of Windows, enter “sigverif” in the Windows search text box followed by clicking the “OK” button.
Step 2 – Select the “Advanced” menu button and search for files that are not digitally signed by Microsoft. To do so, click the “Browser” and then “Advanced” menu options and located the “Windows\System32\Drivers” folder and select the “OK” menu button twice.
Step 3 – Choose the “Start” menu button and wait for sigverif.exe to run to completion. A listing of all unsigned drivers on the computer will now appear on the computer’s display.
Step 4 – Create a folder on your computer’s hard drive to move all of the unsigned drivers into. Then, move the unsigned drivers to this folder by dragging them from the current location to this new folder. The folder should be created in the Windows director so that if the computer has issues with restarting you can restore them via the Windows Recovery Console.
Step 5 – Restart your computer to see if moving the unsigned drivers has corrected the error being thrown.
Option 5: Delete or remove all third party drivers from the computer.
Another common cause of Windows error 0x0000007e is incompatibility of third party drivers with the computer’s operating system. If the removal of unsigned drivers has not fixed the issue, then starting to remove all third party drivers from the computer (one at a time) will help further determine the cause of the Windows STOP code from being thrown.
Step 1 – Create a temporary folder to move all third party drivers on your computer. This folder should be created within the System32 subdirectory of the “Windows” folder.
Step 2 – Move all of the files that are published by a third party to this folder. Note, that some computers rely on third party SCSI or IDE controller drivers for correct operation. These drivers should be left in the original location in order to allow proper computer operation while attempting to identify the faulty driver.
Step 3 – Restart the computer. If the error has gone away, then the issue now lies within the third party driver installations on the computer.
Step 4 – Move the third party drivers back to their original location one at a time. Restart the computer after each driver is moved back to its normal location.
Step 5 – When Windows error 0x0000007e reappears, you have identified the third party driver that caused the issue.
Step 6 – Launch your computer’s web browser and navigate to the company that publishes the faulty driver’s website.
Step 7 – Download and install the most recent device driver for the third party driver causing Windows to throw the STOP code.
Step 8 – Restart the computer normally and the Windows error should now be cleared.
Option 6: Removing all third party remote control services
If the Windows error 0x0000007e continues to persist after completing all previous options to remove the error, and the STOP message contains a Win32k.sys file name, the error may be generated by a third-party remote control application.
Step 1 – Restart the computer in Windows Safe Mode.
Step 2 – Launch the Windows Recovery Console.
Step 3 – Remove or delete the third party, remote control service file.
Step 4 – Restart the computer normally to correct the Windows error.
help
I have his error, but i cant enter safe mode to fix it. What now?
Error is: setup of xp cannot continue in safemode. Press ok to restart.
So it just loops again.
frederik
try “Long Path Tool”
rejohn
Long Path Tool help me a lot when i have an issue like file deleting or
renaming the file. Also good to use if file name and file extension is
too long.
frederik
(THIS POST IS SPAM……SPAM…….SPAM.)
Long Path Tool help me a lot when i have an issue like file deleting or
renaming the file. Also good to use if file name and file extension is
too long.