Windows Operating System (OS) users may encounter the NMI Parity Check/Memory Parity Error during the computer start-up process. The error is normally displayed when a computer hangs or stops responding during the Windows start-up process, and may be the result of a number of hardware or hardware configuration problems.
What does the NMI Parity Check/Memory Parity Error Look Like?
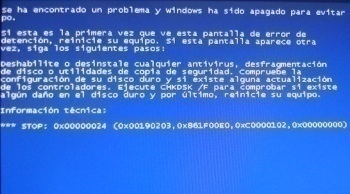
A number of error codes can be displayed when the error occurs. These include:
NMI: Parity Check/Memory Parity Error, NMI: Bus Timeout, NMI: Software NMI generated, NMI: Eisa IOCHKERR board x, NMI: Channel Check/IOCHK, or NMI: Fail-safe timer
The error codes typically start with the “*** Hardware Malfunction” message and a display message indicating that the computer or system has been “halted” follows.
Why does the NMI Parity Check/Memory Parity Error Occur?
The NMI Parity Check/Memory Parity error typically occurs if a computer hardware component is damaged, malfunctions, or if an incompatible driver is installed on the computer.
How to Fix the NMI Parity Check/Memory Parity Error
Most hardware problems that trigger this error involve the computer’s RAM, motherboard, cache memory, or a hardware adapter on the computer. The following are troubleshooting steps that can be taken to identify the cause of the error:
Verify Your Computer’s Memory
Step 1 – Remove any new RAM modules that have been installed on the computer.
Step 2 – Restart the computer to see if the error message continues to be displayed.
Step 3 – If the error is eliminated, then replace the RAM modules that were installed. If it persists, repeat the process but only leave the minimum amount of RAM necessary to boot the computer in order to determine if the computer has faulty RAM.
Step 4 – Replace the faulty RAM modules if they are the source of the problem.
The Microsoft RAM diagnostic tool found at: http://oca.microsoft.com/en/windiag.asp may also be used in order to help identify faulty computer modules.
Verify the Adapters on the Computer
Step 1 – Remove all adapters that are not required to run or start the computer. Most Windows computers can be run with only the video and drive subsystem controller adapters.
Step 2 – Restart the computer. If the error does not appear, then the problem is one of the adapters removed in step 1.
Step 3 – Reinstall one adapter at a time until the error is displayed again. This determines the adapter that was the source of the error. Visit the adapter manufacturer’s website and download and install the latest version.
Step 4 – Re-seat all adapter hardware cards if the error is not eliminated to ensure that this is not the cause of the problem.
Verify the Computer BIOS
Step 1 – Ensure that the latest revision of the computer’s BIOS and firmware configuration are installed.
Step 2 – Open the BIOS and change the configuration to “load Fail-safe defaults” or “BIOS defaults,” set “Plug and Play OS” to “No,” and disable anti-virus protection options located in the BIOS.
Step 3 – Restart the computer to see if the error has been corrected.
Check for Driver Updates
If Windows OS was recently upgraded or new hardware installed, then an outdated device driver may be the cause of the error.
Step 1 – Ensure that Windows Updates is configured to automatically update the computer from the “Windows Updates” application found in the computer’s “Control Panel.” Manually update the Operating System. Restart the computer after completing the manual Windows update.
Step 2 – If any new hardware was installed, remove the hardware drivers in the “Add/Remove Programs” menu after updating the OS in Step 1 and restart the computer.
Step 3 – Check the other device drivers installed on the computer for updates if the error is still being displayed and an update as required. Restart the computer after each device driver update to complete troubleshooting it.
Francisco
Came to this page after I had memory issues with my Compaq W6000. I followed the steps to remove the memos, and now it’s working fine again. So I can tell that this was very useful to me
Md kabeer uddin
HP Compaq dc7100S PARITY MEMORY ERROR N HP HOW TO SOLVE THIS PROBLEM
Yakubu jibrin
NMI Parity Check/Memory Parity Error Look Like? in Samsung x20 but initially the system uses windows xp but i upgraded to window 7 after that it working normal with no problem i now decided to run driver park to install some missing drivers like sound, video cards. after that the system started displaying the above error massage please what’s is the way out.
tony muga
did you also update the chipsets?
Harry Stocks
The NMI parity Blue Screen of death issue can also be caused by an old video card. I have an Dell Inspiron 9400 which has worked perfectly for years. Then I had problems with the screen. It looked like the matrix in the film. I got the screen replaced and it was fine for a while. Then I started to get the NMI parity BSOD. It happened occasionally but slowly became more frequent. I ran diagnostics and all the RAM checked out ok. I replaced my RAM – I have some spare – but the problem remained.I replaced the motherboard – still got the problem.
Then I noticed that just before the computer crashed a ghost appeared just above a word on the screen. Could this be a video card problem? I went onto you tube and there is a video of a man revitalising his video card from an Inspiron by baking it in the oven. I kid you not. Actually the science is that as the video card gets older – or if it poorly manufactured – it can have micocracks in the solder. The baking softens the solder and closes the cracks. You put the card back together and Hey Presto all is fine again. Well it worked for me too.
mohamed aden
PARITY MEMORY ERROR N HP HOW TO SOLVE THIS PROBLEM
mohamed aden
how to solve problem Nmi IN HP
mohammed haji
i’am having this issue on my hp dx6120mt The problem was isolated to my Qualcomm Atheros AR5006X Wireless Network Adapte
Mramor
I`m having this issue on my Dell Inspiron 6400. The problem was isolated to my wireless mini 1390 adapter. When I disable it computer boots up without any problem. I got the new wireless card, replaced it but still get the same error. I have tried to install drivers, checked the BIOS and tried several other solutions offered on the web.
Could someone please help me resolve this?
Thank you
joipalli
got this The NMI Parity Check/Memory Parity error because of overheating