When trying to upgrade a computer running an older version of Windows to Windows 7, end-users can encounter the 0×80070570 error. When the error is thrown, Windows will only notify the user that the installer is not able to install the files required to upgrade the computer preventing further progress from being made with the upgrade of the operating system (OS). The common causes for the error include having incorrect permissions to upgrade the OS, a damaged Windows 7 installation disk, or a damaged ISO image preventing the proper upgrade of the computer.
What is the Error Message Displayed by the 0×80070570 Error?
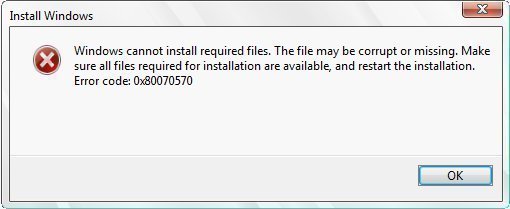
Typically, when the 0×80070570 error is thrown, the following message will be displayed to the end-user:
“Windows cannot install required files. The file may be corrupted or missing Make sure all files required for installation are available, and restart the installation. Error 0×80070570.
Error code: 0×80070570: The file or directory is corrupted and unreadable. “
Once the error message is displayed, Windows will cease the update to the new operating system.
What are the Causes of the 0×80070570 Error?
The primary cause of the 0×80070570 error is that the computer is not able to continue to process the required files and settings included on the Windows 7 installation CD/DVD. The issue can commonly result from a damaged install CD/DVD, using an ISO Image download not saved to disc (or that is corrupted), or insufficient computer resources available on the target computer to support running Windows 7.
Windows 7
Windows 7 was a major edition of the Microsoft Windows OS released in late October of 2009. The OS is available in six different editions: Ultimate, Enterprise, Starter, Home Basic, Home Premium, and Professional). The primary editions available through retail outlets are the Ultimate, Home, Premium, and Professional editions of the OS. The additional editions are focused on enterprise and developing world markets. All editions of the OS are able to support 32-bit CPU’s and all but the Starter Edition can support 64 bit x64 CPUs. The features for all of the Windows 7 editions are stored on the computer independent of what edition is actually purchased. If a consumer desires to upgrade to a more advanced edition of Windows 7 that has additional features, he or she can simply purchase the Windows Anytime Upgrade to unlock the new edition or upgrade.
Windows 7 Upgrade Editions
Computers that have the Windows OS installed can upgrade to Windows 7 if Windows Vista Service Pack 1 or newer is installed on the computer. If this is the case, then if the CPU, language, architecture, and comparable edition are in place, the upgrade to Windows 7 can proceed. If an earlier version of Windows installed than Vista Service Pack 1, then installation of Windows 7 can only be accomplished via a clean OS install. For some non-U.S. countries, Microsoft has recommended consumers conduct a clean install of the OS no matter what version of Windows was previously installed on the computer.
Windows Standard Upgrade Editions
For Windows 7, Microsoft does support upgrading from different versions of XP and Vista using upgrade editions. This results in multiple upgrades having to be conducted; however, until Windows Vista Service Pack 1 is installed on the computer. Another option is to leverage the Windows Easy Transfer application to collect the personal data saved on the computer, conduct a clean installation of Windows 7, and then reinstall program data and settings from the Windows Easy Transfer application. This still requires a reinstallation of all programs that were not part of the core Windows program bundle. When upgrading to Windows 7, there is typically only discount pricing available for users of certified copies of Windows XP or Vista.
Windows 7 Family Pack
Microsoft has made Windows 7 available as a Family Pack upgrade edition in a number of markets worldwide. If taking advantage of this option, it allows a family to have licenses to upgrade up to three computers from Microsoft Vista or Windows XP to the Windows 7 Home Premium edition. Each of these upgrades are not full versions of the OS, so the computer(s) being upgraded will have to have a qualifying, earlier version of the Windows OS for it to work. The Family Pack upgrade was discontinued in the United States a few months after release; however, it has been offered at other times in the life of the OS depending on the availability of inventory.
Windows 7 Upgrade Options
When Windows 7 was first released, Microsoft advertised two methods to upgrade to the OS on an existing computer with Windows install: 1 – An in-place install, and 2 – A clean install. For the in-place install option (branded as an “Upgrade” by Microsoft), the programs and settings are preserved from the earlier version of Windows being installed. This option is only available to end-users who are upgrading from Windows Vista SP 1. For the clean install option (branded as a “Custom” upgrade), all of the end-users settings and applications are fully erased if the end-user does not make a backup of their data. This includes all user account information, programs, music, photos, and other applications that may have been purchased or downloaded during the life of the computer.
How Do You use Windows Easy Transfer?
Step 1 – Download the Windows Easy Transfer Application on your computer if it is not already installed. To tell if the application is already on the computer, select the “Start” menu and then choose the “All Programs,” “Accessories,” and “System Tools” menu options. The “Windows Easy Transfer” icon will be located on the listing of the applications. If you don’t see the program listed, you will need to install it on the computer.
Step 2 – Click the program icon and launch the Windows Easy Transfer application.
Step 3 – Choose the “Start a New Transfer” menu option.
Step 4 – Choose the folders, files, and programs to backup using the Windows Easy Transfer program.
Step 5 – Select the media to save the information from your computer to. This can be a CD, DVD, flash drive, or portable hard drive depending on the amount of information that you need to backup. If the computer has been in use for several years, you will likely need to use media that has a large amount of storage space available if there is a large amount of multimedia stored on the computer.
Step 6 – When prompted by the application, select the drive letter that the portable media is connected to for the backup option.
Step 7 – Once the application prompts you, remove the media when the data is finished being copied to the drive or disc.
Step 8 – Remove the disc and store it in a safe place until you are ready to restore your program settings after finishing the upgrade to Windows 7 on the computer.
Restoring Data after the Windows 7 Upgrade
Step 1 – After the upgrade to Windows 7 is complete, launch the Windows Easy Transfer application.
Step 2 – When prompted, indicate that this is a new transfer and connect the media that you previously saved your legacy files and programs to.
Step 3 – Click the “Next” menu button and follow the Data Transfer Wizard steps to restore the settings and files to your computer.
Step 4 – If you used multiple CDs or DVDs to back-up your old computer, insert the subsequent backup discs as requested by the Data Transfer Wizard.
Step 5 – Exit the Windows Easy Transfer application once the back-up process is complete.
What is an ISO Image?
ISO images are an archive file of a disk image that includes the information stored on every written sector of the optical disc. These images will typically have a file extension of .iso which is taken from the ISO 9660 file system that is used with CD-ROM media but may also include the file system used by DVDs and Blu-ray discs. These images can be created from the optical disc through the use of various tools or specialized optical disc authoring software. ISO disc images are not compressed and do not use any defined container format since they are simply a sector-by-sector copy of the information stored on the disc that was copied.
The .img extension is also found on a number of ISO image files, but they tend to include different content than traditionally found in ISO images. The .UDF file extension has also been used at times to indicate that the ISO image has used the UDF file system and not the ISO 9660 standard.
Since any DVD, Blu-ray disc, or CD-ROM can be archived in an ISO format, operating system installation discs can be saved as ISO images. Once saved to an ISO image, the information can be opened by a number of file archivers. If attempting to install Windows 7 from an ISO image not saved onto a disc, then the end-user may find themselves in a position of having to use a stand-alone product to burn the installer to disc to continue with a successful upgrade to Windows 7.
How to Fix the 0×80070570 Error
As stated, the primary cause of the 0x80070570 error is typically a failure of the computer to read the installation disc for some reason.
Step 1 – If attempting to conduct a clean installation of Windows 7, make sure you have made a full backup of your private data and third party applications installed on the computer before starting the installation process.
Step 2 – If you have been attempting to install Windows 7 from an ISO file, the computer has likely been unable to properly read the files from the ISO or virtual drive. Since any Windows installation will alter the operating system on the computer, any virtual process will likely fail once the installation gets started. If this is how you have been attempting to conduct the upgrade to Windows 7, shift to making the upgrade attempt via CD / DVD.
Step 3 – If you have been attempting to install Windows 7 from an installation disc already or just shifted from attempting via an ISO image, then check the CD/DVD to see if it is damaged or corrupted. If the disc is damaged, this will prevent the computer from being able to properly read all of the options and settings that are required to proceed with the installation of Windows 7. On inspection, if the disc appears to be dirty, it can be cleaned with a soft cloth prior to attempting the installation again. If not scratched too deeply, this will help the computer read the files to complete the Windows 7 installation and resolved the 0x80070570 error.
Step 4 – If you are still getting an error on installation of Windows 7, then there may be a problem with the current Windows installation on your computer preventing the upgrade from occurring. This issue can be overcome by conducting a full repair of the current installation on the computer. Prior to conducting the repair; however, you should make a backup of all files and programs if you did not already do so to avoid potential data loss. To repair the Windows OS, first restart the computer. Then, load the original Windows disc for the current installation of the OS and boot from the disc. Next, press the “Enter” key to continue booting from the disc and choose the Windows installation currently on the computer. Then, press the “R” key to launch Windows Repair. Once the Repair utility completes restoring the system files on your computer, restart the PC. At this point, you should be able to retry upgrading the computer to Windows 7 and avoid having the 0×80070570 error thrown.


frederik
“Long Path Tool” is very helpfull
rejohn
You can use “Long Path Tool” !