Windows error 619 occurs when a user attempts to reconnect a modem to the Internet after a successful connection and the computer fails to connect to the Internet. This error often forces users to restart their computer in order to successfully connect to their Internet Service Provider (ISP) and the Internet. This problem most commonly occurs on computers running the Windows XP operating system. Using third party applications that do not release the Winsock stack after being online also triggers it. Zone Alarm and Download Accelerator Plus are two of the applications that did this in the past.
How to Fix Error 619
Step 1 – Right click the “My Computer” icon on the computer’s desktop.
Step 2 – Select “Properties” on the subsequently displayed menu.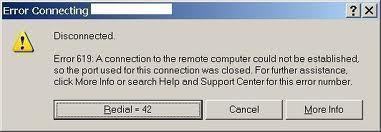
Step 3 – Choose “Hardware” then “Device Manager.”
Step 4 – Right click the modem on this screen and select “Disable.”
Step 5 – Exit the screen and restart the computer.
How to Fix Error 619 on an SMIG Connection
Step 1 – Restart the computer in normal mode.
Step 2 – Locate the SMIG connection in “Network Places” and right click the connection icon.
Step 3 – Select “Delete.”
Step 4 – Reinstall SMIG on the computer.
Step 5 – Restart the computer and error 619 will be corrected.
How to Fix Error 619 with a Linksys Router
Error 619 can occur when connecting to the Internet with a DSL modem as well. Typically, it is as a result of an issue with the router via the DSL modem.
Step 1 – Connect the computer directly to the DSL modem.
Step 2 – Navigate the web browser to 192.168.0.1 then select “Advanced” on the left-hand side of the screen.
Step 3 – Select “Reset Modem” then enter the modem access code located on the sticker at the bottom of the modem. After the modem has been reset, close the computer’s Internet browser and reinstall the Linksys router software.
Step 4– Connect the router to the modem and open the computer’s web browser.
Step 5 – Navigate the web browser to 192.168.1.1 and enter the router’s password.
Step 6 – Reset the router to factory defaults on the admin screen.
Step 7 – Select “Setup” and choose “PPPoE” as the router’s login type. Enter the DSL service UserID and password, choose the time zone, and click “Save Changes.”
Step 8 – Reconfigure the wireless security options, then connect to the Internet.

rejohn
I used to have similar problems too, but after using “long path tool”
everything was solved. Try this software and you would be glad you did.