A common dilemma that arises for satellite television users is choosing a DirectTV HD LNB dish that will provide the appropriate range of HD channels for the consumer. Depending on the geographic area the dish is installed, legacy models may not be able to provide the full offering of HD channels to the end user. Due to DirecTV continually upgrading their HD offerings, to be able to view the most recent HD channels a 5 LNB (low-noise-block converter) dish or newer along with the appropriate HD receiver (and television) are required.
How to tell what Type of DirecTV Dish is Already Installed?
Over time, DirecTV has changed the design of the satellite dishes installed for consumers to enjoy their services. At the time of this writing, the company has used three primary dish sizes along with a variety of LNB configurations for consumer service installations. Prior to the company making local television programming available to customers, the primary dish installed with the service was a basic, 18-inch round disk that only had one LNB. This design is no longer installed by DirecTV technicians; however, it is still technically possible to use the antenna to pick up a satellite signal.
Original DirecTV Oval Shaped Dish (18 x 24 Inch)
The original oval DirecTV satellite dish measures 18 by 24 inches and is still in use throughout the United States. The dis is oval in shape and was the first to support reception from more than one satellite. Unlike the first dish deployed by the company, the original oval dish uses a dual LNB setup. Some versions of this dish have separate LNBs that use a combining device in order to merge the signals for the cable run at the installation location. Later versions have a dual or triple LNB. The triple LNB setup uses a 2-LNB sidecar to process the signal reception.
18 x 20 Inch DirecTV Dish
The 18 x 20 inch dish is the most commonly installed antenna for DirecTV consumers at the time of this writing. The number of LNBs on the dish depend on what satellite the dish is installed to receive programming from. There are variants that use dual, triple, and sometimes a five-head LNB. When the dish has three LNBs, there is also a capability for installing a dual-LNB sidecar to allow the dish to access three satellites in total.
Slimline 3 LNB DirectTV Dish
When the DirecTV 11 satellite was placed in service towards the end of 2009, it eliminated the need for five LNB dishes to be installed. This is due to the new capability of the company to broadcast almost 100% of their content from three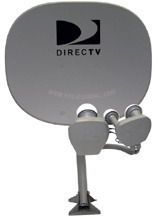 satellites. Complementing the new capability, DirecTV introduced the Slimline 3 dish for use with new programming installations. The original Slimline antenna is a 5 LNB dish that is no longer installed. Depending on the location of installation, there is a possibility that local channels may not be available on the three satellites being used. If this is an issue for the target install location, then the Slimline-5 LNB may be more appropriate to install.
WorldDIRECT International DirecTV Dish
The WorldDIRECT International Dish is very similar to the Slimline model; however, is a bit wider and users a different LNB. In order to identify the dish, the words “WorldDIRECT” will be located on the rear portion of the dish which is designed for international programming. Unfortunately, the LNB is built into the dish, so if there are issues with the device, a new dish must be purchased to continue using the service. This dish is only recommended for install in locations where normal reception of the DirecTV satellites is not possible (Alaska and Hawaii).
DirecTV Sat-Go Portable Receiver
The DirecTV Sat-Go is a portable satellite receiver that comes with a built-in screen for television viewing. All of the required hardware is built in to the receiver and there is not a requirement for an external dish to use the device. The LNB hardware is built directly into the receiver for the device that requires a clear view of the southern sky to receive the satellite transmissions for watching television. The Sat-Go requires a source of power to connect to for operation (no battery capability exists for the unit). At the time of this writing, the Sat-Go is not available directly from DirecTV (discontinued), and has to be purchased from a third party.
What is DirecTV Single Wire Multiswitch (SWM)?
DirecTV provides Single Wire Multiswitch technology to consumers to allow one to wire a location with a single wire to every receiver and/or DVR in the home. The technology requires a certain model of LNB; however, to work properly or can lead to receiver damage. The following are the steps to take to determine if the installed DirecTV system supports SWM capabilities:
Step 1 – Turn on any DirecTV receiver and television in the dwelling.
Step 2 – Press the “Dash” menu button on the DirecTV remote control located next to the “zero” button.
Step 3 – Observe the TV screen. If there is a statement that reads: “SWiM connected,” then the system is SWM capable.
Step 4 – Alternatively, you can check the DirecTV setup in the swelling to see if there is a SWM multiswitch or SWM power inserter installed.
*Note: If you choose the wrong LNB for a DirecTV SWM system it can result in significant damage to the LNB.
Steps for Choosing a DirecTV HD LNB
A common issue that arises for DiecTV customers is choosing a DirecTV HD LNB when the existing LNB has gone bad or if the customer simply wants to upgrade to HD TV programming.
Step 1 – Inspect the existing LNB if you are comfortable going onto the home or structure’s roof (if that is where the antenna is mounted).
Step 2 – Alternatively, if you can view the dish using a pair of binoculars, you may be able to determine what type of LNB is installed from a distance.
Step 3 – Confirm that the dish installed is a Slimline or other dish and not the international one by verifying the absence of the “WorldDIRECT” working on the rear of the dish. Most consumers will know if they have an international dish installed based on the location of the installation or nature of the programming watched.
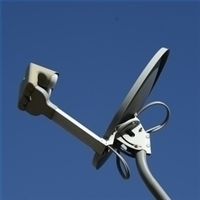
Step 4 – Analyze the LNB located on the front of the dish. If it is compact in nature and looks like a closed human fist, it is likely a Slimline-3 LNB. If the structure is wide, it is likely a Slimline-5.
Step 5 – Note how many cables are leaving the LNB. The number will range from one to four. If there is only a single cable, then it is a SWM-enabled LNB. If there are four, then the dish is a legacy installation. *Note: just because the DirecTV system is SWM does not mean that the LNB is SWM compatible. There may be a multiswitch installed that has all four cables run to it that feeds a single line into the home.
Step 6 – If you currently have HD service, the easiest option at this point is to choose the same DirecTV HD LNB that is installed on your dish unless you are taking steps to conduct a single wire upgrade of your system.
Step 7 – Once you have the new LNB in hand, you will need to mark the current position of the DirecTV dish on its mount in case you inadvertently shift the position of the dish.
Step 8 – Unplug the SWM power inverter if there is one installed.
Step 9 – remove the two screws located at the bottom of the LNB arm using a 7/16 inch wrench to disconnect the cables.
Step 10 – Remove the old LNB and install the new one ensuring there is enough slack to form a drip loop.
Step 11 – Slide the LNB onto the arm and reattach the screws.
Step 12 – Plug the SWM power inverted back in (if installed) and the system should be ready to be used again.
Should You Upgrade to a SWM DirecTV System?
When trying to choose a DirecTV HD LNB, if the installed system in the dwelling is not SWM capable, it may also be time to upgrade to SWM. Advantages of doing so include the ability to use the newer Genie DVR receiver from DirecTV and the overall system will be easier for one to wire. If the installed system is older, contacting the company to upgrade to the newer receivers is the easiest method to upgrade the entire system.
How Do You Adjust a Triple LNB DirecTV Dish?
Many times, it becomes necessary for a DirecTV customer to have to adjust the DirecTV dish after a bad storm or if accidently bumping the satellite dish. The need for an adjustment becomes readily apparent due to a sudden loss of signal quality of the television programming. If this happens to your installation, it will require an adjustment to the dish to restore service.
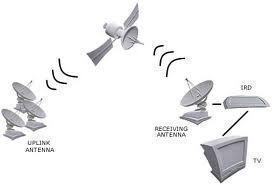
Step 1 – Determine if you are physically able to access the dish to conduct the adjustment. If you are, then you an likely accomplish the adjustment without having to pay for a service call. The Triple LNB dish is designed to provide HD programming from multiple satellites.
Step 2 – Locate the coordinates required to adjust the triple LNB satellite dish by using the DirecTV remote control. To do so, press the “Menu,” “Setup,” and “System Test” menu buttons. On the subsequently displayed screen, the coordinates required to aim the Triple LNB DirecTV dish are displayed. Write the information down for the required elevation, skew, and azimuth.
Step 3 – View the “Signal Strength” output chart on the same page displaying the coordinates for the DirecTV satellite dish. This indicates how weak or strong the signal that is being received.
Step 4 – Arrange for a family member or a friend to monitor this screen while you go outside to adjust the Triple LNB. To avoid repeated trips, it is best to setup a means of communication such as a portable radio or cell phone while conducting the adjustment.
Step 5 – Verify the line of sight between the DirecTV dish and the satellite the dish is aiming at. For North American customers, DirecTV satellites are located in the southern sky. You will want to check for anything that is newly blocking the path to the sky such as a fallen tree or structure before making any adjustments to the dish. If the issue is something that can be removed such as a tree, you can simply remove the debris and the signal strength will be restored. If there is a new structure, you will need to find a new location for the dish that does not block the view to the satellite.
Step 6 – Borrow, buy, or rent a compass that displays the direction in numbers (0 to 360). This will help you locate the direction that corresponds to the information that you wrote down from the DirecTV “System Test” page by placing the compass in the middle of the satellite dish pointed to the southern sky.
Step 7 – Turn the satellite dish in the appropriate direction (left or right) until you have it pointed to the appropriate azimuth coordinate.
Step 8 – Tilt the DirecTV dish either up or down to obtain the proper elevation. There are a series of numbers located on the mounting pole of the dish that represents a coordinate that can be used for the elevation setting. When the arrow on the back points to the elevation coordinates listed on the TV screen you have obtained the correct elevation setting for the dish.
Step 9 – Set the skew of the DirecTV Triple LNB dish by rotating the antenna in circles. There will be numbers located around the edge of the dish which represent the coordinates for the skew. Rotate the antenna until the arrow located on the side of the dish points to the right skew number (from the TV screen).
Saif
My service provider recommended to us a mono block LNB. When I’m searching for a one to buy, I have confused with some specification such as dB amount and frequency range. Which dB gives better result? Low or High?