As the number of homes with high speed Internet has dramatically increased over the past decade, the need to connect a TV to a PC has also risen. By connecting one’s TV to a computer, consumers are able to use the computer to drive the content watched on the television. Popular services such as Hulu, Netflix, and even YouTube are some of the most commonly encountered streaming services in addition to simply watching a movie on the computer’s DVD player while viewing it on a larger flat screen TV in the home. Unfortunately, depending on the model of TV or computer, it can become a challenge determining exactly how to connect a TV to a PC.
TV and PC Technology Collaboration
Although the computer and television industries started out as completely separate industries, the amount of cooperation across manufacturers to support interactive communication between the devices has significantly increased in recent years. Today, it is not unusual for a new television to be able to connect to a WiFi network similar to a PC. For most models that support this capability, the connectivity will typically consist of providing shortcuts to streaming video services of various partners of the company making the TV such as Hulu, BBC, or Netflix.
Additionally, computer manufacturers are also integrating the communication capability of their products to allow for an easier connection to a TV set. It is not uncommon for a new laptop to be able to establish a direct WiFi connection to a TV set to provide both video and sound of a movie or other show being displayed on the computer. Third party plugins, such as RealPlayer, are now being designed to support direct play of video on popular applications such as Facebook on the television located in the home in either a single or dual screen mode.
What is S-Video?
S-Video (separate video) is a transmission technology that transports analog signals via cable. The signals are sent in two parts called the chroma and the lumen. The lumen signal includes the brightness of the signal while the chroma includes the various color aspects of the video transmission. S-Video technology his considered the most appropriate for use with television sets, digital TV receivers, game consoles, computer graphics cards, and DVD players. The 4 pin mini-DIN connector is the most popular S-Video connector on the market. This variant of the cable is rated at a 75 ohm impedance. Alternative technology commonly used on video cards found on laptops includes the 7 pin mini-DIN connector. The 7-pin socket supports use of the 4-pin mini-DIN connector. Some video cards are also capable of using the 9-pin DIN connector with both a Video In and Video Out functionality. Although the usage of S-Video cables is common throughout the world, HDMI and DVI cables are becoming more popular due to the unsuitability of S-Video cables for HD video transmissions.
How to Connect a TV to a PC using WiFi
The most popular method to connect a TV to a PC at the time of this writing is to use WiFi. The television may already come “ready for WiFi” or required a WiFi module to plug into the USB port on the device. Due to movies and video requiring a significant amount of data to be viewed properly, the best results are seen when using the 802.11n vice 802.11g or 802.11b wireless network standards. The following steps take into account that the television set is already WiFi capable or that you have successfully installed a wireless adapter on the TV.
Step 1 – Turn on and login to your computer. Then, turn on the television set.
Step 2 – On the TV menu, turn on or enable the WiFi mode of the box. Next, change the input to “WiFi” from the current setting (normally component, HDMI1, Video1, etc).
Step 3 – Choose the WiFi connection to the television when prompted to do so on the PC. Some laptop manufacturers will actually add a separate key on the computer to start this connection.
Step 4 – Depending on the manufacturer of the television, you might be prompted to enter a password or other security key to allow the device to be recognized as an access point on the network. For some devices, this will only be required on the first time use. On others, it will be a requirement on each new connection.
Step 5 – Restart the WiFi network router if prompted to do so. Then, enter a four digit password or PIN number on the PC if prompted. This will be a code that you configured on initial setup of the TV wireless connection or listed in the owner’s manual for the model of TV.
Step 6 – View the acknowledgement by the PC that the TV is a valid device connection. At this point, you may not see an output displayed on the TV from the computer.
Step 7 – Change the “Screen resolution” on the PC via “Control Panel” selection and select the option that states, “display number 2.”
Step 8 – Pick the option that states: “Extend the desktop onto this monitor” and choose the “Apply” menu button.
Step 9 – View the PC desktop on the television set. Depending on the version of Windows installed on the computer, you might have to select the “Keep display settings” menu prompt.
Step 10 – If the image displayed on the television is too small, you may need to experiment with different screen resolution settings on the computer to obtain the best picture from the connection to the TV.
Step 11 – Load the service or movie that you want to watch on the TV on the computer. Then, drag the window with the desired programming onto the TV monitor using the computer’s mouse.
Step 12 – Enjoy the programming displayed on your TV. If watching from a laptop, ensure you have enough battery charge to last for the length of the movie or other programming.
*Note: For Mac users who are looking to connect a TV to a Mac, a variation of these instructions can be used to connect the computer to the television. In order to access the multi-screen setup, select the “System Preferences,” “Displays,” “Arrangement,” and “Display” menu options. This will let you extend the Mac desktop to two screens or to display what is being shown on the single screen on the computer without having to install Apple TV.
How to Connect a TV to a Mac using Cables
One of the easiest methods to connect a TV to a Mac is to use Apple TV. Apple TV is designed to closely integrate with a Mac computer and can be used to play videos or movies from iTunes and other supported services. Some consumers; however, do not want to spend the money to purchase Apple TV. This doesn’t mean that the Mac user is out of luck when wanting to connect a TV to their Mac. Similar to a PC, Mac computers can be connected to a TV using cables.
Step 1 – Identify the type of video port used by your Mac. If the computer was made after 2008, it will support HDMI, Thunderbolt, or DisplayPort output types. If the computer is older and only has a DVI, Mini-DVI, or Micro-DVI port it may require a different adapter to support use with Apple TV.
Step 2 – Determine the video port type(s) on your TV. They will typically be located on the side or back of the television set. The most commonly encountered port type for newer TVs is HDMI or DVI. The majority of TV sets will also provide legacy support for VGA connections.
Step 3 – Determine what type of connection you will be making between the two devices. You may need to purchase an adapter for the Mac computer if you do not have an HDMI connection.
Step 4 – Acquire the appropriate cable to connect the two devices. If you are using the HDMI port, you will not need to purchase a separate adapter; however, you will need to make sure that you are purchasing the appropriately sized HDMI cable for the computer and the television. Ensure the cable is long enough to reach from where the computer will be setup when playing multimedia programs on your TV.
Step 5 – If you are not using HDMI to connect the devices, you will need to obtain separate audio cables for the connection. The specific type of audio cable will depend on the input type available on the TV and that supported by the computer’s output adapter. The highest quality output will be via the optical sound port in this case.
Step 6 – After connecting the laptop to the television, change the TV to the correct input for the video type being used for the connection.
Step 7 – If you are not using an HDMI connection, the Mac may need to be restarted at this point for the display to automatically configure on start.
Step 8 – Connect the cable or adapter to the computer after connecting to the TV. The audio jack on the computer is the most common audio output connection to provide sound input to the television if not using HDMI for the connection.
Step 9 – Turn on the Mac computer. The computer screen should automatically appear on the screen. If it does not, you will need to adjust the display settings of the computer by selecting “System Preferences,” “Displays,” and the “Arrangement” menu options. Then, select what mode that you want to use for the connection.
Step 10 – Adjust the screen resolution on the computer if required. At the time of this writing, the majority of HD televisions are limited to displaying a maximum screen resolution of 1920 x 1080 (older models are limited to a 1280 x 720 resolution). The resolution can be adjusted under the “Display” sub-menu of the “Systems Preferences” menu.
How to Connect a TV to a PC using Cables and WiFi
Another option to connecting a TV to a PC using only WiFi is a hybrid setup consisting of a WiFi connected computer with a receiver that is connected to the television using an HDMI cable. There are some receiver types that will support RCA connection capability in the event the TV did not come with an HDMI capability.
Step 1 – Turn on the WiFi television receiver and configure the receiver to connect to the WiFi network. For most receiver types, this will require manually connecting the receiver to a laptop using an Ethernet or USB cable.
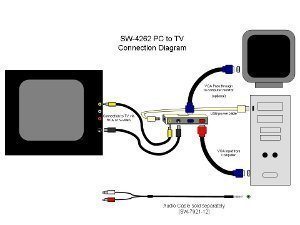
Step 2 – Connect the WiFi receiver to the television using either an HDMI cable or RCA connectors. The RCA cable for video is yellow with the red and white cables responsible for the sound connection.
Step 3 – Once connected, change the television’s input source to the appropriate one for the connection (normally labeled HDMI 1 or Component 1 depending on the model of TV).
Step 4 – Load the movie or programming on the PC that you desire to watch on the TV.
Step 5 – Change the screen resolution of the computer if the PC’s screen is not visible on the television.
How to Connect a TV to a PC using Cables Only
The legacy method to connect a TV to a PC relies on a cable connection between the two devices. The most popular cable for this connection is HDMI since it carries both audio and video signals to the television. Legacy connections can still be made using S-Video and audio cables or VGA cables. These choices; however, do not support as high of a quality of output as HDMI.
Step 1 – Confirm that your computer and television each have HDMI ports. If the PC is older, you may have to purchase an adapter to provide a VGA cable connection to the TV (or if the TV is older and does not have an HDMI port). Some computers will have an S-Video output that can be used in lieu of VGA cables for video. In this case, you will need to purchase a separate audio cable capable of connecting the headphone out jack to the VGA or component “Audio In” plug on the TV.
Step 2 – Setup the computer in the location that you are going to place it for the TV to PC connection. Prior to purchasing the cables for the connection, ensure you measure the distance between the computer’s ultimate destination and the TV to avoid purchasing cable(s) that are too short.
Step 3 – Connect the computer to the TV using the cable(s) that you have purchased.
Step 4 – Change the television input to the appropriate one for the cable(s) used for the connection. If using HDMI, this input will be labeled “HDMI 1” or “HDMI 2” depending on the input plug used on the TV. If using an S-Video or VGA cable connection, the “Component In” or equivalent label will likely be the correct choice to display the computer on the television screen.
Step 5 – Modify the “Screen resolution” on the computer by selecting the “Control Panel” and “Display” menu options.
Step 6 – Choose the display option that is labeled “Display Number 2.” Then, select the menu choice which states, “Extend the desktop onto this monitor” and click the “Apply” menu option.
Step 7 – If the PC display is not the correct size, change the screen resolution on the laptop to a lower resolution than currently selected.
Step 8 – Click the “Keep Display Settings” menu option if prompted.
Step 9 – View the desired movie or television streaming service on the computer. If you are not viewing a mirror image of the computer’s screen, then move or slide the program window onto the second desktop screen located on the TV using the PC’s mouse.


Follow Us!