The toolbar is a component of the Graphical User Interface (GUI) that houses various input and output components such as buttons, menus, icons and so on. End-users can customize toolbars as per their personal requirements. Toolbars can be found in operating systems, software applications, and web browsers. The latest development in toolbar interfacing is the ribbon interface. It basically places groups of toolbars within tabs.
The Windows operating system utilizes toolbars in different areas of its GUI. Several of its applications and tools such as Microsoft Office Suite, Internet Explorer, and Outlook Express use toolbars to maximum effect. Users are given access to the frequently used tools and commands via toolbars.
Toolbars in Windows are positioned in row, column, or block form which is typically placed at the top of the application or program screen. The different deployment modes are: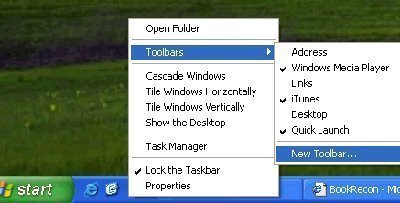
Primary toolbars
Primary toolbars are created to work without a menu bar.
Supplemental toolbars
Supplemental toolbars are created to work with a menu bar.
Toolbar menus
Toolbar menus are menu bars deployed as a toolbar.
Customizable toolbars
Customizable toolbars permit users to change them as per their requirements.
Palette windows
Palette windows are basic dialog boxes that represent a range of commands.
How to change the Windows Toolbar
Windows Toolbars offer a certain level of customization. You can turn on or turn off a toolbar, move a toolbar, create a new toolbar, add toolbars, change the buttons on the toolbar and so on.
To turn on or turn off a toolbar, perform the following steps:
- Right-click the toolbar.
- The shortcut menu with all the available toolbars appears.
- The currently used toolbars will have a check mark next to them. Check or uncheck the toolbars as required.
To move or change the position of a toolbar, perform the following steps:
- Right-click the toolbar.
- The shortcut menu with all the available toolbars appears. In certain toolbars, you might find the option lock the toolbars on the shortcut menu with a checkmark next to it. Uncheck this option to move the toolbar.
- Click the dotted line present at the left side of the toolbar, and move it to where you want to place it. You can move the toolbar to the left or right of the top pane; place it horizontally at the left of the screen, or at the bottom of the screen.
To customize a toolbar, perform the following steps:
- Right-click the toolbar and then click the option Customize.
- The Customize Toolbar window appears.
- You can use this window to add, remove, and reorganize the order of buttons on the toolbar. The options for customization vary according to program or application.
- Click the button Close to save your changes.
Follow Us!