One of the most popular router brands on the market is the Linksys router. Despite this popularity; however, end-users are commonly challenged to setup the device in the home, office, or other locations. There are a number of types of Linksys routers on the market to include the WRT54G, WRT610n, and the Linksys e4200 which support both wired and wireless network configurations using an omnidirectional antenna.
Popular Types of Linksys Routers
Linksys WRT54G
The WRT54G has been one of the most popular models of Linksys routers sold supporting the 802.11g, b, and a standards with max throughput rates of up to 54 MB/second. When the router was initially released, it did take hits by various review sites due to a reduced range as compared to other 802.11g routers; however, Linksys has subsequently addressed these issues through router firmware updates. When purchased new, the router installation CD walks end-users through router setup using a configuration wizard that includes default router security recommendations.
Linksys WRT610N
The WRT 610N is one of the first true dual-band wireless routers on the market and produced by Linksys. It supports both 2.4 and 5 Ghz wireless clients simultaneously and is designed to serve as a network-attached storage device when connected to an external hard drive via USB port. Linksys has also deployed media optimized networking technology with the router to support smoother streaming of high-definition video, music, and real-time gaming.
Linksys e4200
The Linksys e4200 router supports dual band N at 2.4 and 5 Ghz with a 450 MB/second throughput in the 5 Ghz band. It comes with a USB port for shared storage and has a built-in UPnP AV media server. The router also has a USB 2.0 port that supports external attached network storage and provides compatibility with the 80211.n, g, b, and a standards.
Other Popular Linksys Routers
Other popular Linksys routers on the market include:
Linksys e2000 – Wireless N, Selectable 2.4 or 5 Ghz bands, Gigabit Ethernet ports (10/100/1000 MB/sec)
Linksys e1000 – Wireless N, 2.4 Ghz band, Supports secure guest access, Fast Ethernet ports (10/100 MB/Sec)
Linksys WRt54gl – Wireless G, Push-button setup and configuration, 128-bit security, access filtering.
Linksys wrt300n – All LAN ports support auto-crossover (MDI/MDI-X), 256-bit security, expanded range compared to 802.11g routers.

Linksys Router Configuration Interface
One of the most popular features of Linksys routers is the web-based interface for setup and configuration of the router. Once connected via Ethernet cable to the router, the interface is accessed by entering the default Linksys IP address, 192.168.1.1, into the web browser which provides access to the control panel after entering the login and password for the router. The default login for Linksys routers is typically ‘blank” with password being “admin.” For newer routers, the login is set to “admin” and password to “admin.” When the web-based interface is loaded, it will display the following tabs: Setup, Wireless, Security, Access Restriction, Application and Gaming, Administration, and Status. Slight variations in the menu tabs may be observed depending on specific Linksys router version. The functions of the menu tabs are:
Setup– Entry path for setup of DHCP service, Internet connection, DDNS, MAC Address clone, and
advanced
router features.
Wireless– Entry path for wireless security, MAC filtering, and both basic and advanced wireless
settings.
Security– Configuration of the router’s firewall and VPN feature.
Access Restriction– Setup for restricting outbound or inbound Internet traffic, Internet hosts,
network computers, or even time of use/day.
Application and Gaming – Permits publication of internal application servers on the Internet, setup
of DMZ feature, and management of quality of service on the local network.
Administration– Supports router access setup, security and logging features, Linksys router default
configuration restoral, and diagnostic testing.
Status– Shows the local network, wireless network, and router status.
How to Setup a Linksys Router
Although 802.11N compatible Linksys routers are starting to gain greater market share, the Linksys WRT54G remains one of the most widely used versions by end-users. Both variants of Linksys equipment; however, feature the easy-to-use web interface for routers setup. The WRT54G and Linksys e4200N router setup steps are covered below. The steps to setup other router models are similar to the respective G or N model steps included below.
Linksys WRT54G Setup
Step 1 – Plug the Linksys router into a power source and allow it to power up and go through the initialization process.
Step 2 – Insert an Ethernet cable into the Cable modem port. If in a college dorm, many colleges will have an Ethernet cable jack already installed in the room that you insert the cable.
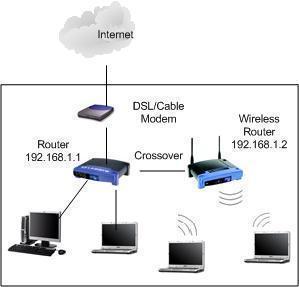
Step 3 – Plug the Ethernet cable into the back of the router that is marked “Internet.” Next, plug a second Ethernet cable into the appropriate port on a laptop and the other into one of the ports labeled “1-4” on the Linksys router.
Step 4 – Open a web browser on the laptop.
Step 5 – Enter 192.168.1.1 in the browser’s address bar followed by pressing the “Enter” key.
Step 6 – Enter “admin” for the user login and “admin” for the password. If this does not work, then remove the “admin” entry for login and try again.
Step 7 – Change the “Router Name” on the “Setup” page that will appear from the default name to a unique name to avoid confusion with other new routers in your area.
Step 8 – Select the “Save Settings” menu option followed by clicking the “Continue” menu button after the “Settings are successful” menu dialog is complete.
Step 9 – Choose the “Wireless” menu tab located at the top of the Linksys router settings screen.
Step 10 – Change the “Wireless Network Name” or “SSID” to a unique name. The router name entered earlier can be reused in this step if desired.
Step 11 – Disable the “Wireless SSID Broadcast” menu option and select the “Save Settings” menu button. After the “Settings are successful” dialog is displayed, click the “Continue” menu button.
Step 12 – Select the “Wireless Security” sub-menu located at the top of the screen.
Step 13 – Use the “Security Mode” dropdown menu box and choose the “WEP” menu option. Then, select “128 bits 26 hex digits” and enter a password between six and eight characters in the Passphrase box.
Step 14 – Select the “Generate” menu button and choose the “Save Settings” button.
Step 15 Click the “Continue” button after the “Settings are successful” menu dialog is displayed. Alternatively, the WPA encryption algorithm can be selected; however, is not supported on all network cards.
Step 16 – If you want to enable MAC filtering to further secure access to the wireless router, select the “Wireless MAC Filter” subsection located at the top of the Linksys router setup menu.
Step 17 – Click the “Enable” menu button and choose the menu choice to “Permit only” PC’s listed to access the network followed by clicking the “Save settings” button followed by the “Continue” menu option.
Step 18 – Click the “Edit MAC Filter List” menu button and enter the MAC address for each computer to allow to connect to the network. Then, select the “Save Settings” and “Continue” menu buttons.
Step 19 – Choose the “Administration” menu tab.
Step 20 Change the default password for access the Linksys router by entering a new one into the “Router Password” field and confirm the change. Ensure this password is different than the one used for WEP encryption and click the “Save Settings” and “Continue” menu buttons.
Linksys e4200 Setup
Step 1 – Connect the Linksys e4200 router to a power source to turn on and wait for the device to power-up and go through its configuration steps. If choosing to manually configure the router or you do not have an installation CD, proceed to step 7.
Step 2 – Connect the WAN/Internet port of the router to the Cable or DSL modem using an Ethernet cable. Alternatively, in a college dorm, plug the cable into the Ethernet port in your dorm room (if available).
Step 3 – Use an Ethernet cable to connect the LAN port of the router to the Ethernet cable port on your laptop.
Step 4 – Insert the Linksys setup CD into the CD/DVD drive on the Laptop.
Step 5 – Accept the EULA (end user’s license agreement) followed by clicking the “Next” menu button.
Step 6 – Enter the required connection details after the router finds settings automatically and click “next” to finish the automatic router setup (these will include DSL login, password, and connection types that the router is not able to automatically detect). This will result in two wireless networks automatically being created. One will be the primary network, and the second will be a guest network allowing Internet access only.
Step 7 – Access the web-based configuration utility by entering 192.168.1.1 in your laptop’s web browser.
Step 8 – Enter “admin” for the router login, and “admin” for the password followed by clicking the “ok” menu button if you did not use the setup CD in steps 1-6. If you did, then you will need to enter the password created during those steps. A new password can be created for the router by selecting the “Administrative” and “Management” menu options from the primary configuration screen.
Step 9 – Select the “Setup” and “Basic Setup” menu options. Then, select the “Language” to be used for the router.
Step 10 – Click the “Internet Setup” menu section and enter the connection specifics provided by your respective ISP or school (ie connection type, and if your host requires a static IP vice the default DHCP connection).
Step 11 – If connecting via DSL, find out if the ISP uses PPPoE, and if so select this option. Then, enter the username, password, and service name (if required) for your service.
Step 12 – Toggle the “Keep Alive” menu option to “Connect on Demand” if your ISP charges you for amount of time connected to the Internet.
Step 13 – Select the “Wireless” and “Basic Wireless Settings” menu options.
Step 14 – Under configuration view, select “WiFi protected setup” to setup both the 2.4 Ghz and 5 Ghz networks on the router (alternatively they can be manually configured).
Step 15 – Under the manual setup, choose which wireless standards to support under the 5 Ghz and 2.4 Ghz network options. Note, 802.11b and 802.11g devices cannot connect to the 5 Ghz network, so ensure the appropriate options are selected on the 2.4 Ghz network setup option. Typically, you want to ensure the lowest standard of connection in your home or apartment is supported on that network (ie if you have an old laptop, it may only be 802.11b compatible). The “Mixed” mode setting will support all standards (A through N).
Step 16 – Disable the SSID broadcast to keep the network name more secure, and if desired change the channel width and number assignments if you are an advanced user on this screen.
Step 17 – Select the “Wireless” and “Wireless Security” menu options to select between WEP, WPA Personal, WPA 2, WPA Mixed Mode, and WPA2 Personnel security standards on the network. Both the 2.4 and 5 Ghz networks can use different security options if desired. WPA2 is the strongest security option available on this router if supported by all client devices.
Step 18 – Decide if you want to allow “Guest Access” to surf the Internet using the 2.4 Ghz network or not. If you do, then the default option is to do so. If not, then select “Wireless” and “Guest Access” from the main router setup menu and change the default setting to “no.”
Step 19 – Similar to the WRT54G setup, MAC address filtering can be enabled and configured on the e4200N router.
Step 20 – Configure advanced options as desired on the router that include network storage, parental controls (by device), VPN Passthrough, FTP Server, Firewall, (Choose Applications and Gaming from the main router setup menu) Gaming options, and (Choose Storage from the main menu) Media Server.
Step 21 – To enable network storage, a portable hard drive will need to be available to connect to the router. By default, all content on the disk will be accessible without a password. To disable this “feature,” select “Storage” and “Administration” and then choose the “Disabled” menu option located under “Anonymous Disk Access.” Shared folders can be used to manage network access to different contents stored on the disk with individual folders or the entire disk available to share. Linksys implements a group and user account policy located under the “Storage” and “Administrative” menu options.
Step 21 – Save settings and the network configurations will be complete.
Linksys Router Firmware
Linksys routers have a feature that allows the end-user to update the router firmware when connected to the Internet. To access this feature, select the “Administrative” menu tab on the router setup screen and then choose the “Firmware Upgrade” menu option. Before taking this step, however, ensure you note all router setup options that are configured as router firmware upgrades will typically reset all Linksys router settings. Linksys does not recommend user’s upgrade router firmware unless experiencing issues or there is a new feature released that are desired. The Linksys Support homepage has the latest information and downloads required to support required device firmware upgrades.
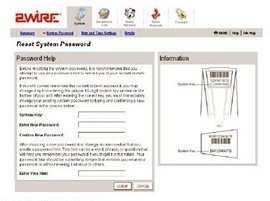
How to Reset Linksys Router
With recent focus on creating strong passwords throughout the computing and online industries, a common problem that arises for home wireless users is forgetting the Linksys router password they have chosen.
Step 1 – Press and hold the reset button on the Linksys router for approximately 30 seconds while it is turned on.
Step 2 – When the Power, Internet, and WLAN indication lights turn back on, release the reset button.
Step 3 – Connect your laptop to the router using an Ethernet cable and open the web browser.
Step 4 – Enter 192.168.1.1 in the address bar followed by clicking the “Enter” key to access the router admin page.
Step 5 – Enter “admin” for the login and “admin” for the router password if you have a newer Linksys router. If older, then the login name may be blank.
Step 6 – Proceed with the setup of the Linksys router.
Linksys Router Downloads
Linksys Router Support Homepage
Max Nigh
You suggest adisconnect the network and reinstall, I try and no passwword works? Now i do not get eventhe network so Ican proceed. I thought W for ynetwork on Lynksys 14669 was admin. No wthat does not work. Leterature fr my modem says toeh [wr is admin. I have blink iwht its lights proper anda Blink-4204, but i canot proceed ecause tehere is no networkconnected Like lynksys04669.I am in a l hole!
Max Nigh
my network is Lynksys04669. I copied it incorreclty in the last email messaageXorry.
Anjem
Steps are good although having issue usually happens can call on Linksys Support on
1-(800)585(2494)
john
How do we retrieve our password and reset a new one I have a wrt120n
H3llas
Behind the router you usually have hole or factory reset button. While router is turned on put needle inside and firmly push. Hold for couple of secs. That will reset your router to factory settings. It will remove password or restore it to factory username and password which you can find in your router manual.
logan
my wrt54g had been acting up lately an i went to log in to the router itself it said “file upload now” and all the options were were”apply”,”reset”,and”browse” ???????????????
H3llas
Did you tried resetting it to factory settings or tried upload new firmware file where it asks for it?
Dave
I hooked up my WRT54GL router to my PC (hard wite)as described in the instructions. When I entered 192.168.1.1 in the address line of web browser window I got a message that the site could not be found. Additionally the PC indicated that there was no internet connection. We were able to access the internet using a laptop with WiFi. The router was bought through e-bay and did not come with a setup disc.
Pat
Followed all steps to set up password for Linksys WRT54G but wifi access does not recognize password I set. The key number works. What do I do?
Daniel Memetic
Could you clarify the problem? Do you mean that the new router password isn’t working, but the WEP passphrase (usually referred to as “key”) works? Or is it that the WEP passphrase doesn’t work?
If it’s the latter and you can get into your router (via 192.168.1.1) you could just try changing your password, saving the change, and then make sure to type the passphrase correctly when connecting. Perhaps it may help to reboot (turn off and then on again) the router after you change the passphrase.
If you can’t get into the router anymore you could reset it and then go through the configuration again, carefully. To reset press and hold the rest button on the back of the router for 30 seconds.
Tony Paluch
I have a WRT320N Linksys router in my home and I would like to put it into a closet in the center of the home. I use the router as a wireless router. Our home is a small 2 bedroom so we are not talking very far from one end to another. Will the WRT320N work just as well in the closet with the doors of the closet closed. Know nothing about routers or anyother technology. Please help.
Ajay Khule
Hi Tony!
I don’t think it would cause any problem. You can go through this link for some more information for inducting your wireless network.
Thanks!
Phil
How do I find my Mac address for my Mac Filter List?
thanks
Celeste
I’m stuck at first step. My router and adapter are up, I’m able to surf wifi with my hp now, but when I keyed 192.168.1.1 to my Internet explorer on my desktop, there’s a pop up “Internet explorer could not open search page”. Please help
MARGE
How do I connect my new Ipad with myu Linksys home network?
John Reynish
I have a Linksys ADSL2+ modem which is not wireless. Where do I go and what do I do to configure it to connect to broadband?
Marlon Franco
John. Just connect the modem to your DSL line with a DSL filter (one end of the cable goes to the DSL Line). Use a network cable from your Linksys modem to your PC. If you are unsure what to do, read the manual or message me here. Your PC should detect the Linksys modem. and the configuration varies from your ISP. You can just run the setup wizard or call ISP for assistance. I might be able to help as well. What’s your ISP?
Mars
Great help, finally connected with your info! Thanks.