For those who have been contemplating setting up a wireless network in their home, there are many reasons to consider how a wireless network will benefit you. One reason that many people decide to set up a wireless network is to share a internet connection. By setting up a wireless network, several family members can be on the Internet at the same time. As well, the use of a wireless network also make it possible to send files between different computers without having to save the information to a diskette or CD-ROM.
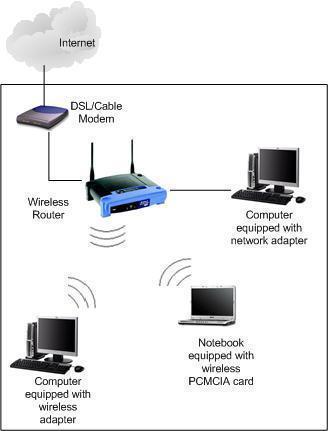
An existing home network can be converted into a wireless network by using a wireless access point. On the other hand, if there is no existing network for the computers or if the user wants to switch from an Ethernet network to a wireless one, a wireless router with a wireless access point, firewall, Ethernet hub and a port to the DSL modem can be used.
Using a wireless router, you can either connect computers and printers in your network using Ethernet cables or wireless signals. Wireless routers typically provide 30 meter coverage in all directions. Of course, walls and doors can affect the router’s coverage area. To extend the coverage or range of the wireless router, you can use repeaters or extenders.
To begin setting up your wireless network, you will need a few pieces of hardware:
- A wireless router
- One wireless network adapter for each computer
- A cable or DSL broadband modem (if you wish to connect your wireless network to the Internet)
- An Ethernet cable (to connect your wireless router to your cable or DSL modem)
- A second Ethernet cable (to configure your wireless router from your computer)

Connect an Ethernet cable between your computer and a LAN port located at the back of your wireless router.
Next, attach another cable between the WAN port of your wireless router and the Ethernet port of your broadband modem.
After completing this, the next step is to turn on the wireless router and wait for it to initialize. Most wireless routers ship with default configurations that will allow you to connect to the Internet at this time. Check to ensure that you are able to access the Internet from your computer. If you are unable to connect, check to see if the cables are connected correctly.
The next step is to configure the wireless router. Configuring your wireless router is not as difficult as it may first appear. This may not be strictly necessary, but may be a very good idea. This configuration can be used to personalize your wireless router, or to secure it from public access. For example, you will most likely want to set the SSID on your wireless router and you will also probably want to configure security of your network.
The next step is to install the wireless network adapters in each computer unless it is already built in (as is the case with laptops). These wireless cards may come in many form factors, including:
- PCI wireless cards
- PCMCIA wireless cards
- USB wireless adapters
If you have a PCI wireless card, you will need to power off your computer, open the case, and install the PCI card in an available PCI expansion slot.
If you have a PCMCIA wireless card, you will only need to slide it into a PCMCIA slot on your notebook PC.
If you have a USB wireless adapter, you will only have to connect it to a USB port on your computer.
Once the card is physically installed, you will need to install the software that came with the card. Follow the instructions in the package to do so.
You will then configure your computer for the SSID and other wireless configuration information to match the options you chose when you configured your wireless router.
Default Settings and User Options
The router runs at its default settings upon activation. The user, however, can change these settings depending on his or her preferences using the web interface. The settings that the user can change are the default setting of the service set identifier or SSID which is the manufacturer’s name, the default channel of the router which is channel 6 most of the time and used to minimize or eliminate interference with a neighbors wireless router operating at the same channel, and the router’s security options which has a username and password option.
Wireless Network Security Options
The last setting is important to people who would like to like to limit access to the wireless network. For this, you can use any of the three wireless network security options available. WEP (Wired Equivalent Privacy) for example, uses a 64- or 124-bit encryption method that prompts user to provide a password prior to access. The WPA or the WiFi Protected Access on the other hand is an upgrade of WEP included in the 802.11i protocol.
WPA differs from WEP for instead of the bit encryption method, it utilizes TKIP (Temporal Key Integrity Protocol) encryption to safeguard the network data. As with WEP, all users need to provide a password in order to log in to the network. Finally, the Media Access Control or the MAC eliminates the need for passwords and usernames in providing wireless network security. The MAC utilizes the unique MAC address of every computer to determine who is or who is not allowed into the network.
EE Klos
Do you have to have one computer hard wired to the modem, or can you have all of them wireless? (4 computers).
Thank You